M2_Australia Post Shipping
Australia Post Shipping
Version: 2.0.5
Compatibility:
Community Edition 2.0. *, 2.1. *, 2.2.*, 2.3.*, 2.4.*
About Australia Post Shipping
Introduction
Australia Post Shipping is helpful for merchants as they can use it for domestic and international shipping purposes. It provides functionality to post letters as well as parcels and automatically reflects any changes that take place in Australian Delivery Post rates. One can also calculate the rates for domestic and international rates as well as letters that are to be shipped from Australia to overseas. Once you integrate it, your customers can track the shipments through a provided shipment tracking id. Australia Post Shipping also enables the admin to generate labels for orders after generating shipment for store orders.
Benefits of Australia Post Shipping
Enables Australian merchants to provide customers with an enhanced buying experience.
Adds value to an online store and makes shipping process smooth.
Shippers can make the most out of appropriate, high quality, and reasonable shipping solutions.
Generate Printing Labels for store orders after generating shipments.
Facilitate your customers to track the shipment details of parcels.
Automatically update rates according to Australia Post Shipping guidelines.
Offer support for both domestic and international, parcels as well as letter packages.
Allows customers to choose shipping methods based on cost.
Set shipment handling charges and offer multiple shipping methods for shipments.
Provide shipment tracking facility through emails.
Generate and print labels for shipment with Australia Post logo
Provides address validations for the shipping addresses.
Get extra services like pre-defined satchels for parcels through Satchel Services.
Users can view the Shipping service as having the cheapest rates.
Services like ‘Signature on Delivery’ and Extra Cover for the shipments.
Pre-requisites
The user should have an account at Australia Post, as the Australia Post API key is required to make the extension work.
To view the Live Rates, user must have PAC API key and in case you don’t, you can obtained from here: https://developers.auspost.com.au/apis/pacpcs-registration.
For Contract Rates, Shipment Generation, and Label Generation, the user must have a Shipping and Tracking API Key and in case you don’t, you can obtain it from here: https://developers.auspost.com.au/apis/st-registration. All the required details of the API key will be available at your email address.
Installation
Mandatory Instruction:
Kindly ensure that Magento 2 is set up correctly. Enter developer mode before initiating the installation. You can achieve the mode by running the following command: bin/Magento deploy: mode: set developer –s.
It will enable the developer mode and skip compilation. You can enter default mode after successful installation of the extension.
Installation Steps
Manual Installation (Installing Magento 2 extension by copying code)
Step 1:
For Windows OS:
Go to <your Magento install dir>/app/code. Under that, create the folders using the following hierarchy:
Biztech
~ Auspost
For Linux OS:
Enter the following commands keeping their order:
cd <your Magento install dir>/app/code
mkdir -p Biztech/Auspost
After this, find the Download Zip and extract all files and folders in Biztech/ Auspost.
Step 2:
After the successful installation, you have to run the command on the Magento2 root directory-
“php bin/magento setup: upgrade”.
If you see a blank page or permission error, go to Terminal (Linux)/ Command Prompt (Windows).
cd [magento root directory] [var]
run the following command
$ chmod –R 777 *
Step 3:
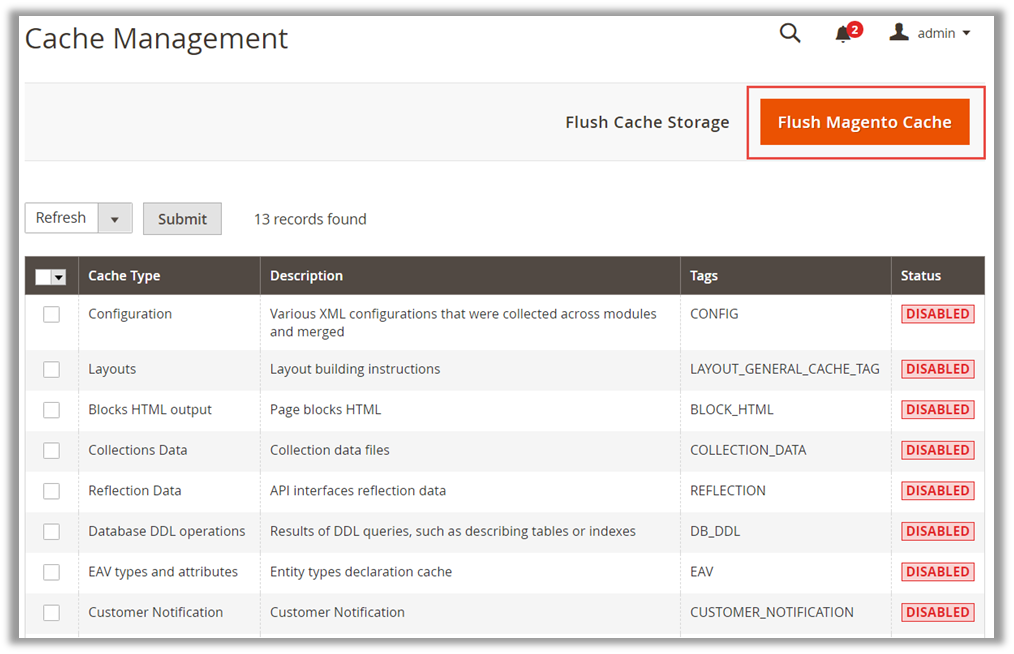
After running the command, log into the admin panel and clear the Cache.
Go to SYSTEM -> Tools (section) -> CACHE MANAGEMENT to clear the cache.
Step 4:
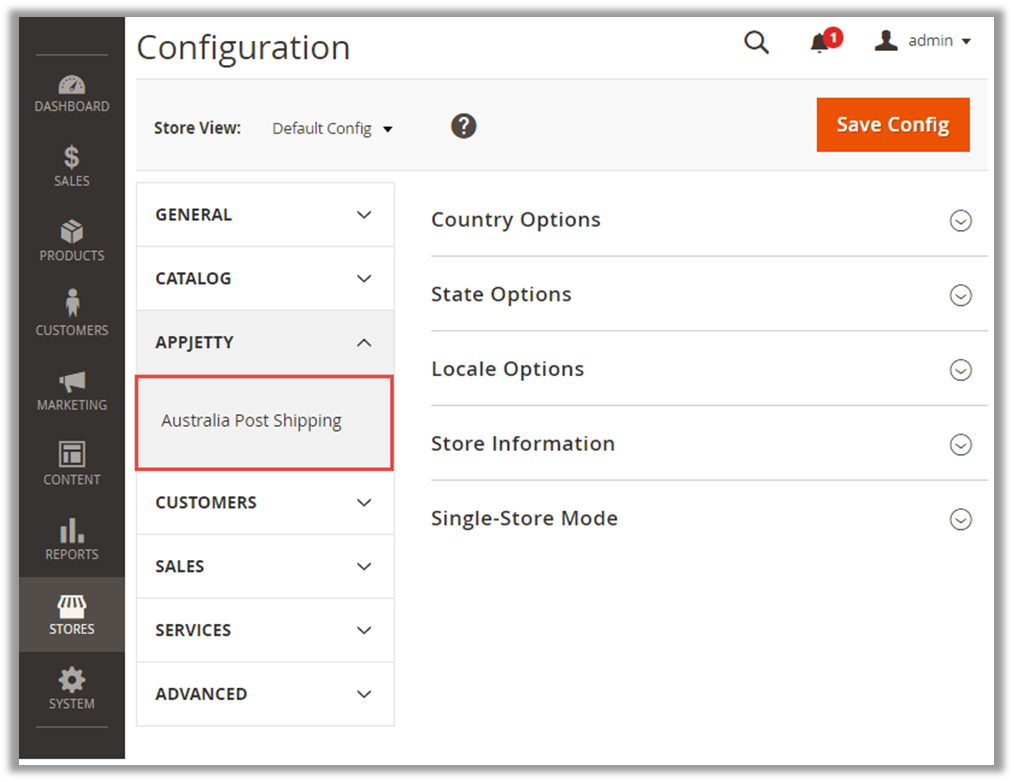
After successful installation, you can see the ‘Australia Post Shipping’ under the ‘APPJETTY’ tab inside STORES -> Configuration.
Installation via Composer
Step 1:
Create a new folder on your preferable server path. Add Extension zip archive into the created folder.
Step 2:
Use Your SSH details to connect to your server. After connecting to the SSH, change your working directory with one of your Magento setup paths using the below command:
cd /PATH/TO_YOUR_MAGENTO_SETUP_PATH
Step 3:
- Now you have to define the folder with the extension’s archive as a repository for composer reference. For this, run the Composer command:
composer config repositories.biztech artifact /ABSOLUTE_PATH_TO_ZIP_Archive_FOLDER/
- For Example:
composer config repositories.biztech artifact /Packages/Biztech/
After executing this command, it will automatically add Repository Details in composer.json file.
Step 4:
- Perform the following command for installation of the module:
composer require biztech/auspost
Step 5:
After successful installation using the above command you can verify the module status using the below command:
php bin/magento module:status
You can check the newly added module in the List of disabled modules.
Step 6:
Now you can upgrade your setup using the below command.
php bin/magento setup:upgrade
It will enable the module and it should be doing the automated process required by Magento.
Step 7:
- You can now compile the modules using the below command.
php bin/magento setup:di:compile
Step 8:
In case if you have to update our extension from a composer you can use the below command:
composer update biztech/auspost
But before using that command you should have placed the latest Extension zip archive into the /ABSOLUTE_PATH_TO_ZIP_Archive_FOLDER/
After executing the above command your module is updated and now you just have to run the upgrade command same as step 6 and compile command same as step 7.
The installation is successful! Scroll down to activate the extension.
Extension Activation
Copy an activation key
Copy the activation key from the Order Confirmation Mail. OR
Log into your account at www.appjetty.com using the email and password you have provided at checkout process.
Go to Downloadable Options and copy the activation key for the Australia Post Shipping extension.
Activate the extension
Log into Magento Admin Panel and go to STORES -> CONFIGURATION -> APPJETTY -> Australia Post Shipping Activation and enter the activation key in the ‘Activation Key’ field for the Australia Post extension then click the ‘Save Config’ button.
Select Websites
When you enter and save the key it will be verified and you can select the websites where you need to use the Australia Post extension. Click the ‘Save Config’ button after making your selections.
Now, Australia Post Shipping Extension got activated! You just have to set configurations.
Configuration
Please follow below mentioned steps to configure the shipping method of Australia post.
Go to STORES -> Configuration.
General Configuration
Go to STORES -> SALES -> Shipping Methods Here you can see AppJetty Australia Post Shipping.
Note: Because of the ‘Store Pickup’ available, now onwards the Shipping Methods referred to as Delivery Methods in the 2.4 editions of the Magento2.
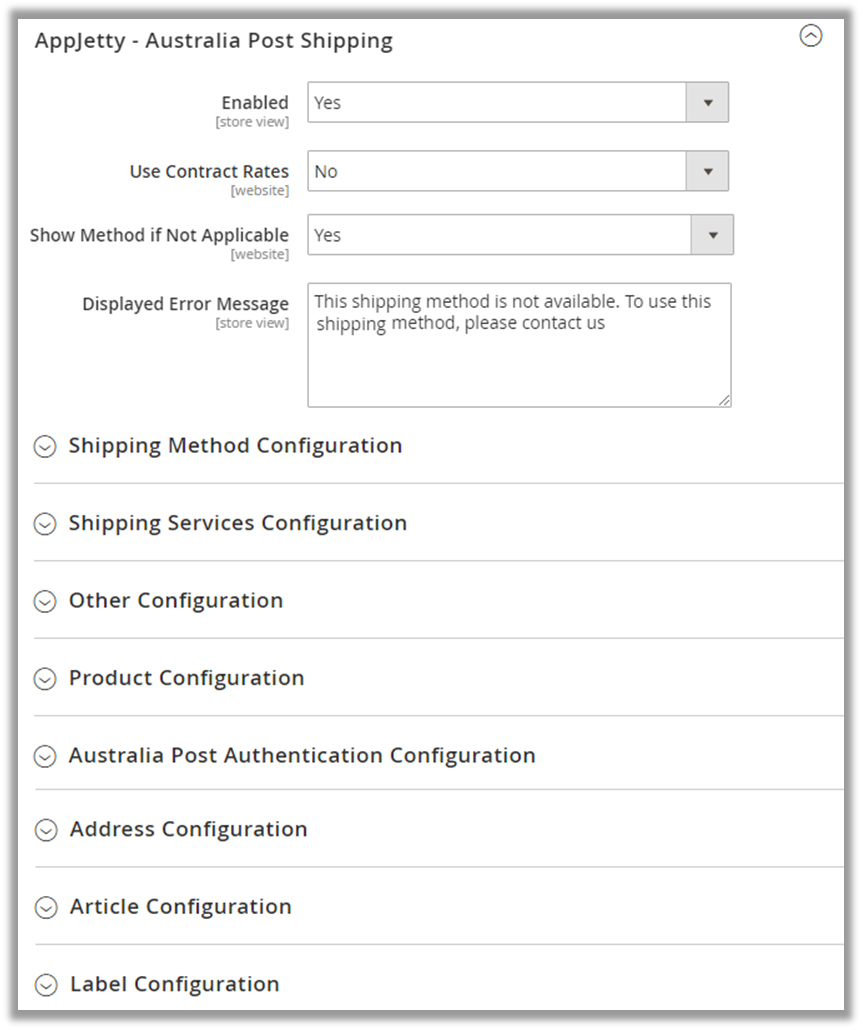
In this tab, you can set basic configurations of Australia Post Shipping Extension. Here is the detailed description of the configuration.
Enabled: Select ‘Yes’ to enable the Australia Post Shipping extension. The extension is disabled by default. By enabling the extension, you can see new shipping methods in checkout process.
Use Contract Rates: Select ‘Yes’ to use the Contract Service Rates in the shipping methods during the checkout process.
Enable Contract Services: Choose the shipping methods to be enabled for the Contract Services.
Note: On enabling the Contract Services admin will not be able to use other shipping services.
Show Method If Not Applicable: Select ‘Yes’ to show error message when shipping method is not applicable.
Displayed Error Message: Enter the error message which is to be displayed in frontend when shipping method is unavailable.
Shipping Configuration
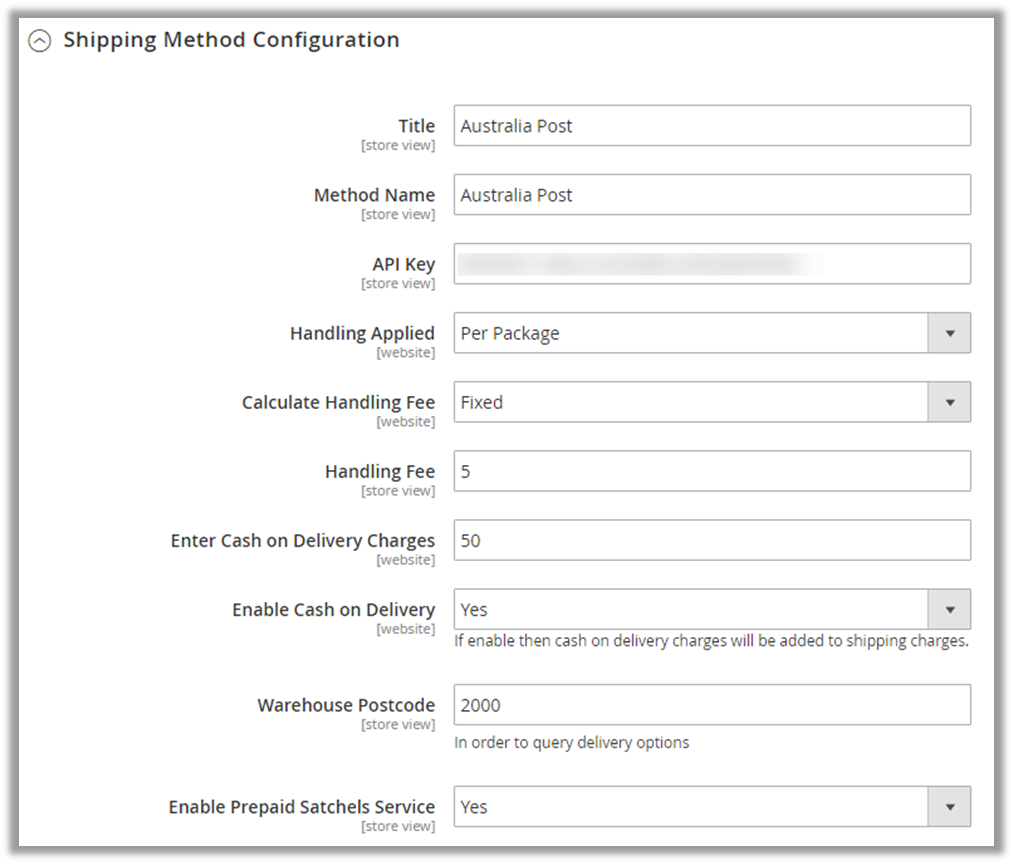
Click on Shipping Method Configuration to configure basic configuration of Australia Post Shipping. You can configure following configurations:
Title: Define Title which you want to get displayed in shipping method section.
Method name: Enter method name for shipping method.
API Key: Specify API Key provided by Australia Post Shipping (you can generate API key from https://developers.auspost.com.au/apis/pacpcs-registration).
Calculate Handling Fee: Admin can decide handling fee type either fixed or percentage wise.
Handling Fee: Enter the Handling Fee to be added with shipping charges. If needed it can also be added per order.
Enable Cash on Delivery: Select ‘Yes’ to enable the cash on delivery charges for the shipment charges.
Enter Cash on Delivery Charges: Enter cash on delivery charges to be added with the shipment charges if cash on delivery is enabled.
Warehouse Postcode: Enter the relevant postal code from where the product gets dispatched to various destinations.
Note: For Contract Services Warehouse details will not be used instead Address details provided in the Address Configurations will be used.
Enable Prepaid Satchels Service: Select ‘Yes’ to enable the Satchels Service for the order shipments.
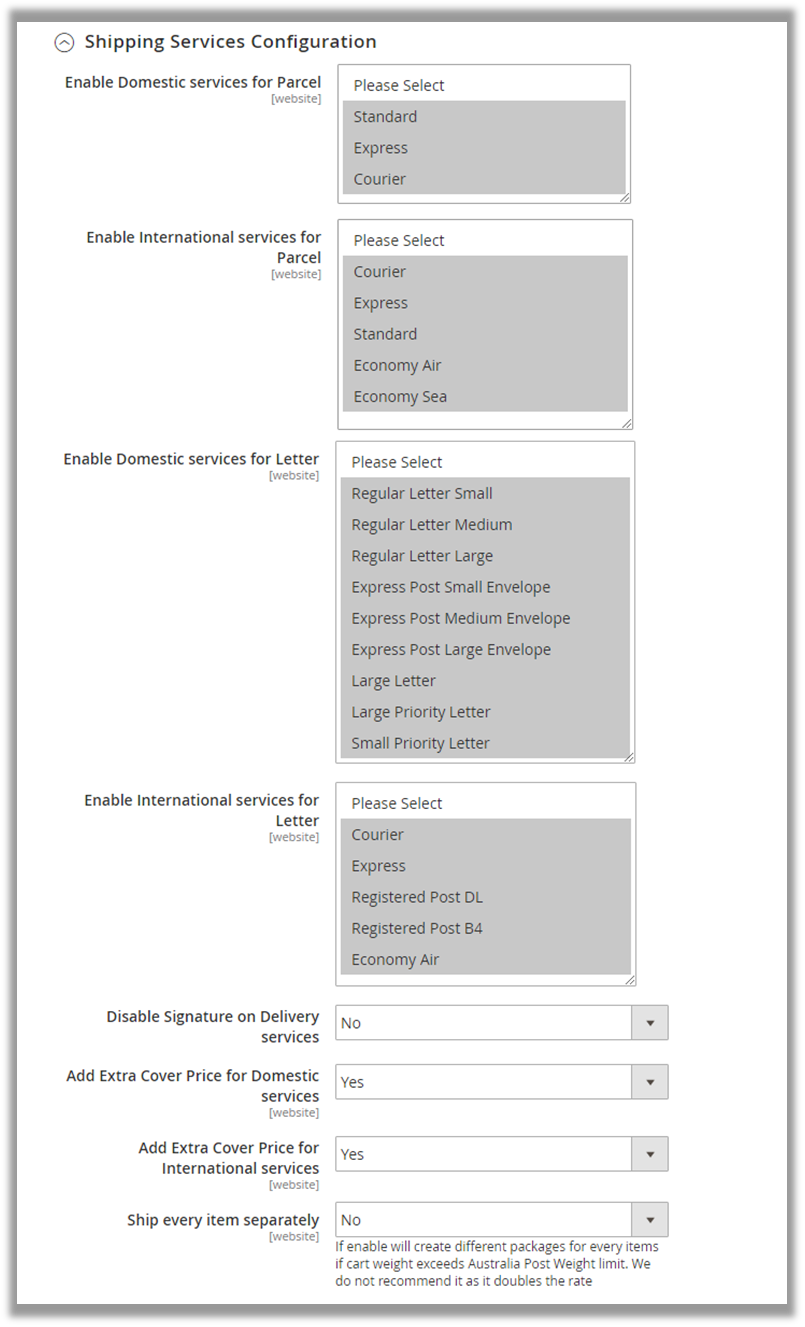
Shipping Services Configuration
Click on ‘Shipping Services Configurations’ to configure shipping services for International & Domestic Parcel & Letter Services.
Enable Domestic services for Parcel: Domestic service for a parcel can be configured from here either standard/expressed by selecting the domestic services to be enabled for the parcel.
Enable International services for Parcel: International service for a parcel can be configured from here by selecting the international services to be enabled for the parcel.
Enable Domestic services for Letter: Domestic service for letters can be configured from here either Regular/expressed by selecting the domestic services to be enabled for the letter.
Enable International services for Letter: International service for letters can be configured from here by selecting the international services to be enabled for the letter.
Disable Signature on Delivery services: Select ‘Yes’ to disable Signature on Delivery Services.
Add Extra Cover Price for Domestic services: Select ‘Yes’ to add extra cover (insurance) charge for Australia (Domestic Services).
Add Extra Cover Price for International services: Select ‘Yes’ to add extra cover charges for International countries (insurance).
Ship every Item separately: Select ‘Yes’ to ship every item separately.
Note: Cart weight must be greater than 22KG then every item will be shipped in different packages.
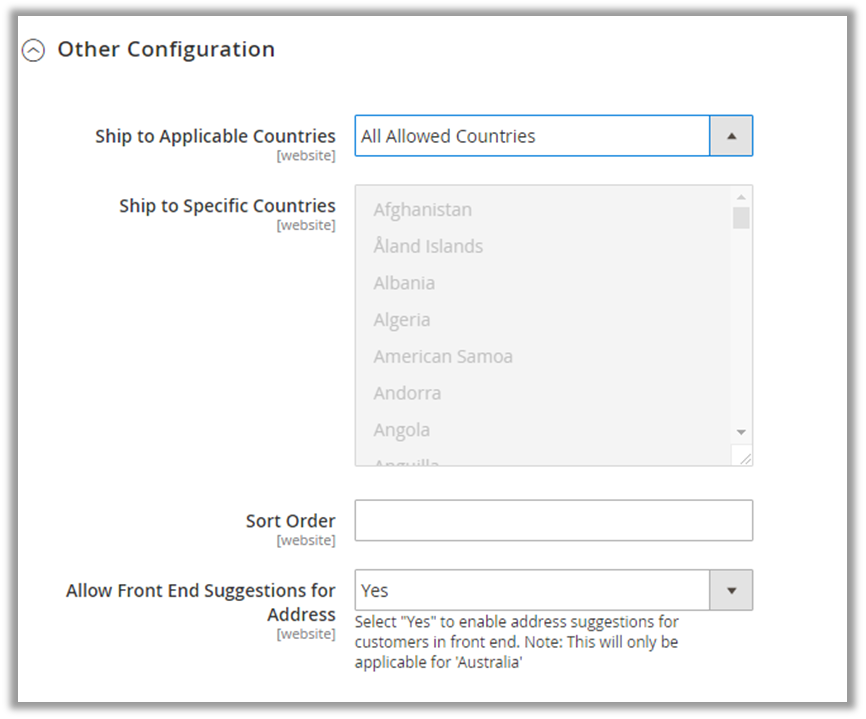
Other Configuration
To manage other configurations like country-related shipping configurations, go to Other Configurations.
Ship to Applicable Countries: Select the countries where the shipping service will be applicable. Possible Options are:
All Allowed Countries
Specific Countries
Ship to Specific Countries: On selecting ‘Specific Countries’, you can select the specific countries where shipping will be available.
Sort Order: At which order wants to display Australia post shipping method.
Allow Front End Suggestions for Address: Select ‘Yes’ to enable address suggestions for customers in the front end.
Note: This will only be applicable for ‘Australia’.
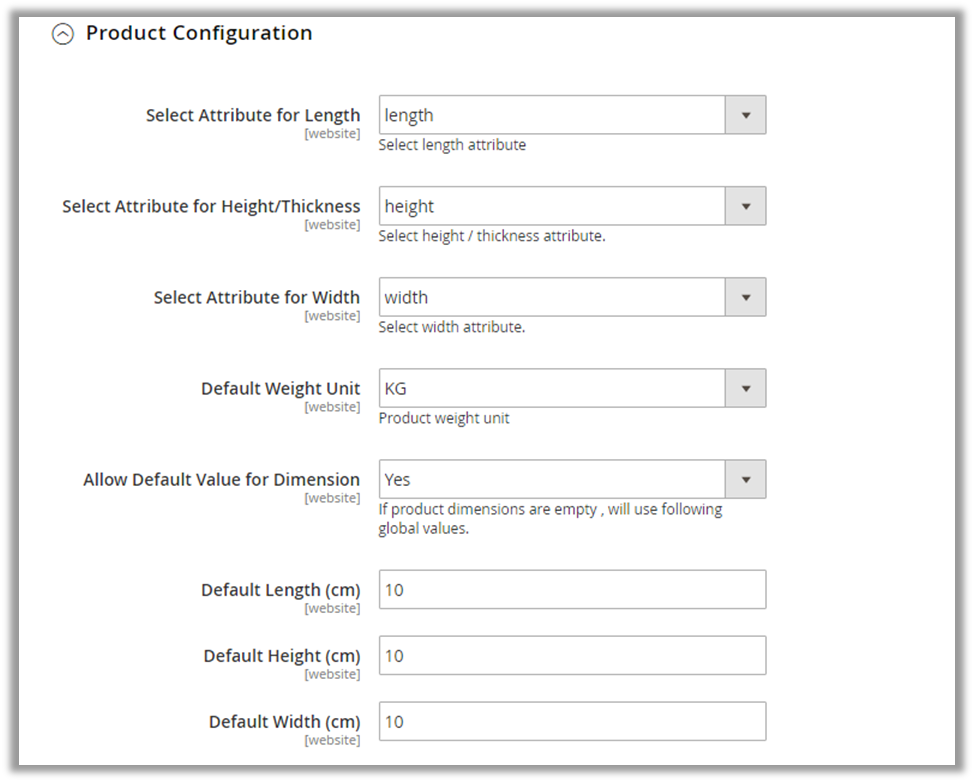
Product Configuration
In this tab, admin can set default configurations for every product dimension and can also decide product weight unit to be considered.
Select Attribute for Length: Choose the default attribute for length.
Select Attribute for Height / Thickness: Choose the default attribute for height/ thickness.
Select Attribute for Width: Choose the default attribute for width.
Default weight Unit: Choose the default weight unit.
Allow default value for dimension: Australia Post works on product dimension and entering dimension is compulsory for every user, now if you want to set default dimensions for all products it can be done from here.
Default Length (in C.M): Set the default length for the shipments in cm (centimeter) from here.
Default Height (in C.M): Set the default height for the shipments in cm (centimeter) from signature here.
Default Width (in C.M.): Set the default width for the shipments in cm (centimeter) from here.
Authentication Configuration
For Australia Post Authentication Configuration go to Australia Post Authentication Configuration.
Operation Mode: Select the mode of operation.
Account Number: Enter the account number provided by Australia Post Shipping for Shipment Tracking.
API Key: Enter the API Key provided by Australia Post Shipping.
Password: Enter the password provided by Australia Post Shipping.
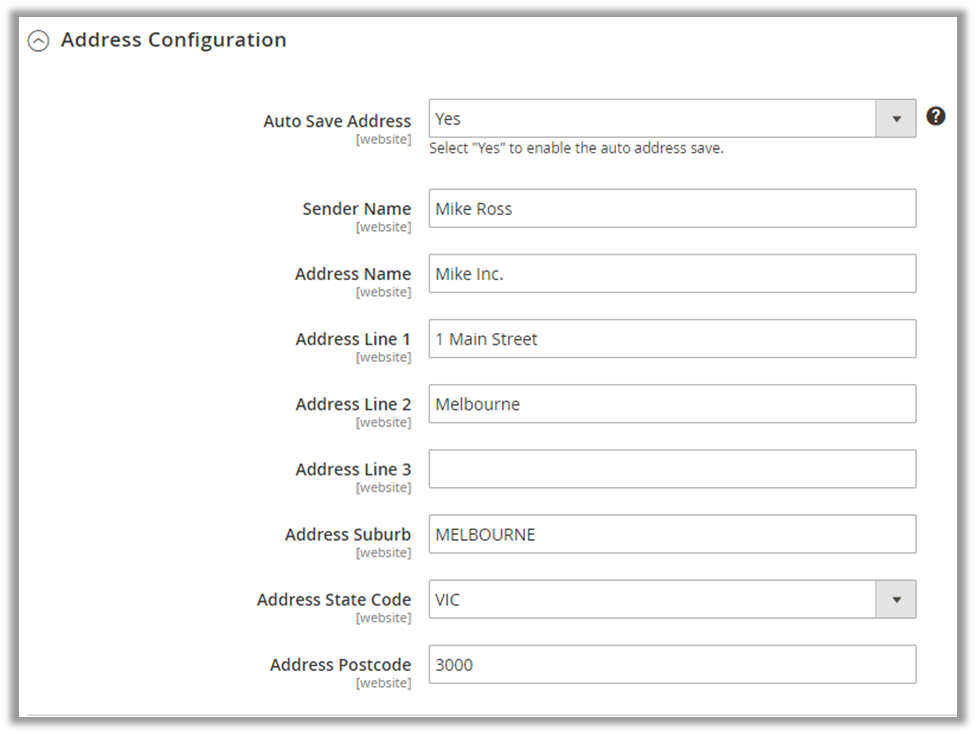
Address Configuration
To configure address for Australia Post Shipping, go to Address Configuration and enter following address details:
Auto Save Address
Sender Name
Address Name
Address Line 1
Address Line 2
Address Line 3
Address Suburb
Address State Code
Address Postcode
Note: On enabling the Auto Save Address, the address will automatically be saved as per the provided account details. With Testing Credentials, Auto Save Address won’t work.
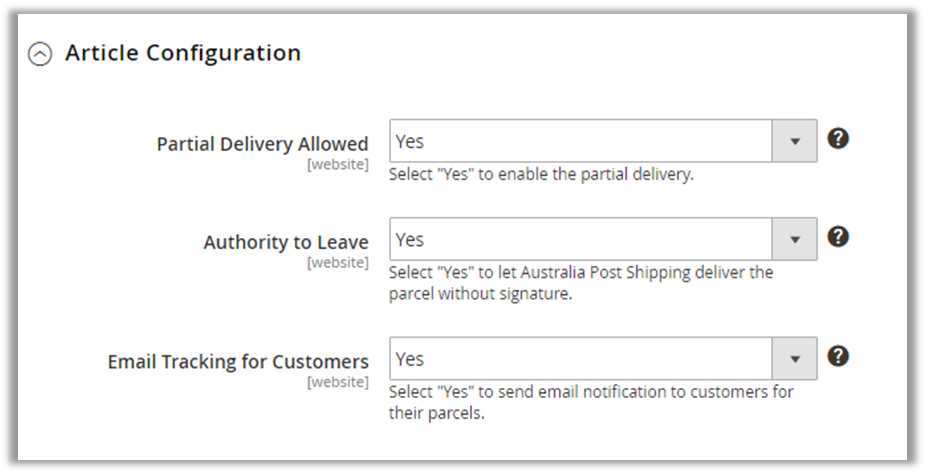
Article Configuration
You can set delivery related configurations from Article Configurations tab.
Partial Delivery Allowed: Select ‘Yes’ to enable the partial delivery of the shipment. For Ex. If customer has ordered 10 items but only 5 are available, with Allowed Partial Delivery these 5 available items can be shipped to Customer.
Authority to Leave: Select ‘Yes’ to let Australia Post Shipping deliver the parcel to another person and without signature.
Email Tracking for Customer: Select ‘Yes’ to send email notification to customers for their parcels or shipments.
Label Configuration
You can manage configurations for the labels to be printed from ‘Label Configuration’ tab.
Label Layout for Parcel Post: Select size of the label layout for Parcel Post from following:
A4-1pp
A4-4pp
THERMAL-LABEL-A6-1PP
Label Layout for Express Post: Select size of the label layout for Express Post from following:
A4-1pp
A4-3pp
THERMAL-LABEL-A6-1PP
Australia Post Branding: Select ‘Yes’ to enable Australia Post Branding on the label.
Label Left Margin: Enter the value by which you want to set the Left Margin of label.
Label Top Margin: Enter the value by which you want to set the top margin of label.
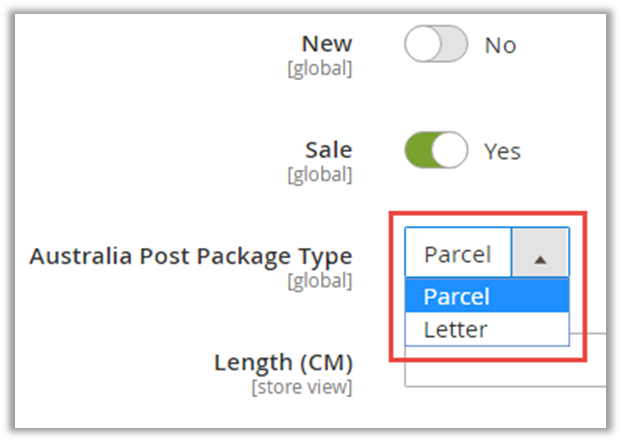
Select Package type
Go to Catalog -> Products and open any product in edit view.
You will find a new attribute ‘Australia Post Package Type’. It will have two options:
Parcel
Letter
Select the most appropriate one, according to the weight of the product. Be careful here, any wrong selection will not display the rate at the front end!
Generate Shipment and Download Label
To generate and download labels for any order, navigate to SALES -> Orders and select the order from the list of orders. [1]
Now, click on the ‘View’ icon beside the particular order. By clicking on the ‘View’ icon you will be redirected to the ‘ORDER VIEW’ of that particular order. [2]
Thereafter generate an invoice and generate shipping for the particular order click on the ‘Invoice’ and ‘Ship’ buttons simultaneously from the detail page of that particular order.
Now to generate shipment, navigate to the ‘Australia Post Shipping’ tab and click on the ‘Generate shipment’ button from ‘ORDER VIEW’ By clicking on it if there are any errors in generating shipments it will be displayed as shown below:
Once you have corrected the address error click on ‘Generate Shipment’ to generate shipment and by generating the shipment, you will be notified with ‘Shipment has been generated to Australia Post Shipping.’ Thereafter ‘Get Shipping Label’ button will be displayed beside the ‘Generate shipment’ button. [3]
Now by clicking on the ‘Get Shipping Label’ button, the shipping label for the particular will be downloaded. [4]
Thereafter you need to submit these orders to Australia Post Shipping. Go to APPJETTY AUSTRALIA POST SHIPPING -> Submit orders Australia Post. Here, you will find the list of orders whose shipment has been generated to Australia Post Shipping and the label has been downloaded to the system. [5]
Lastly to track shipment navigate to the particular order’s details page by clicking on the ‘Information’ tab in ‘ORDER VIEW’ and clicking on the ‘Track Order’ link. [6]
By clicking on it, you can view the tracking information from the ‘Tracking Information’ window. [7]
Frontend
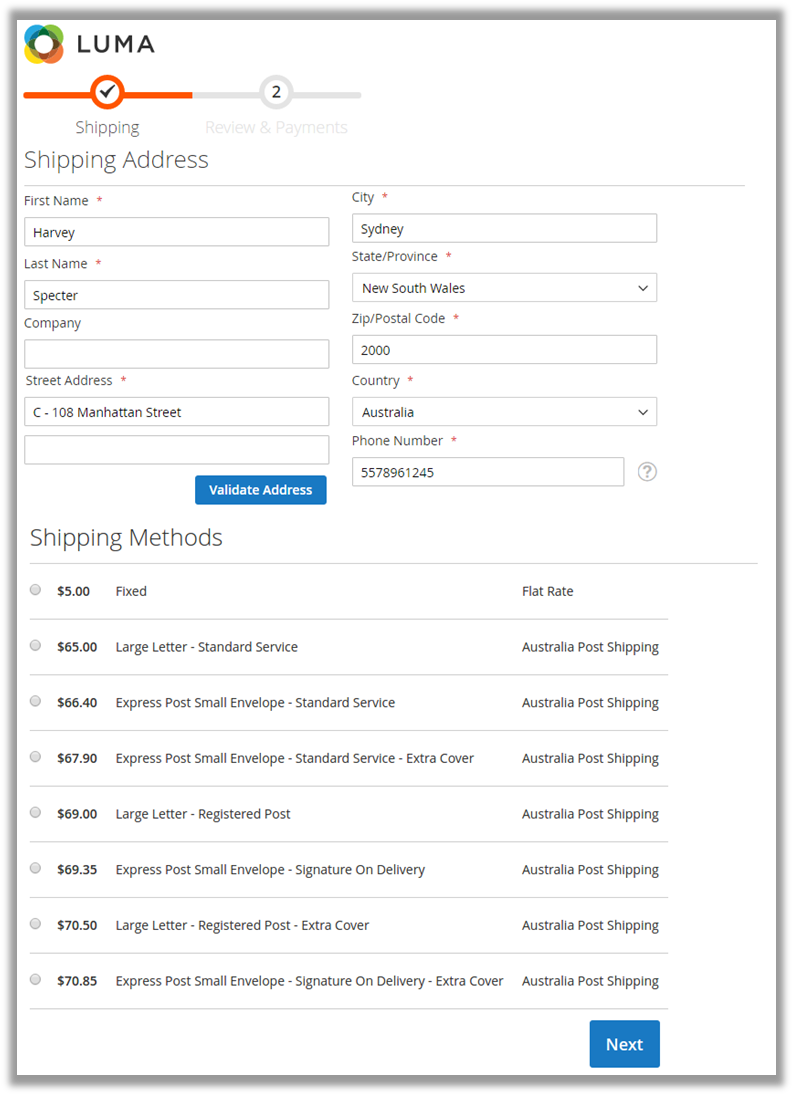
Live Rates
Once your customer has added the products to the cart, he/she can view the live shipping rates from the checkout page. [1]
Note: Shipping rates can be displayed as per the shipping configurations configured by the admin from the backend. Only the cheapest shipping rate will be displayed if the admin has enabled “Cheapest delivery rate”. [2]
Shipment Tracking
Once the admin has generated shipment for the customer’s order, the customer can view the tracking id and track the shipment of particular order from the order’s page.
Thereafter, customers can view the tracking information by clicking on the ‘Track this Shipment’ link. [3]
Points to Note
An API key is a must define for automatic reflection of changes that takes place in Australia Delivery Post rates.
Merchant has to manually bind the three major attributes (properties) length, width, and height used in this extension with the relevant length, width, and height that the admin has given to different products for their identification.
Units of measurement that has to be used in our extension are below:
– Weight: Kg/grams as configured by admin.
– Length: cm
– Height: cm
– Width: cm
The admin can configure the height, width, and length of the attribute for the Australia post method, if not set for the product. In addition, the admin has to enter the relevant warehouse postcode to get the shipping rates for various destination locations, where the parcels have to be delivered.
Admin needs to compulsory define the product’s weight for each product as it is required to get Australia Post services.
Go to Products -> Catalog and fill the value of the weight, apart from height, width, and length of the attribute, individually for each product.
If you select “yes”, for add Cover price, the extension will consider cart subtotal price as for Extra Cover price.
If the cart subtotal is greater than the extra cover max value, it will consider max value, which is 5000, then it will consider the max value of extra cover i.e. 5000.
To check Australia Post size and weight guidelines please follow guidelines from the below URL. http://auspost.com.au/parcels-mail/size-and-weight-guidelines.html
If the Bundle items that are set to ‘false’ are to ship separately from backed and if the weight is greater than 22KG it will not be displayed in the services list. (Not applicable for Contract Rates)
Contact Us
We simplify your business, offer unique business solution in digital web and IT landscapes.
Live Chat
Get instant support with our Live Chat.
Visit our product page at: https://www.appjetty.com/magento2-australia-post-shipping.htm and click on the Live Chat button for instant support.
Tickets
Raise tickets for your specific question!
Send an email to [email protected] or you can login to my account www.appjetty.com and click on My Support Tickets on your account dashboard, to get answers to your specific questions.
Customization:
If you would like to customize or discuss about additional feature for Australia Post Shipping, please write to [email protected]




![[1] Shipment & Label](https://docs.appjetty.com/wp-content/uploads/2021/06/image019-6.png)
![[2] Missing Details](https://docs.appjetty.com/wp-content/uploads/2021/06/image020-6.png)
![[3] Aus. Post Shipping](https://docs.appjetty.com/wp-content/uploads/2021/06/image021-6.png)
![[4] Shipping Labels](https://docs.appjetty.com/wp-content/uploads/2021/06/image022-6.png)
![[5] Submit Orders](https://docs.appjetty.com/wp-content/uploads/2021/06/image023-6.png)
![[6] Track Order](https://docs.appjetty.com/wp-content/uploads/2021/06/image024-6.png)
![[7] Tracking Information](https://docs.appjetty.com/wp-content/uploads/2021/06/image025-5.png)
![[2] Shipment Tracking](https://docs.appjetty.com/wp-content/uploads/2021/06/image027-5.png)
![[3] Tracking Information](https://docs.appjetty.com/wp-content/uploads/2021/06/image028-5.png)