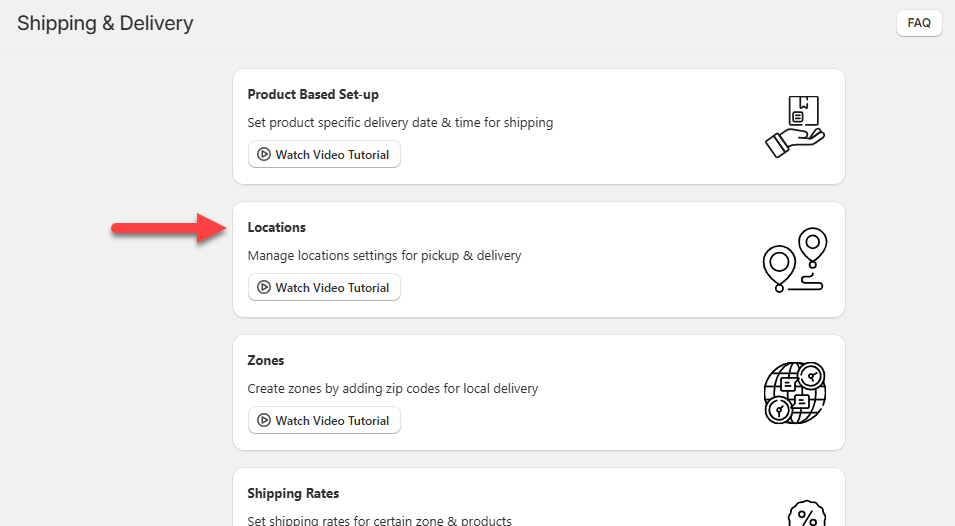
- Through Locations, you can manage your locations for pickup and delivery. Also, you can set various configurations for Store Pickups and Local Deliveries for your customers from here.
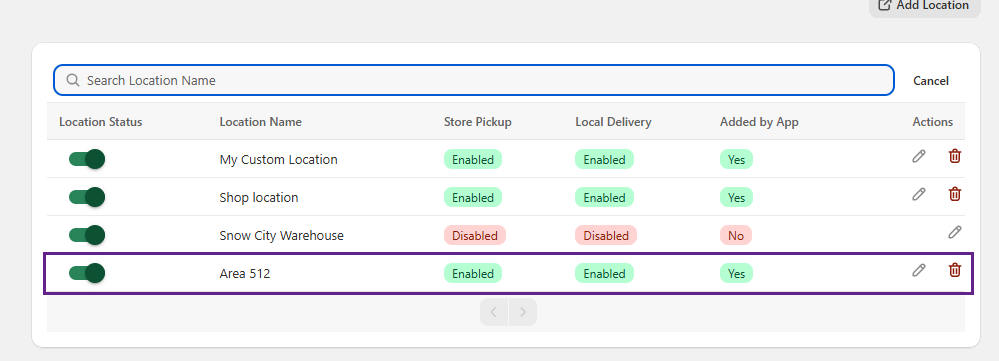
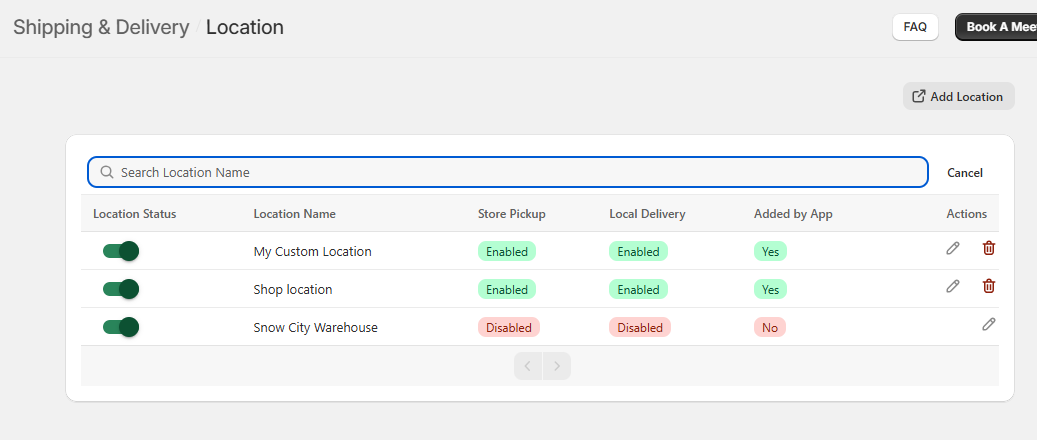
Location List
- In the Location List page you see a list of addresses with its Location Status, Location Name, Store Pickup, Local Delivery, Added by App and Action.
- You can search addresses by location name on the search bar.
- Enable/Disable a particular location through the toggle button in the Location Status.
- The Action column consists of icons such as – Edit and Delete. By clicking on the Edit icon, you will be navigated to the details page of the location where you can make respective changes.
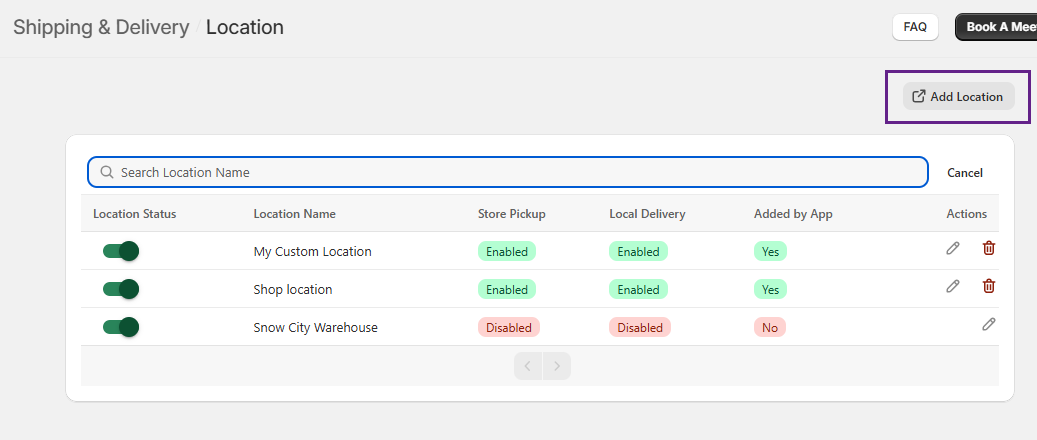
Add Locations for store pickup & local delivery
- Let’s check how to configure a new address. Click on the Add Location button. Here you can configure a new address for Store pickup and Local delivery.
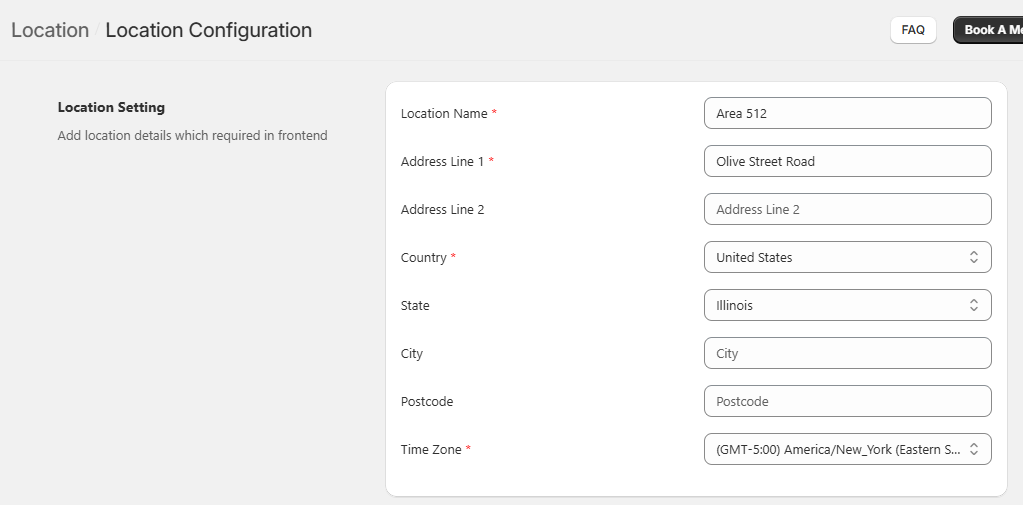
Location setting
- Here you can add basic location details of the store pickup center like Location Name, Full Address, Country, State, City, Postcode, and Time Zone.
- Added locations will be displayed on the front store.
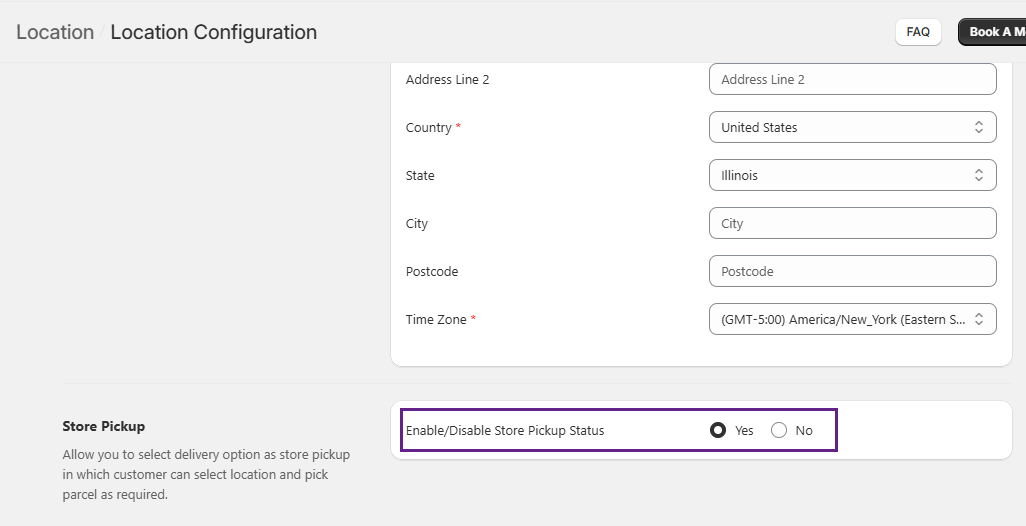
Store Pickup Configurations
- From here, you can enable and disable the Store pickup setting for the store.
- By enabling the store pickup option, you will be able to configure all settings.
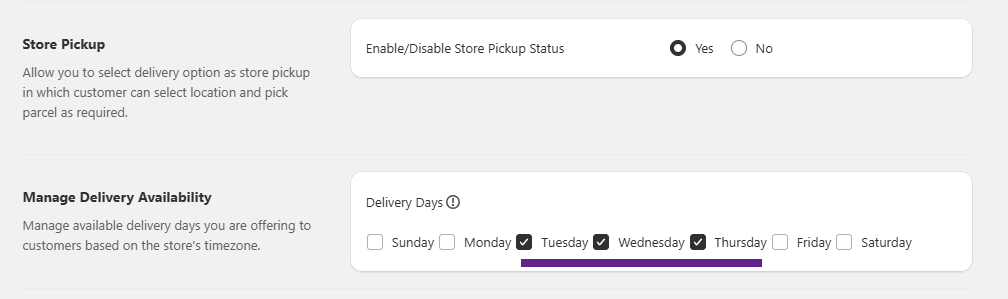
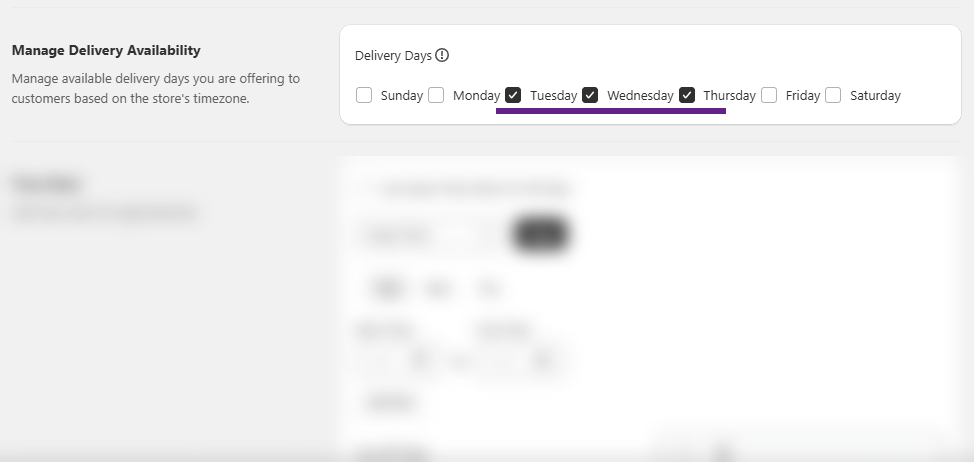
Manage Delivery Availability
- In this section, select the days on which the store pickups will be available.
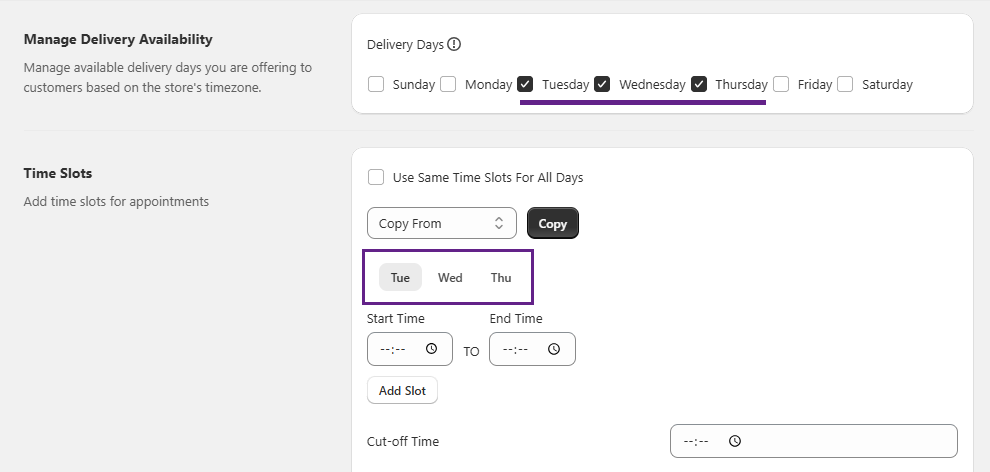
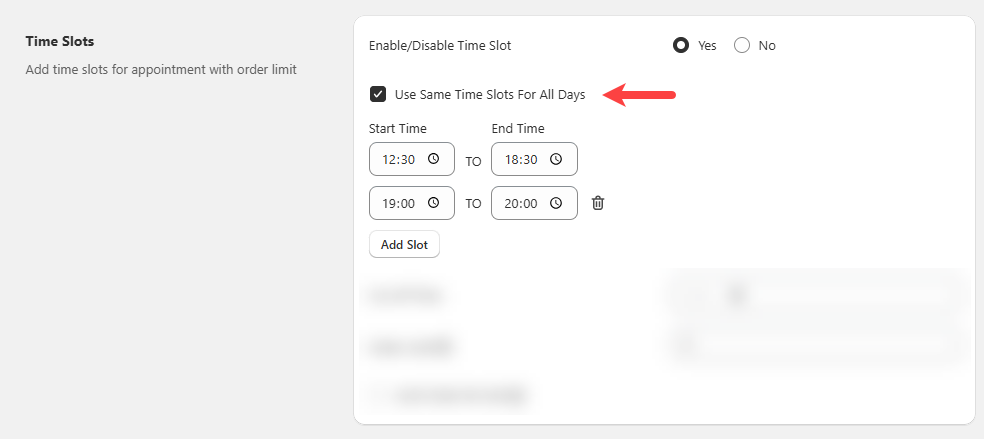
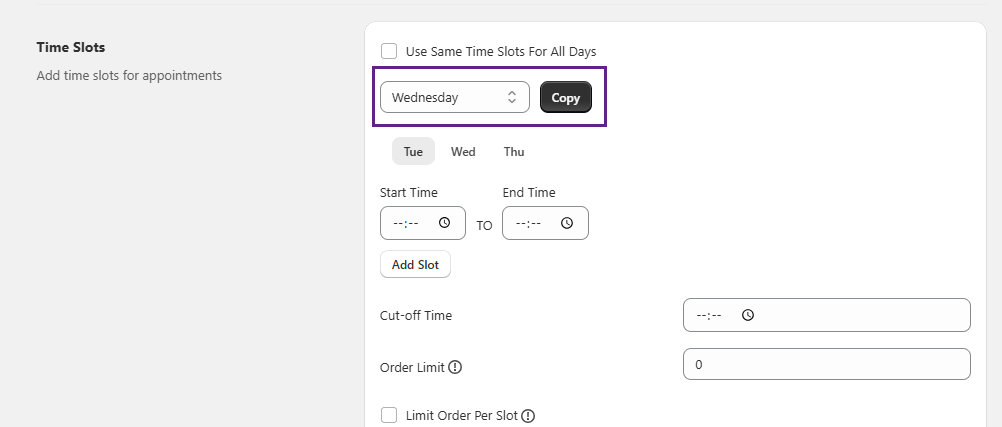
Time Slots
- The selected Delivery Days will be displayed in the Time Slots section.
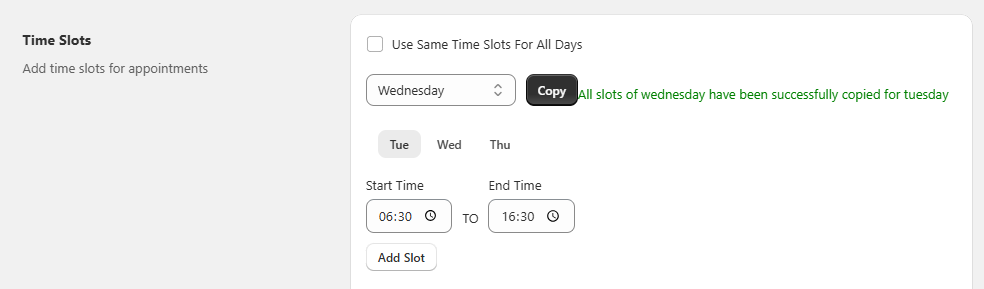
- Use Same Time Slots For All Days
- To apply the same time slots to all selected days, you can simply check the box for this specific field. By doing so, you can directly set the time slot(s).

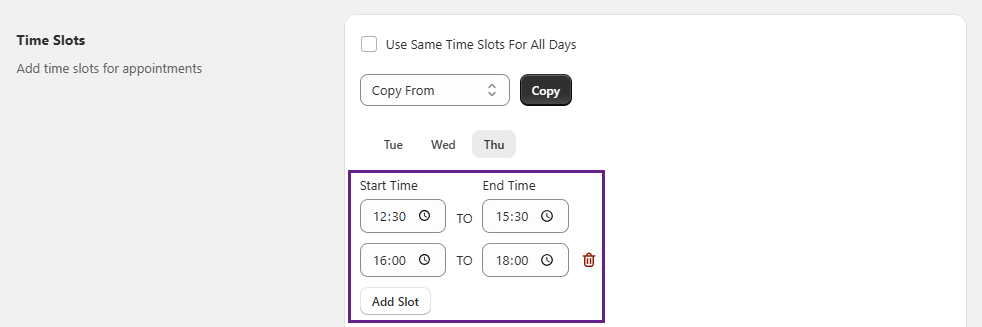
- Duplicate Time Slots
- You can copy a specific day’s time slot by choosing that specific day by means of the Copy From field. Navigate to the day to which the slots should be copied. For instance, here let us move towards “Tue”.
- Now proceed to choose the day from which you want to copy the slots and then click on the Copy button. Here, we would be selecting Wednesday.

- Once the time slot(s) gets successfully copied, a success message is displayed.
- Time Slots
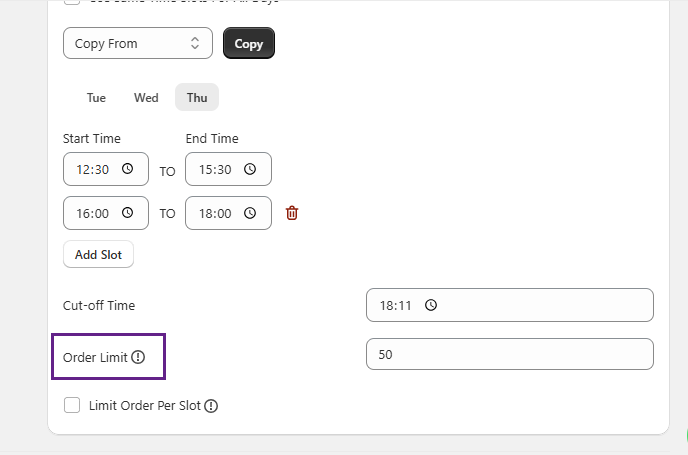
- You can set a time slot by defining the start and end time as per your preferences. Through the Add Slot button you will be able to set additional slots as well.
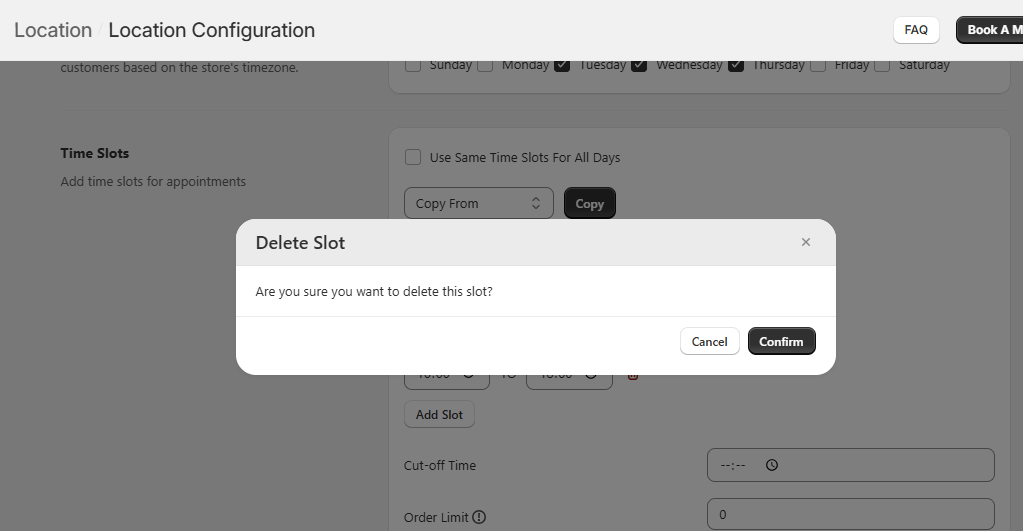
- For deleting a time slot, you just need to click on the Delete icon displayed beside the respective slot; by doing so, a confirmation pop-up will appear, proceed the deletion by clicking on the Confirm button.

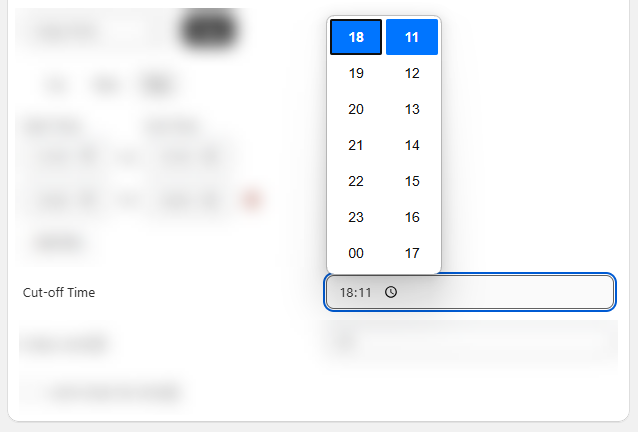
- Cut-off Time
- Cut-off Time is used to define what time you stop accepting orders on the same day. From the entered time, the slots will not be displayed onto the store.

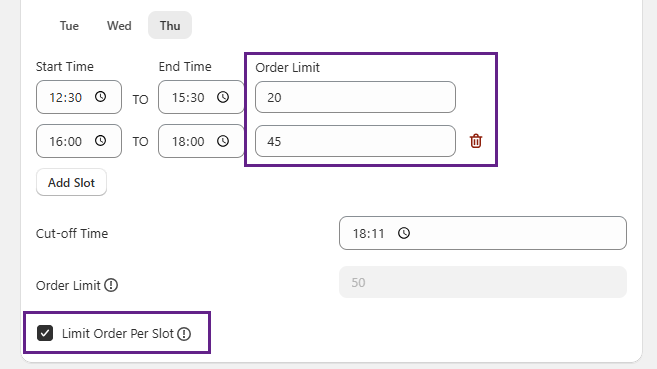
- Order Limit
- Through this field you will be able to limit the processing orders for the day to the value that you have entered. For instance: You have entered “Order Limit – 15” so for that particular day, a maximum of 15 orders will be processed.
- Now, note that, to receive unlimited orders the value should be entered as “0”.

- Limit Order Per Slot
- The checkbox in this field, when clicked upon, would add processing order limit for particular timeslot(s) and the Order Limit field would be disabled.
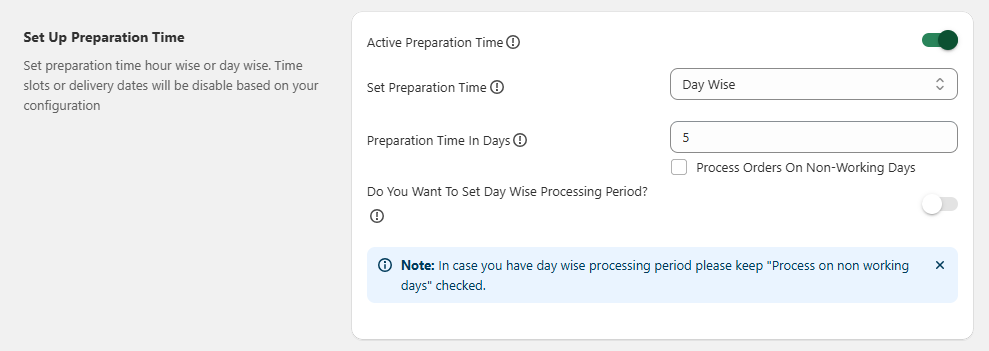
Set Up Preparation Time
- You can configure the preparation time either on an hourly basis or by day, depending on your preference. When you set the preparation time, the system will automatically disable the corresponding time slots and delivery dates based on your configuration.
- Firstly, Enable preparation time to proceed with the configurations and then move towards selecting the Hour Wise or Day Wise preparation.

- Hour Wise
- Selecting Hour Wise preparation will display “Enter Preparation Time In Minutes”.
- You should enter the value according to minutes and accordingly the time slots or delivery dates will be disabled.

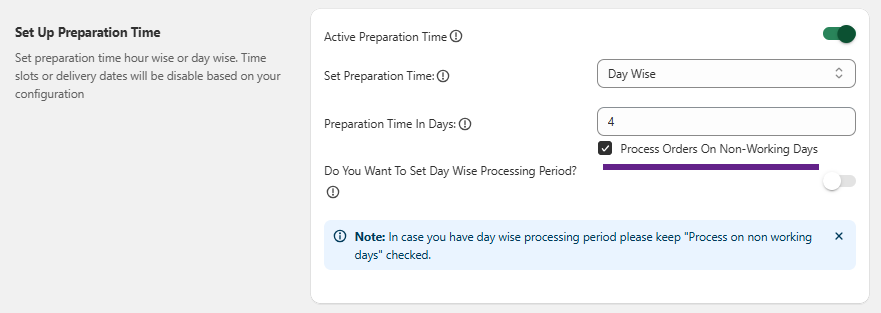
- Day Wise
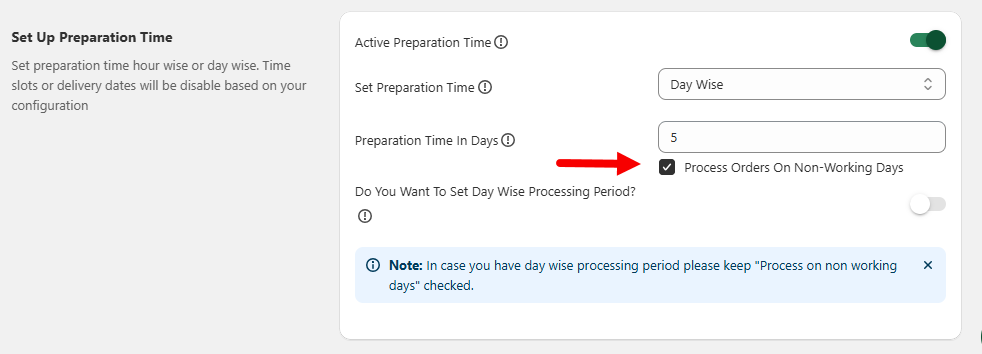
- Select Day Wise to proceed with the respective configurations. Preparation Time In Days would be the first consequent field where you need to enter the minimum number of days it would take to process an order.

– Process Orders On Non-Working Days
- This checkbox field allows the system to process orders on days typically designated as non-working days. When enabled, orders will be processed on these non-working days according to the configured settings. If left unchecked, orders will be processed only on working days.
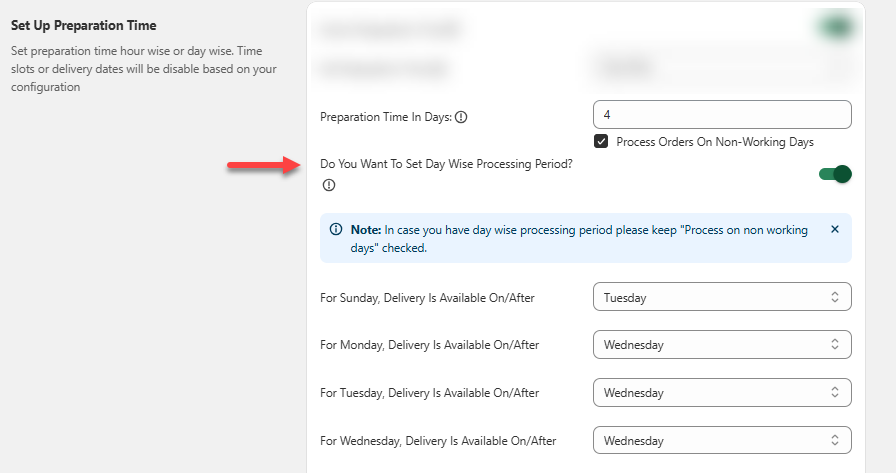
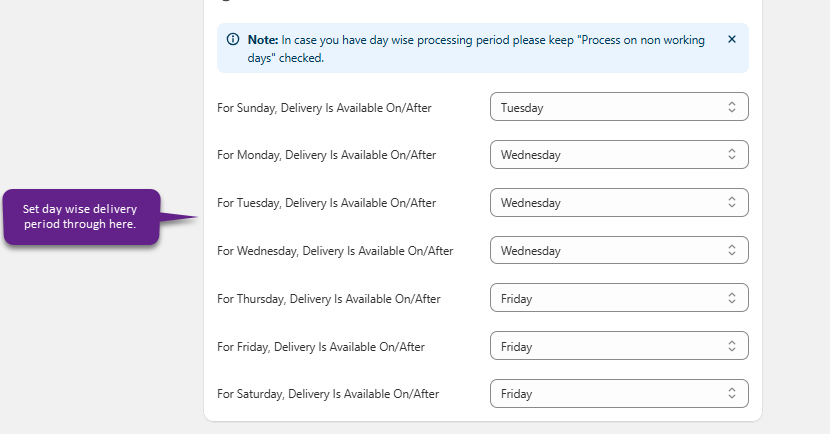
– Day Wise Processing Period
- When you have varied delivery rules for various weekdays then you need to opt for this section. Foremost Enable this section and then the succeeding fields would be displayed.
- Note that when configuring this section, you need to select the checkbox of “Process Orders On Non-Working Days”.
- Now you can set processing time based on days. For example – if you have to set process time for Sunday – you are selecting Monday as processing day. So on/after Monday delivery will be available.


Delivery Restrictions
- In this section you can manage tags, set maximum delivery period as well as configure blackout dates.
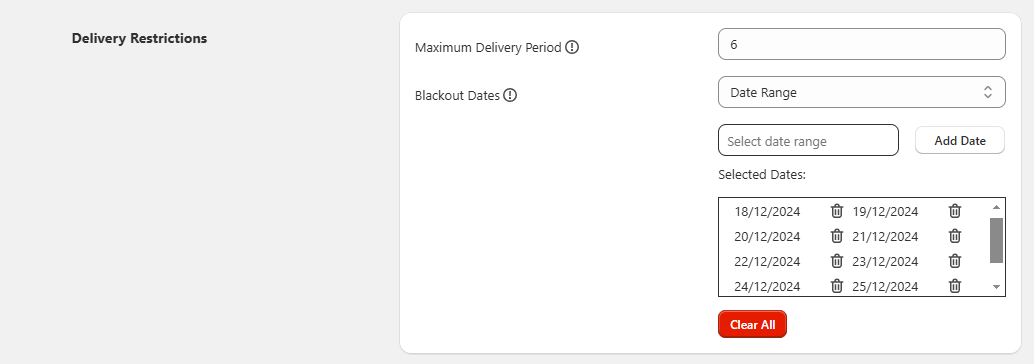
- In the Maximum Delivery Period field, specify the number of days within which the delivery will be completed. Customers would not be able to place the order after the entered day.

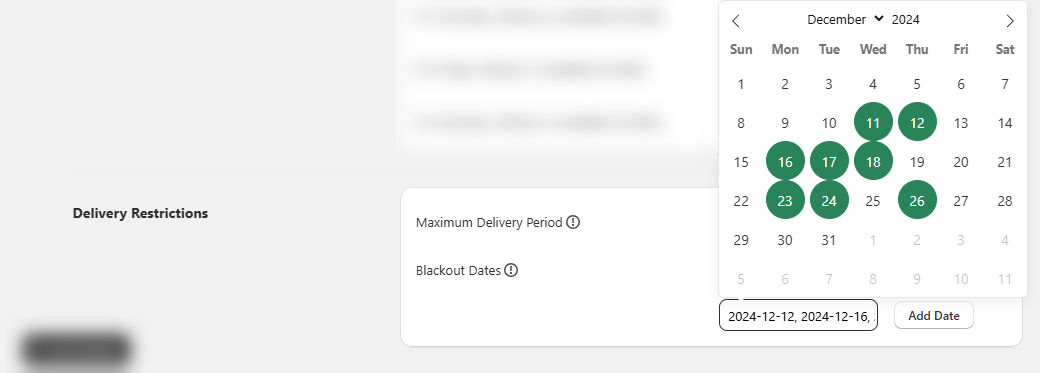
– Blackout Dates
- You can select days on which you are not available to deliver the orders.
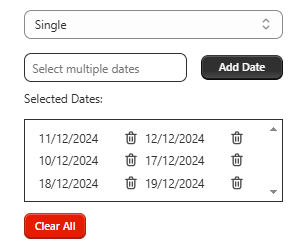
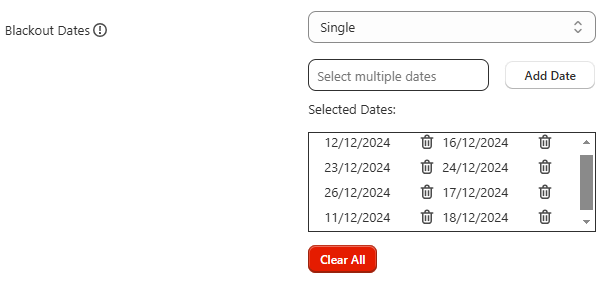
- Single
- Opting for Single allows you to add individual dates.
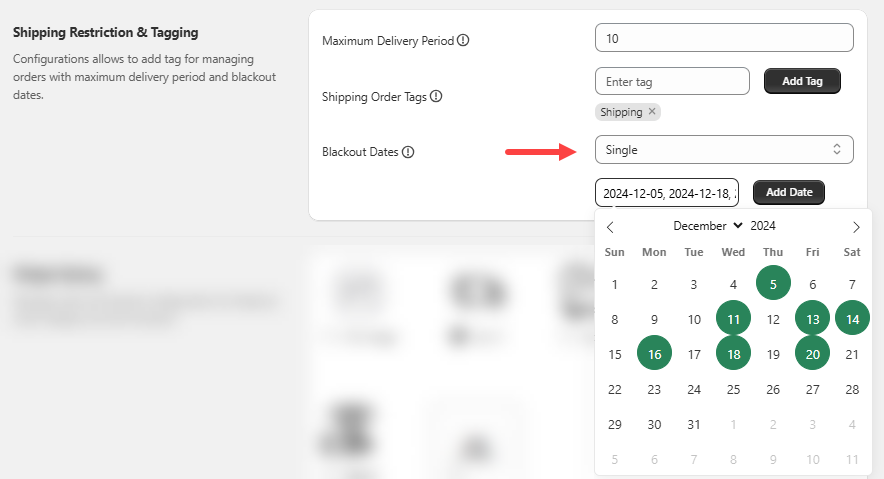
- Once you click on the Add Date button, all the selected dates will be listed under Selected Dates.
- Now, in order to delete; individually you can delete by clicking on the delete icon or else by clicking on Clear All, you can delete all at once.
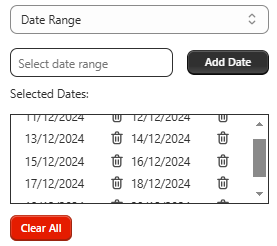
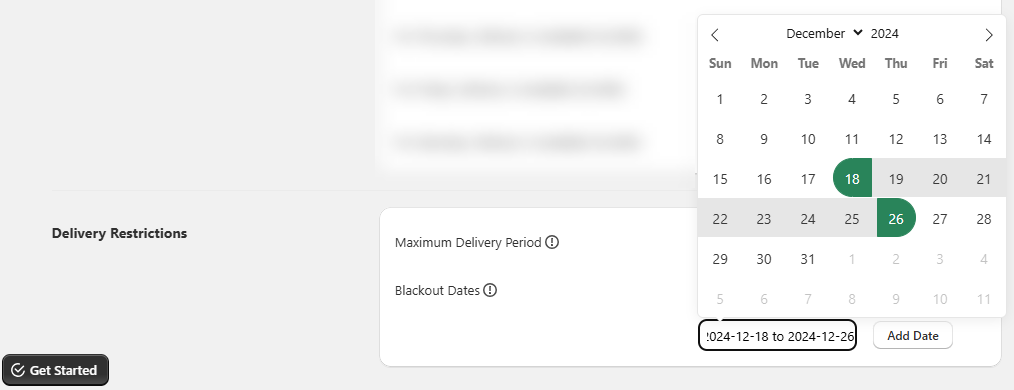
- Date Range
- You can add a specific range via this option.
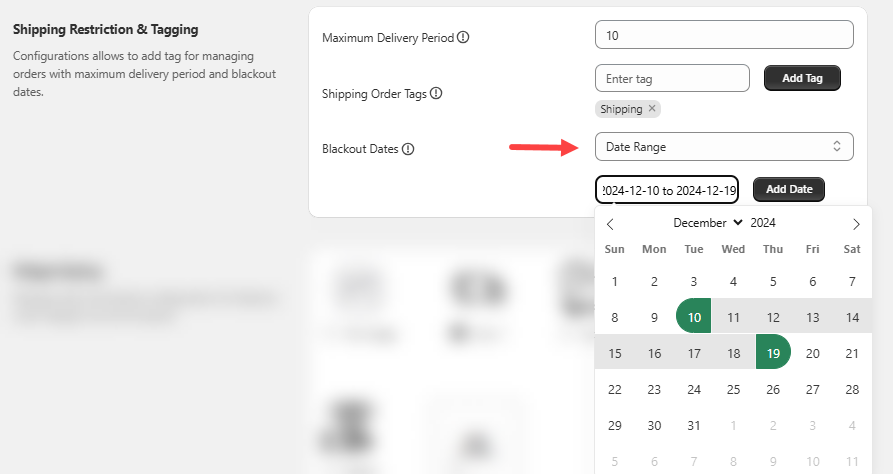
- Once you click on the Add Date button, the range will be listed under Selected Dates. Now, in order to delete; individually you can delete by clicking on the delete icon or else by clicking on Clear All, you can delete all at once.
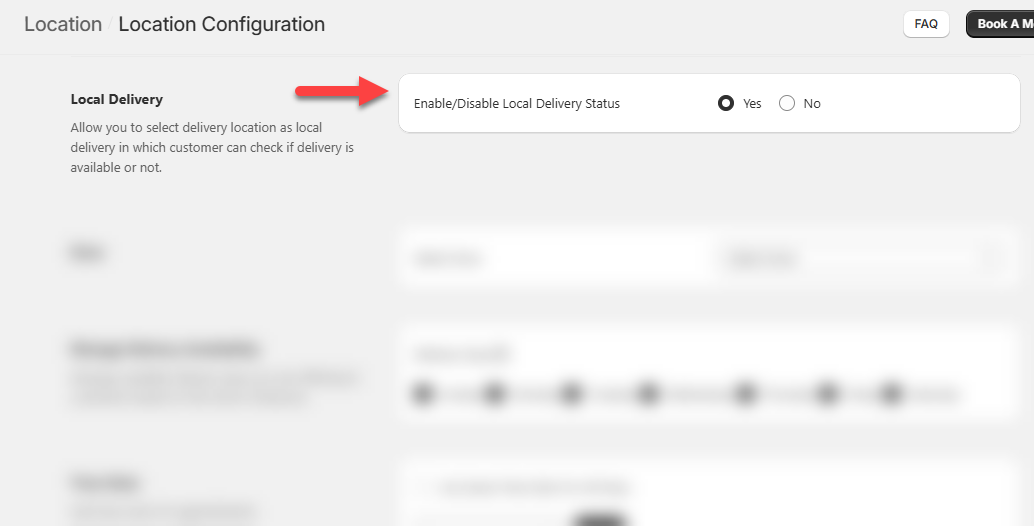
Local Delivery Configurations
- First and foremost, you need to enable local delivery to allow your customers to choose local delivery as the delivery method.
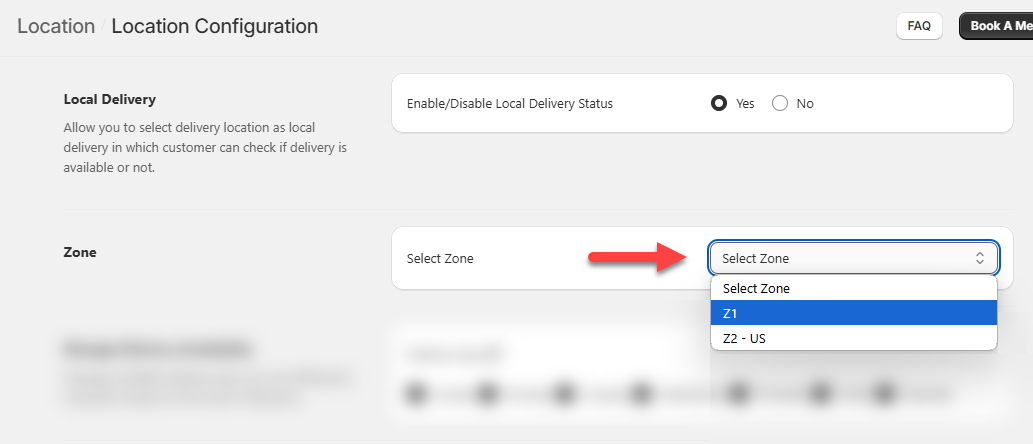
Zone
- Here, select the zone for which you want to configure the local delivery.
Manage Delivery Availability
- In this section, select the days on which the local delivery will be available.
Time Slots
- The selected Delivery Days will be displayed in the Time Slots section.

- Use Same Time Slots For All Days
- To apply the same time slots to all selected days, you can simply check the box for this specific field. By doing so, you can directly set the time slot(s).
- Duplicate Time Slots
- You can copy a specific day’s time slot by choosing that specific day by means of the Copy From field. Navigate to the day to which the slots should be copied. For instance, here let us move towards “Tue”.
- Now proceed to choose the day from which you want to copy the slots and then click on the Copy button. Here, we would be selecting Wednesday.
- Once the time slot(s) gets successfully copied, a success message is displayed.

- Time Slots
- You can set a time slot by defining the start and end time as per your preferences. Through the Add Slot button you will be able to set additional slots as well.
- For deleting a time slot, you just need to click on the Delete icon displayed beside the respective slot; by doing so, a confirmation pop-up will appear, proceed the deletion by clicking on the Confirm button.

- Cut-off Time
- Cut-off Time is used to define what time you stop accepting orders on the same day. From the entered time, the slots will not be displayed onto the store.
- Order Limit
- Through this field you will be able to limit the processing orders for the day to the value that you have entered. For instance: You have entered “Order Limit – 15” so for that particular day, a maximum of 15 orders will be processed.
- Now, note that, to receive unlimited orders the value should be entered as “0”.
- Limit Order Per Slot
- The checkbox in this field, when clicked upon, would add processing order limit for particular timeslot(s) and the Order Limit field would be disabled.

Set Up Preparation Time
- You can configure the preparation time either on an hourly basis or by day, depending on your preference. When you set the preparation time, the system will automatically disable the corresponding time slots and delivery dates based on your configuration.
- Firstly, Enable preparation time to proceed with the configurations and then move towards selecting the Hour Wise or Day Wise preparation.

- Hour Wise
- Selecting Hour Wise preparation will display “Enter Preparation Time In Minutes”.
- You should enter the value according to minutes and accordingly the time slots or delivery dates will be disabled.

- Day Wise
- Select Day Wise to proceed with the respective configurations. Preparation Time In Days would be the first consequent field where you need to enter the minimum number of days it would take to process an order.
– Process Orders On Non-Working Days
- This checkbox field allows the system to process orders on days typically designated as non-working days. When enabled, orders will be processed on these non-working days according to the configured settings. If left unchecked, orders will be processed only on working days.
– Day Wise Processing Period
- When you have varied delivery rules for various weekdays then you need to opt for this section. Foremost Enable this section and then the succeeding fields would be displayed.
- Note that when configuring this section, you need to select the checkbox of “Process Orders On Non-Working Days”.
- Now you can set processing time based on days. For example – if you have to set process time for Sunday – you are selecting Monday as processing day. So on/after Monday delivery will be available.
Delivery Restrictions
- In this section you can manage tags, set maximum delivery period as well as configure blackout dates.
- In the Maximum Delivery Period field, specify the number of days within which the delivery will be completed. Customers would not be able to place the order after the entered day.

– Blackout Dates
- You can select days on which you are not available to deliver the orders.
- Single
- Opting for Single allows you to add individual dates.
- Once you click on the Add Date button, all the selected dates will be listed under Selected Dates.
- Now, in order to delete; individually you can delete by clicking on the delete icon or else by clicking on Clear All, you can delete all at once.
- Date Range
- You can add a specific range via this option.
- Once you click on the Add Date button, the range will be listed under Selected Dates. Now, in order to delete; individually you can delete by clicking on the delete icon or else by clicking on Clear All, you can delete all at once.
Newly Added Location
- Once all the configurations have been saved, this newly added location will be listed onto the grid.
- The grid will indicate whether Store Pickup and Local Delivery are enabled or disabled.
- You can edit further through the Edit icon displayed in the Action column and also can delete via Delete icon listed in the same column.
- The location can be enabled or disabled through the Location Status column.