M2 Language Translator
Language Translator
Version: 2.1.1
Compatibility:
Community Edition: 2.1.*,2.2. *,2.3. *, 2.4*
Language Translator
Introduction
Language Translator translates important content of Magento 2 ecommerce store to any language supported by Google APIs. Just integrate Google API with Language Translator and one can proceed. One can easily install and configure this extension in e-commerce store. With the use of this extension one can translate the product attributes and Meta details of a specific page from one language to another through CRON processes. It will boost your sales as it will reach wider range of people using their regional language. It helps to manage multi-lingual stores more efficiently. It is a must extension for store owner who runs an e-store supporting multiple languages.
Benefits of Language Translator
Helps manage stores having multiple audiences to target.
Helps customers understand your products better as it will be in their regional language.
Convert CMS page details like Page Title, Content Heading, Content and Meta Details in any language.
Translate reviews from one language to another.
Search and translate any string of the store.
Translate the custom module data
Mass translation for multiple store fields will be carried through CRON or Console.
Check the CRON Log of the translations
Mass Translate Product In all store view
Translate Automatic new added products
Set Daily Character Limit for the translation and Set Safe Limit to be kept during translation.
Check the available quota on daily basis in real-time.
Calculate number of characters for product based on the attributes selected.
Send email once the mass translation process is successfully completed.
Prerequisite
Admin needs to add Google API Key to run this extension.
Please make sure to have backup of your database before proceeding with mass translation.
LT-Installation
You can install the LT plugin in two ways:
> Manually > Installation via Composer
Installation Steps
Manual Installation (Installing Magento 2 extension by copying code)
Step 1:
For Windows OS:
Go to <your Magento install dir>/app/code. Under that, create the folders using the following hierarchy:
Biztech
– Translator
For Linux OS:
Enter the following commands keeping their order:
cd <your Magento install dir>/app/code
mkdir -p Biztech/ Translator
After this, find the Download Zip and extract all files and folders in Biztech/Translator.
Step 2:
After the successful installation you have to run the command on the Magento2 root directory-
“php bin/magento setup:upgrade”
If you see a blank page or permission error, go to Terminal (Linux)/ Command Prompt (Windows).
cd [magento root directory][var]
run the following command
$ chmod –R 777 *
Step 3:
After running the command, log into the admin panel and clear the Cache. Go to SYSTEM -> Tools (section) -> CACHE MANAGEMENT to clear the cache.
Step 4:
After successful installation, you can see the ‘AppJetty Language Translator’ under APPJETTY EXTENSIONS tab inside STORES -> CONFIGURATION.
Installation via Composer
Step 1:
Create a new folder on your preferable server path. Add Extension zip archive into the created folder.
Step 2:
Use Your SSH details to connect to your server. After connecting to the SSH, change your working directory path with one of your Magento setup path using below command.
cd /PATH/TO_YOUR_MAGENTO_SETUP_PATH
Step 3:
Now you have to define the folder with the extension’s archive as a repository for composer reference. For this, run the Composer command:
composer config repositories.biztech artifact /ABSOLUTE_PATH_TO_ZIP_Archive_FOLDER/
For Example:
composer config repositories.biztech artifact /Packages/Biztech/
After executing this command, it will automatically add Repository Details in composer.json file.
Step 4:
Perform the following command for installation of the module:
composer require biztech/translator
Step 5:
After successful installation using the above command, you can verify the module status using the below command:
php bin/magento module:status
You can check the newly added module in the List of disabled modules.
Step 6:
Now you can upgrade your setup using the below command:
php bin/magento setup:upgrade
It will enable the module and it should be doing the automated process required by Magento.
Step 7:
You can now compile the modules using the below command:
php bin/magento setup:di:compile
Step 8:
In case you have to update our extension from a composer, you can use the below command:
composer update biztech/ translator
But before using that command, you should have placed the latest Extension zip archive into the
/ABSOLUTE_PATH_TO_ZIP_Archive_FOLDER/
After executing the above command your module is updated and now you just have to run the upgrade command same as step 6 and compile command same as step 7.
Extension Activation
Copy an activation key
Copy the activation key from the Order Confirmation Mail. OR
Log into your account at www.appjetty.com using the email and password you have provided at checkout process.
Go to Downloadable Options and copy the activation key for the Language Translator extension.
Activate the extension
Log into Magento Admin Panel and navigate to Stores -> Configuration where you find the “AppJetty Extension”. Click on the AppJetty Language Translator.
– Activation Key: Enter the activation key in the ”Activation Key” field for the Language Translator extension then click the ‘Save Config’ button.
Select Store: When you enter and save the key it will be verified, and you can select the websites where you need to use the Language Translator extension. Click on the ‘Save Config’ button after making your selections.
Note: Admin will get an alert to take the backup before proceeding for activation, for data safety.
Now, the Language Translator Extension got activated! Configure the Language Translator options.
LT- Configuration
Please follow below mentioned steps to configure the “Language Translator” extension. Go to Stores -> Configuration.
Translator Configuration
On the left side under the APPJETTY EXTENSIONS tab click on “AppJetty Language Translator”, you can see its configuration sections. [1]
Enabled: Select ‘Yes’ to enable the Language Translator extension. The extension is disabled by default.
Google API key: It is used to translate the data. (Note: Use this link to generate the Google API key – https://developers.google.com/translate/v2/getting_started)
Enter Daily Quota: Enter the daily limit specified in your Google Billing Amount. You will also get the “Available Today’s Daily Quota” (Real-Time), so that you can manage translations per quota availability.
Enter Safe Limit: Enter a daily safe limit to avoid the errors while translating the content.
Note: It must be less than the value entered in Enter Daily Quota field. And, if the daily limit exceeds for the day it will continue the rest of the process on Next Day.
The Daily Limit works as per the below example: – If the limits set in the configuration are as below: Daily Quota = 1000000 Safe Limit = 1
The Equation would be:
Daily Quota limit – Safe Limit = Daily Quota Based on the equation: 1000000 – 1 = 999999 The daily translation limit would be 999999 characters
Language Translate From-To selection
Language you want to translate your website to: Translate the product data, category data, CMS page, CMS block, review fields and Meta data in defined language. If language has been not specified, then it will be translated in current locale language. [2]
Note: If you select ‘Current locale’ then by default it will use current locale language.
Translate From: Translate from a specific language. If you select ‘Auto Detect’ then it will automatically detect the language (Note: If you specified ‘Auto Detected’ then language will be detected automatically).
Translate Button Label: Enter the text to be displayed on the Translate button.
Note: You must select the Translate Language To and Translate Language From options to translate the mass products and newly added products.
Mass Product Translation
Admin can enable the Mass products translation for multiple store view. [3]
Tallow mass products translation in multiple store view: By enabling this option, all products will be translated for the selected all stores.
Select Store view: Select the Store to allow translating the mass products.
Mass Translation of new products
Admin can enable the mass translation for new products as per the selected stores. [4]
Allow mass translation of new products in multiple store view: By enabling this option, the newly added product will be translated for the selected stores.
Select Store view: Select the ‘Store’ to allow the newly added product translation only for them.
Note: To translate the ‘mass products’ and ‘newly added products’ for the selected store, admin must have selected the “Translate Language To” and “Translate Language From”.
Old Module Translation
Admin can translate old products that are not translated even after the extension installed. [5]
Translate not translated from module installation: By enabling this option, the old products that are not translated yet even after the extension is installed, will be translated.
Send Email upon translation
Admin can enable the Email functionality for getting the mail notification when mass translation is completed. [6]
Send mail upon successful mass product translation cron: Enable this option to send a mail notification once mass product translation is successfully completed.
Select Email Template: Select the required ‘Email Template’ format to send mail notification of successfully completed translation.
Select Mass Translation Cron To Send Mail: Select the mass translation of that cron to send the mail notification when the translation process is completed.
Email Notification ID: Insert the Email ID to get the notification mail upon successful completion of mass translation. Admin can also add multiple mail IDs separated by a comma.
Fields Translation
Admin can choose fields that are to be translated for Products, CMS Pages & Categories. [7]
Translate Fields: Translate specific fields for the product module.
CMS Page Translate Fields: Translate specific fields for CMS Page. [8]
Category Translate Fields: Translate specific fields for the Category module.
Manage Translation
Admin can manage the translations in various ways: [9]
Enable Translate in all Store view: Select ‘Yes’ to perform translation in all store view. It will translate all products with category.
Do you want to translate all products again? Select ‘Yes’ to translate all the products again. This will eliminate the chances of skipping any product from the translation including the products already translated.
Batch Size to translate: Enter the number of products to be translated at a particular time.
Calculate Characters: To calculate and view the number of characters based on product configurations selected click on ‘Calculate Character Count’ button.
Product details translation
> Translate Product Details from one language to another
You can translate the product individually. Go to Catalog -> Products and click on any product to translate it to any other language. [1]
You can also translate all fields by clicking on a single button from the Top right corner.
Click on ‘Product Details’ to translate details of the product like Name & Description. [2]
By clicking on the “Translate <language>” button, it will translate the content into your selected language. Along with that, you can also edit the translated string if you want.
Once done with the editing, click on Apply Translate button to translate the text. [3]
For every translation done, you can edit the translated string.
Click on ‘Search Engine Optimization’ to translate the Meta Title and Meta Description of the product. [4]
> Translate CMS page details from one language to another
Go to Content -> Pages and click on any page to translate it to any other language. [5]
Admin can translate Page Information, Content, and Meta Data of the CMS Page.
Content translation
Go to Content -> Blocks and click on Select -> Edit to translate blocks of that page to any other language.
Admin can change Block Content based on Store view.
Translate Store Reviews to Any Language
Go to Marketing -> User Content -> Reviews and click on any review to translate it to any other language.
Mass (Bulk) Translation
You can also translate the content of the CMS pages, Static Blocks, Product Review, and Products, by selecting multiple records.
Content Translation
Go to any of the respective pages that you want to translate and select multiple records. Then click on the ‘Actions’ option.
From the ‘Action’ dropdown list, click on ‘Translate Selected (Pages/Blocks/Product Reviews)’. A list of languages will appear; select the language in which you want the selected attributes to be translated.
Product Translation
Navigate to Catalog -> Products. You can translate the products in two ways: “for a specific store by filtering the store” or “for Multiple stores”. [1]
> Using Filter option
From the product listing page, click on the ‘Filters’ option to translate the product(s) by selecting a specific store. [2]
After selecting the specific store, select one or multiple products and click on ‘Action’. [3]
By clicking on the ‘Actions’ drop-down option, you will get the list of the option ‘Translate Selected Products using Cron’ or ‘Add product to translate using console’ and a list of languages will appear. Select the language in which you want the selected attributes to be translated.
You can also translate the selected products for all the store views that are enabled from “Stores → Configurations → AppJetty Language Translator → Mass Products Translation in Multiple”
‘Add Product to Translate using Console’ performs mass translation using a console command.
In case you try performing translation action without filtering store view, it would generate an error to compulsorily select store view.
In case you want to allow translation for all store views without selecting a filter, you need to enable translation for all store views option from the configurations. [4]
Now after submitting the process, it will be notified with a message about the CRON Process by which the mass translation will be carried out on the same page with the selected store view.
By clicking on Add Product to Translate using Console button, you need to add products in product translation from the product grid page. [5]
To perform mass translation using the console, you first have to change the working directory with your Magento root directory and need to fire command: php bin/magento appjetty:product:translate
After starting the translation process, the user can view the status and daily quota for translation on the console.
Products that are already translated will be skipped if the related configuration is enabled. Translation will not be performed if anyone’s execution is already in process.
Note: The mass translation of the product will be carried out through a CRON or via Console and only one CRON or one command in a console can be registered at a single time. And if you wish to view the status of translated products, navigate to the Catalog -> Product -> Grid and under the ‘Product Translated’ column you can view the status of Product Translation included in the Mass Translation.
AppJetty Translator
By clicking on “AppJetty Translator” from the Magneto navigation pane, you can manage bulk translation and check the translation processes.
Manage Translation
Go to AppJetty Translator -> Manage Translation to translate some of the content/strings by searching. [1]
> Search String & Translate
Enter any string you want to translate in the search box. [2] Click on the ‘Edit’ option of the string you want to Translate and translate into any of the Languages that you want.
Once it gets translated, that translated string is shown within the string section from where you can again edit the translated string. [3]
> Translate Category in a Mass to any of the languages
Select categories that you want to translate. Select the translated language and that category will be translated in all store views. [4]
> Module Static Data Translate
By clicking on the “Module Static Data Translate”, the admin can translate the static data that is added for the modules. [5]
You need to select the options to translate the specific modules: [6]
Modules: Select the required modules from the drop-down list.
Store: Select the store for which you want to translate.
Translate to: Select the language to translate to.
Bulk Product Translation
To view the status of mass translations carried out by CRONs or Console go to APPJETTY TRANSLATOR -> Bulk Product Translation.
> AppJetty Mass Product Translator
Here, you can view a list of things translated by CRONs or CONSOLE to see what the mass translation was carried out with, along with translation statuses and other details.
By clicking on View Product, it will take you to the translation page, which contains products and status for the product that is translated or still pending.
> View Cron Log
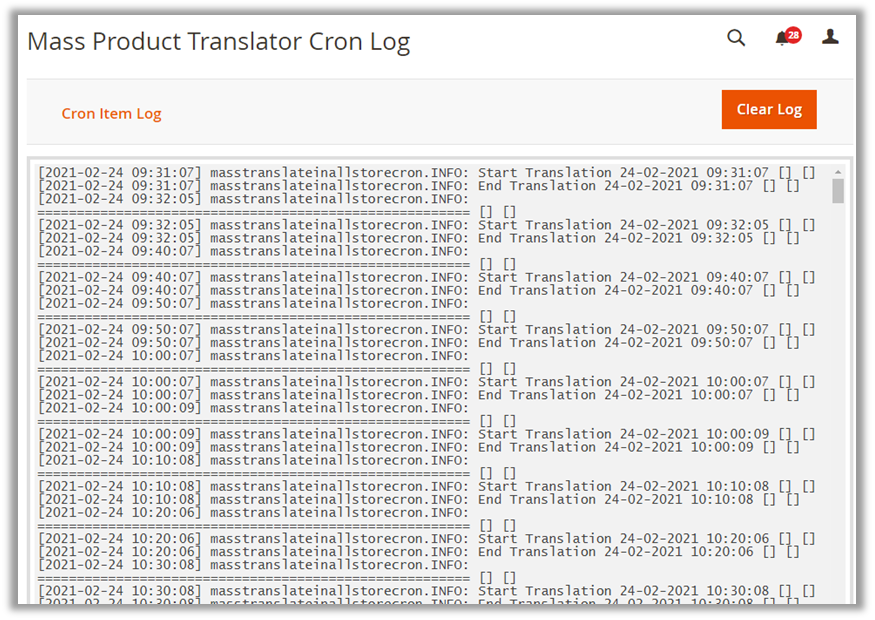
By clicking on the View Cron Log button, the admin can check the logs of the “Mass Product translations”.
You can view the CRON Log. [6] Admin can also clear the logs by clicking on the Clear Log button.
Bulk Product Translator in Multiple Stores
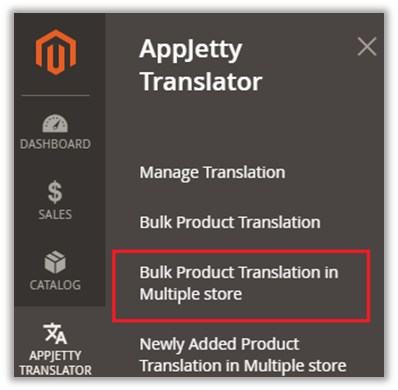
To view the status of mass translations for multiple stores, go to APPJETTY TRANSLATOR -> Bulk Product Translation in Multiple stores. [1]
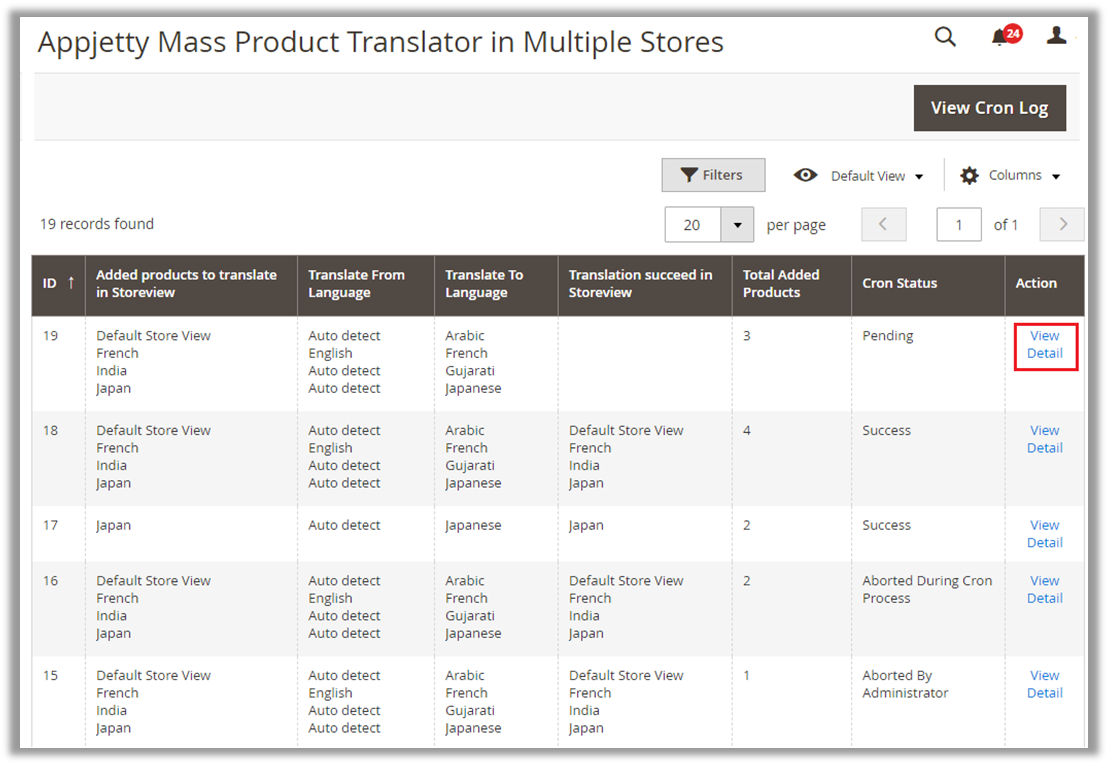
Here, you can view a list of all the translations for multiple stores that are enabled from Store -> You will get the status of the translation: ‘Pending’, ‘Success’, ‘Aborted During Cron process’ and ‘Aborted By Administrator’. [2]
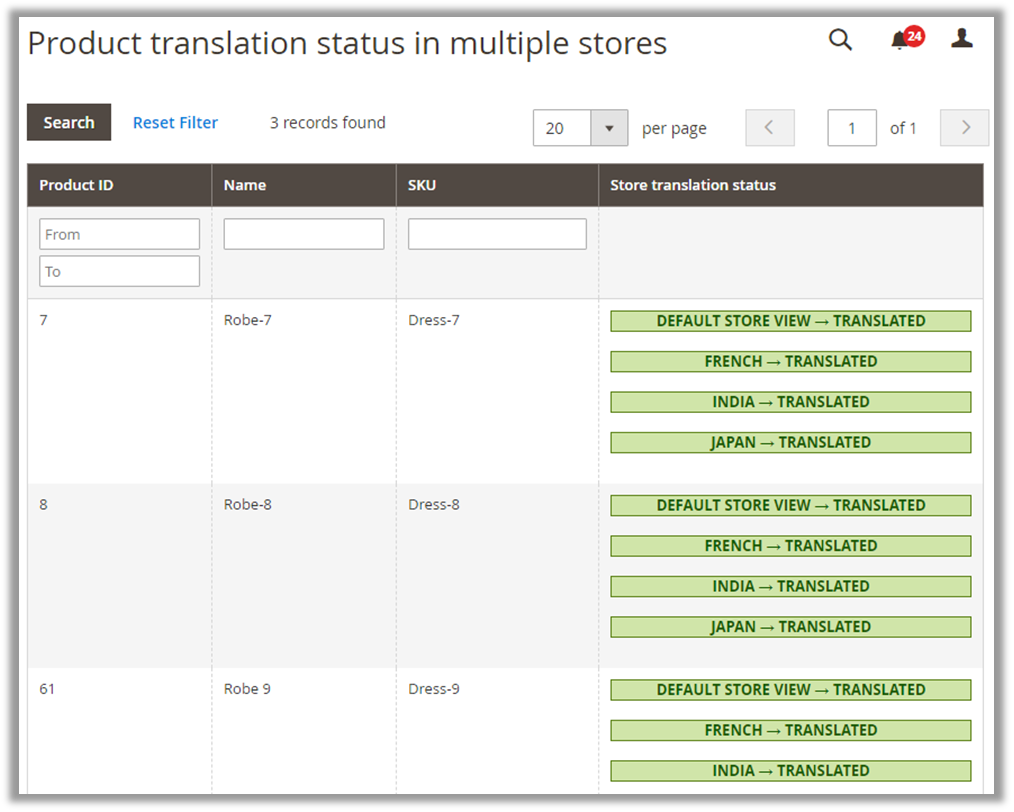
By clicking on View Detail, it will take you to the translation detail page, which contains store wise translation status of the products. [3]
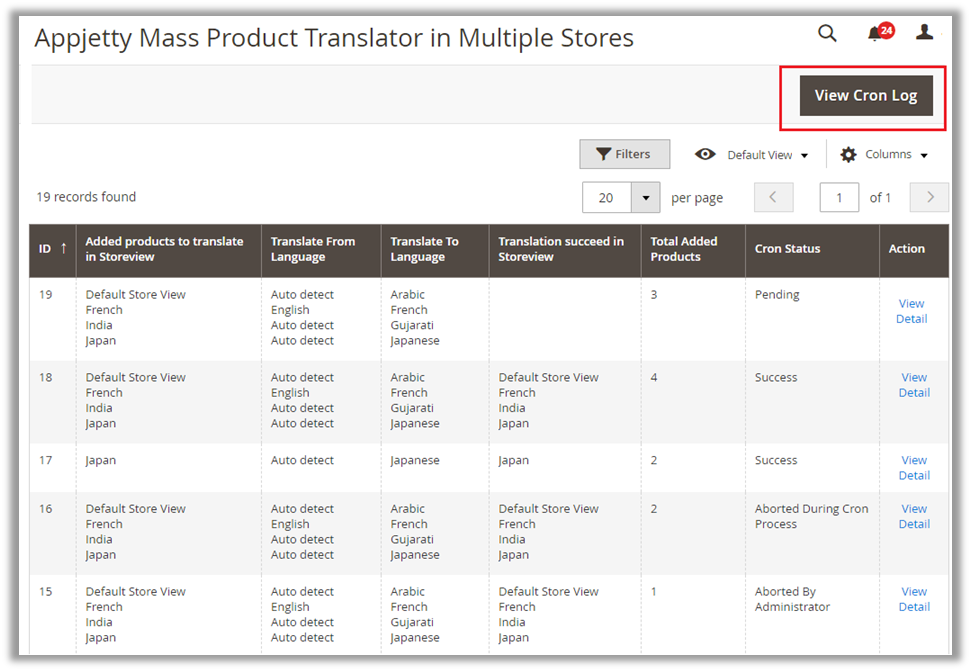
> View Cron Log
By clicking on the View Cron Log button, the admin can check the logs of the “Mass product translations in Multiple Stores”. [4]
You can view the CRON Log. admin can also clear the logs by clicking on the Clear Log button. [5]
Newly added products
To view the status of the newly added products, go to APPJETTY TRANSLATOR -> Newly Added Product Translation in Multiple stores. [1]
Here, you can view a list of all the translations of newly added products as configured from AppJetty Language Translator (Store -> Configurations). [2]
By clicking on View Detail, it will take you to the translation detail page of the newly added product with translation status. [3]
> View Cron Log
By clicking on the View Cron Log button, the admin can check the logs of the mass translations of newly added products in multiple stores. [4]
You can view the CRON Log. Admin can also clear the logs by clicking on the Clear Log button. [5]
Contact Us
We simplify your business, offer unique business solution in digital web and IT landscapes.
Live Chat
Get instant support with our Live Chat.
Visit our product page at: https://www.appjetty.com/magento2-language-translator.htm and click on the Live Chat button for instant support.
Tickets
Raise tickets for your specific question!
Send an email to [email protected] or you can login to my account appjetty.com and click on My Support Tickets on your account dashboard, to get answers to your specific questions.
Customization:
If you would like to customize or discuss about additional feature for Language Translator, please write to [email protected]


![[1] Translator Configuration](https://docs.appjetty.com/wp-content/uploads/2021/06/image007.png)
![[2] Translator Configuration](https://docs.appjetty.com/wp-content/uploads/2021/06/image008.png)
![[3] Mass Product Translation](https://docs.appjetty.com/wp-content/uploads/2021/06/image009-2.png)
![[4] Mass Translation of new products](https://docs.appjetty.com/wp-content/uploads/2021/06/image010-2.png)
![[5] Old Module Translation](https://docs.appjetty.com/wp-content/uploads/2021/06/image011-2.png)
![[6] Send Email upon translation](https://docs.appjetty.com/wp-content/uploads/2021/06/image012-3.png)
![[7] Fields Translation](https://docs.appjetty.com/wp-content/uploads/2021/06/image013-2.png)
![[8] Field Translation](https://docs.appjetty.com/wp-content/uploads/2021/06/image014-2.png)
![[9] Manage Translation](https://docs.appjetty.com/wp-content/uploads/2021/06/image015-1.png)
![[1] Prod. details translation](https://docs.appjetty.com/wp-content/uploads/2021/06/image016-1.png)
![[2] Prod. details translation](https://docs.appjetty.com/wp-content/uploads/2021/06/image017-1.png)
![[3] AppJetty Translator](https://docs.appjetty.com/wp-content/uploads/2021/06/image018-1.png)
![[4] SEO Translate Data](https://docs.appjetty.com/wp-content/uploads/2021/06/image019-1.png)
![[5] Translate CMS Page details](https://docs.appjetty.com/wp-content/uploads/2021/06/image020-1.png)
![[1] Content Translation](https://docs.appjetty.com/wp-content/uploads/2021/06/image021-1.png)
![[2] Edit Review Translation](https://docs.appjetty.com/wp-content/uploads/2021/06/image022-1.png)
![[1] Translation in Bulk](https://docs.appjetty.com/wp-content/uploads/2021/06/image023-1.png)
![[2] Translation in Bulk](https://docs.appjetty.com/wp-content/uploads/2021/06/image024-1.png)
![[1] Product Translation in Bulk](https://docs.appjetty.com/wp-content/uploads/2021/06/image027-1.png)
![[2] Filter Option](https://docs.appjetty.com/wp-content/uploads/2021/06/image026-1.png)
![[3] Translate Product Using CRON](https://docs.appjetty.com/wp-content/uploads/2021/06/image025-1.png)
![[4] Note for Product Translation](https://docs.appjetty.com/wp-content/uploads/2021/06/image028-1.png)
![[5] Product Translation - CRON Process](https://docs.appjetty.com/wp-content/uploads/2021/06/image029-1.png)
![[1] Manage Translation](https://docs.appjetty.com/wp-content/uploads/2021/06/image030-1.png)
![[2] String Translation](https://docs.appjetty.com/wp-content/uploads/2021/06/image031-1.png)
![[3] String Translation](https://docs.appjetty.com/wp-content/uploads/2021/06/image032-1.png)
![[4] Category Translation](https://docs.appjetty.com/wp-content/uploads/2021/06/image033-1.png)
![[5] Module Static Data Translation](https://docs.appjetty.com/wp-content/uploads/2021/06/image034-1.png)
![[6] Translation Results](https://docs.appjetty.com/wp-content/uploads/2021/06/image035-1.png)
![[1] Bulk Product Translation](https://docs.appjetty.com/wp-content/uploads/2021/06/image036-1.png)
![[2] Mass Product Translation](https://docs.appjetty.com/wp-content/uploads/2021/06/image037-1.png)
![[3] AppJetty Translator](https://docs.appjetty.com/wp-content/uploads/2021/06/image038-2.png)
![[4] AppJetty Translator](https://docs.appjetty.com/wp-content/uploads/2021/06/image039-1.png)
![[5] View CRON Log](https://docs.appjetty.com/wp-content/uploads/2021/06/image040-1.png)
![[6] Mass Product Translator Log](https://docs.appjetty.com/wp-content/uploads/2021/06/image041-2.png)
![[1] Newly Added Prod. Translation](https://docs.appjetty.com/wp-content/uploads/2021/06/image047-1.png)
![[2] View Detail](https://docs.appjetty.com/wp-content/uploads/2021/06/image048-2.png)
![[3] Translation Detail](https://docs.appjetty.com/wp-content/uploads/2021/06/image049-1.png)
![[4] View Cron Log](https://docs.appjetty.com/wp-content/uploads/2021/06/image050-1.png)
![[5] Clear Log](https://docs.appjetty.com/wp-content/uploads/2021/06/image051-1.png)