M2_Australia Post Parcel Send
Australia Post Parcel Send
Version: 1.0.8
Compatibility:
Community Edition 2.1.*, 2.2.*, 2.3.*, 2.4*
About Australia Post Parcel Send
Introduction
AppJetty provides effective solution in the form of Magento Australia Post Parcel Send Extension which helps store owners to submit consignment manifests to Parcel Send and generate labels for printing. Along with this, it also provides support for various Domestic and International shipping services under Australia Post Parcel Send.
Customers can choose shipping methods provided by admin and opt for the most suitable method. Admin can set charge codes for the defined methods along with setting up free shipping methods as well. Admin will have list of consignments and will be able to submit them to Parcel Send by creating Manifests. After creating the manifests, the admin will have detailed information about the manifests and can generate labels for printing. Using Magento Australia Post Parcel Send Extension, admin can reprint the labels without extra charge.
Benefits of Australia Post Parcel Send
Official Australia Post Partner
Manage Shipping Methods
Address Verification Facility
Shipment Tracking with Parcel Send
Custom articles for consignments
Free Shipping Rules Management
Manifest Summary Report
Easily Generate Labels for Consignments
Prerequisites
Admin should have an Australia Post account
Admin should hold a Business account
Admin should also hold a Developer account
Installation & Activation
Mandatory Instruction:
Kindly ensure that Magento 2 is set up correctly. Enter developer mode before initiating the installation. You can achieve the mode by running the following command:
bin/Magento deploy:mode:set developer –s.
It will enable the developer mode and skip compilation. You can enter default mode after successful installation of the extension.
Installation Steps
> Manual Installation
Installing Magento 2 extension by copying code
Step 1:
For Windows OS:
Go to <your Magento install dir>/app/code. Under that, create the folders using the following hierarchy:
Biztech
– Ausposteparcel
For Linux OS:
Enter the following commands keeping their order:
cd <your Magento install dir>/app/code
mkdir -p Biztech/ Ausposteparcel
After this, find the Download Zip and extract all files and folders in Biztech/Ausposteparcel.
Step 2:
After the successful installation, you have to run the command on Magento2 root directory-“php bin/magento setup: upgrade”.
If you see a blank page or permission error, go to Terminal (Linux)/ Command Prompt (Windows).
cd [magento root directory] [var]
run the following command
$ chmod –R 777 *
Step 3:
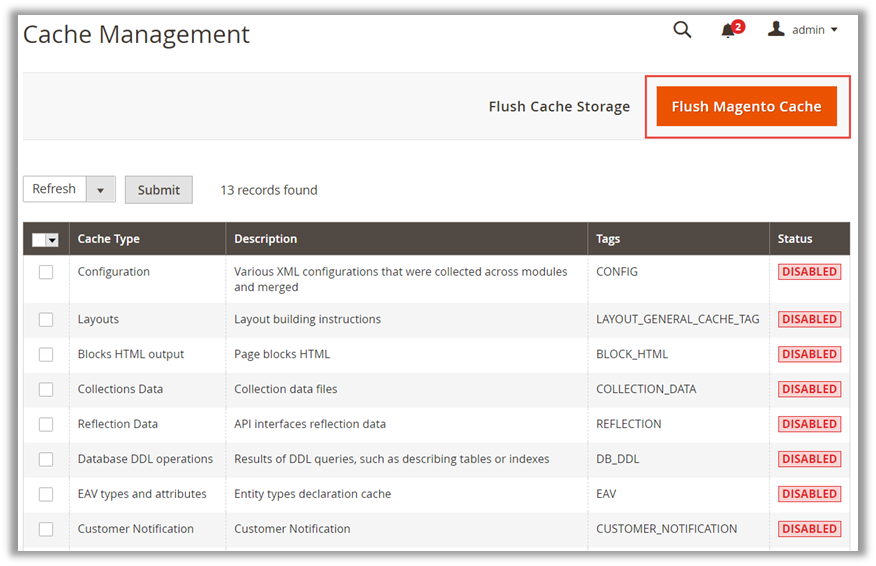
After running the command, log into the admin panel and clear the Cache.
Go to SYSTEM -> Tools (section) -> CACHE MANAGEMENT to clear the cache.
Step 4:
After successful installation, you can see the ‘Australia Post Parcel Send’ under ‘APPJETTY extensions’ tab inside STORES -> Configuration.
> Installation via Composer
Step 1:
Create a new folder on your preferable server path. Add Extension zip archive into the created folder.
Step 2:
Use Your SSH details to connect to your server. After connecting to the SSH, change your working directory with one of your Magento setup paths using below command:
cd /PATH/TO_YOUR_MAGENTO_SETUP_PATH
Step 3:
Now you have to define the folder with the extension’s archive as a repository for composer reference. For this, run the Composer command:
composer config repositories.biztech artifact /ABSOLUTE_PATH_TO_ZIP_Archive_FOLDER/
For Example:
composer config repositories.biztech artifact /Packages/Biztech/
After executing this command, it will automatically add Repository Details in composer.json file.
Step 4:
Perform the following command for installation of the module:
composer require biztech/ausposteparcel
Step 5:
After successful installation using the above command, you can verify the module status using the below command:
php bin/magento module:status
You can check the newly added module in the List of disabled modules.
Step 6:
Now you can upgrade your setup using the below command:
php bin/magento setup:upgrade
It will enable the module and it should be doing the automated process required by Magento.
Step 7:
You can now compile the modules using the below command.
php bin/magento setup:di:compile
Step 8:
In case if you have to update our extension from a composer you can use the below command:
composer update biztech/ausposteparcel
But before using that command you should have placed the latest Extension zip archive into the /ABSOLUTE_PATH_TO_ZIP_Archive_FOLDER/
After executing the above command your module is updated and now you just have to run the upgrade command same as step 6 and compile command same as step 7.
The installation is successful! Scroll down to activate the extension.
Extension Activation
Copy an activation key
Copy the activation key from the Order Confirmation Mail. OR
Log into your account at www.appjetty.com using the email and password you have provided at checkout process.
Go to Downloadable Options and copy the activation key for the ‘Australia Post Parcel Send’ extension.
Activate the extension
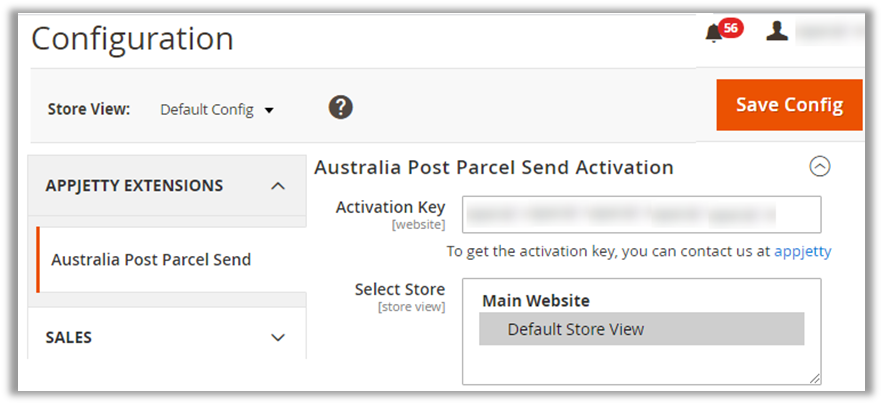
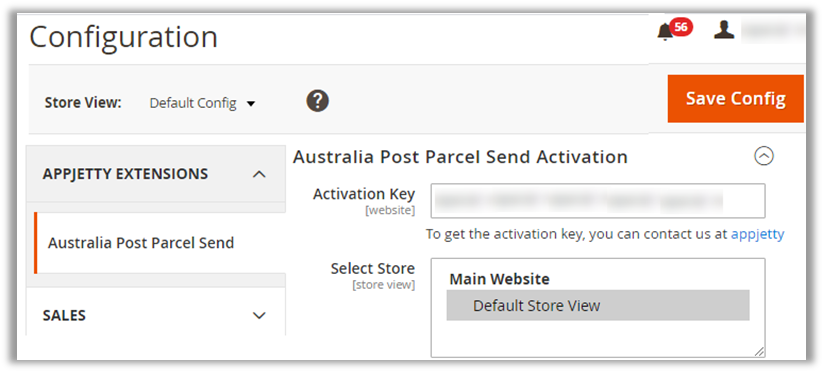
Log into Magento Admin Panel and go to STORES -> CONFIGURATION -> APPJETTY EXTENSIONS -> Australia Post Parcel Send Activation and enter the activation key in the ‘Activation Key’ field for the extension. Click the ‘Save Config’ button.
Select Store
When you enter and save the key it will be verified, and you can select the ‘Stores’ where you need to use the Australia Post extension. Click the ‘Save Config’ button after making your selections.
Now, the “Australia Post Parcel Send” extension got activated! You can configure the modules as per your requirement.
Backend Configuration
Please follow the steps below to configure Magento 2 Australia Post Parcel Send extension.
Go to STORES -> Configuration -> AppJetty Extension. Under that you will find the ‘Australia Post Parcel Send’ activation options.
Here you can insert the activation key and select the required store/s.
General Configurations
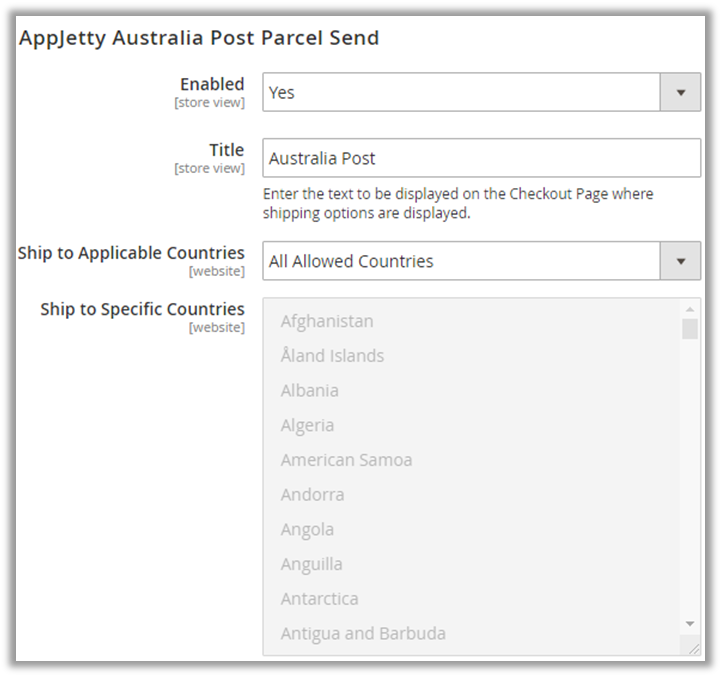
For the General Configuration, go to STORES -> Configuration -> SALES -> Shipping Methods.
Note: Because of the ‘Store Pickup’ available, now onwards the Shipping Methods referred to as Delivery Methods in the 2.4 editions of the Magento2.
Enable: Select ‘Yes’ to enable the extension. The extension will be disabled by default.
Title: Enter the title to be displayed for the Shipping Methods.
Ship to applicable countries: Select from below options to ship the consignment in applicable countries.
All Allowed Countries: This allows admin to ship the consignment in all countries.
Specific Countries: This allows admin to ship the consignment only in specified countries.
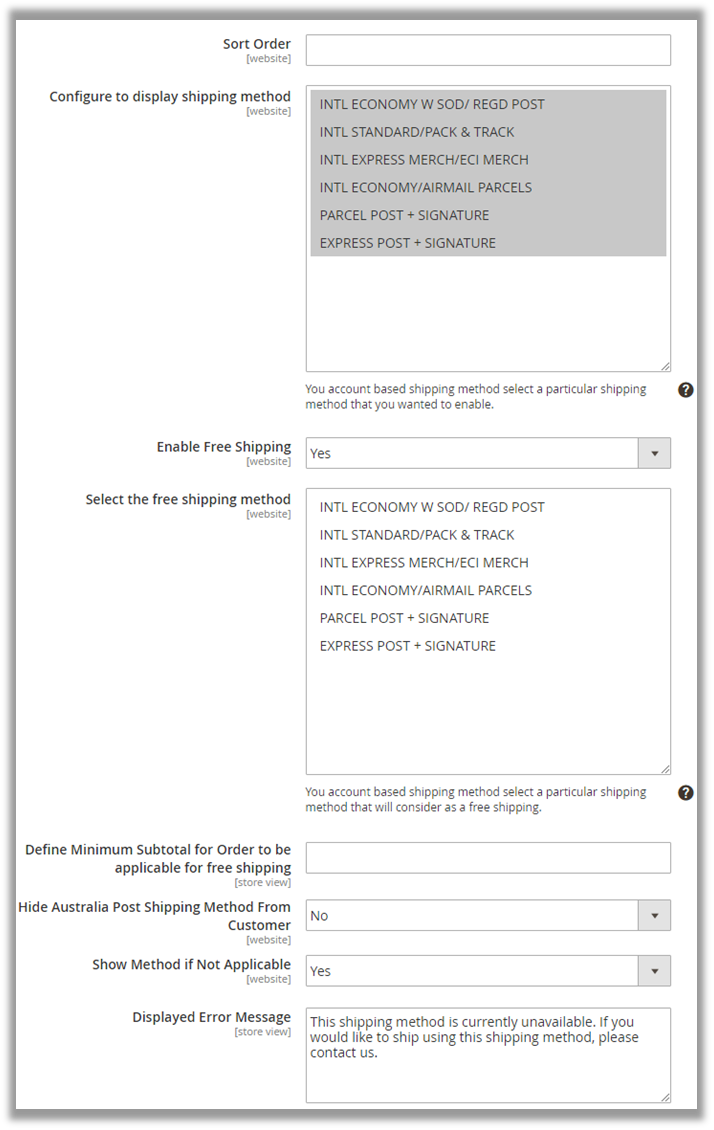
Sort Order: Choose shipping methods that you need to be show at front end for the contract services.
Enable Free Shipping: Enable/Disable free shipping option to be displayed on the front end. You enable this option by selecting “Yes” for the same.
On enabling free shipping option, select the free shipping methods to be displayed on the frontend. Along with that, define minimum subtotal for order to be applicable for free shipping.
Hide Australia Post Shipping Method From Customer: Select this option to Yes if shipping method other than Australia Post Shipping is to be used. Possible options are: Yes or No.
Show method if not applicable: Choose whether to display the method if that particular method is not applicable or unavailable. Possible options are: “Yes” or “No”
Displayed Error Message: Set message which you want to display when method is not applicable.
Shipping Method Configuration
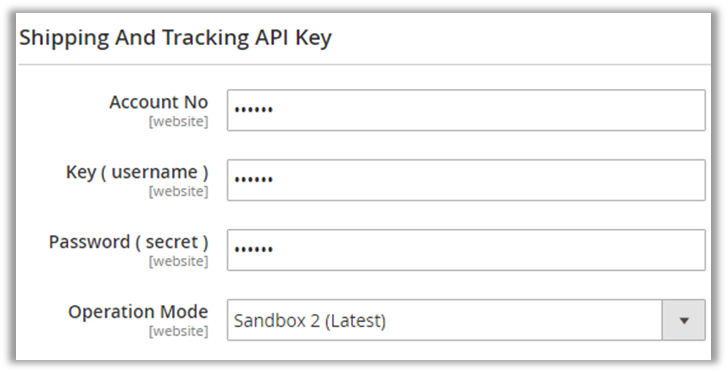
Account Number: Enter your Australia Post Parcel Send account number for the shipments.
API Key: Enter your Australia Post Parcel Send API Key.
Password: Enter the password for your Australia post Parcel Send account.
Operation Mode: Test mode enables admin to use and test all features of the Australia Post Parcel Send for Magento module without submitting orders to Parcel Send. The live mode will upload orders to the Australia Post Parcel Send system. Possible options are “Test” or “Live”.
Note: This configuration is only available for Label Printing and Shipment Tracking.
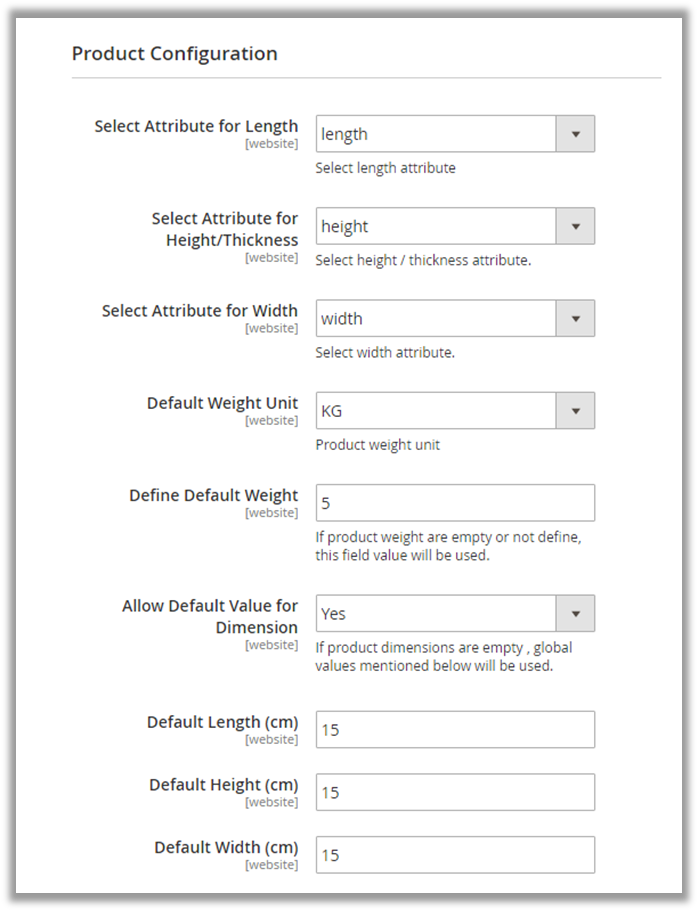
Product Configuration
Select Attribute for Length: Choose the attribute for the product’s length.
Select Attribute for Height / Thickness: Choose the attribute for the product’s height / thickness.
Select Attribute for Width: Choose the attribute for the product’s width.
Default Weight Unit: Choose the default weight unit for the product. Possible options are:
KG: For weight in Kilograms
GM: For weight in Grams
Define Default Weight: Using this feature you can define the default product weight which will be taken into consideration when product weight is not defined.
Allow Default Value for Dimension: Select ‘Yes’ to allow default values of dimensions height, width and length.
Default Length (cm): Enter the default value for length.
Default Height (cm): Enter the default value for height.
Default Width (cm): Enter the default value for width.
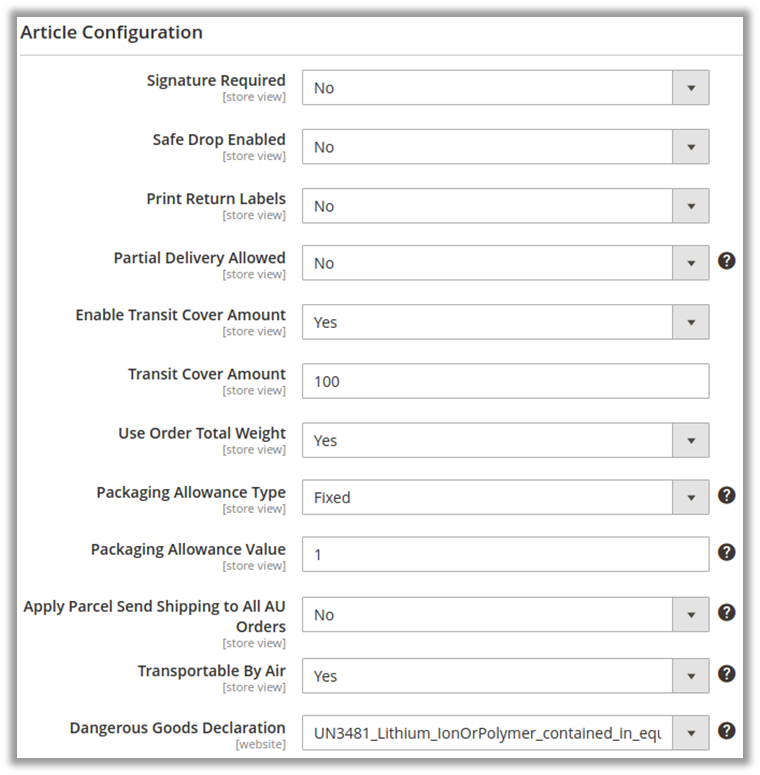
Article Configuration
Signature Required: Default setting for ‘Signature Required’ on consignments. This default setting can be overridden while creating consignments. Possible options are: “Yes” or “No”.
Note: If set to ‘No’, customers will be prompted to confirm that they authorize their delivery to be left if no one is available to sign for it, and then be required to enter special instructions. E.g. ‘leave at side door’ – these instructions will show on labels associated with the consignment for the order.
Safe Drop Enabled: If you select ‘Yes’, then your customer can request that the parcel be left in a safe place at the delivery address if they are not home to sign for their delivery.
Print Return Labels: Default setting for printing returns labels for consignments. This default can be overridden when creating consignments. Possible options are: “Yes” or “No”.
Partial Delivery Allowed: Default setting for specifying if partial delivery is allowed for consignments. This default can be overridden when creating consignments. Possible options are: “Yes” or “No”.
Enable Transit Cover Amount: It lets you enable transit cover amount on the parcels. Select yes to enable it.
Transit Cover Amount: Enter the cover amount that you wish to provide.
Use Order Total Weight: If your products in Magento have weights associated with them, admin can use this option to use the total weight of the combined items on an order as the weight for the consignment. Possible options are: “Yes” or “No”.
Packaging Allowance Type: Use this option to add additional weight to order total for allowing packaging. Possible options are:
Fixed: To add a fixed weight to each order.
Percent: To add an allowance based on the percentage of the total weight for each order.
Packaging Allowance Value: Depending on the options, admin can choose for ‘Packaging Allowance Type’, this value will determine what value to add to the total weight of the combined items on an order. If admin selects fixed, then they will be able to input the additional weight in KG. E.g. .25 for .25 kg/250 grams. If they select percentage, they would be able to input the percentage to an order. For E.g. 5 for 5%. Admin can leave this field empty if they do not want to apply a packaging allowance to orders.
Apply Parcel Send Shipping to All AU Orders: Admin can select this option if they want to apply Parcel Send shipping and management to all the existing Magento shipping rules and options; including orders via M2E Pro. If admin wants to apply different Parcel Send shipping types to the different shipping methods they want to offer, we recommend them to use our ‘Assign Shipping Types’ option instead.
Transportable By Air: Select ‘Yes’ if the goods being sent are dangerous but are permitted to be transported by air.
Dangerous Goods Declaration: If the goods being sent are dangerous and the transportable_by_air is selected ‘Yes’, then the DG Declaration becomes mandatory.
Label Configuration
> General Label Printing
Australia Post Branding: Choose whether the Australia Post branding should be included on the labels. If the admin is using purchased stationery from Australia Post, the generated labels should not include the branding. Default is ‘False’. Possible options are: “Yes” or “No”
Label Left Margin: Use this field to adjust the left margin of the page. Default is ‘0’.
Label Top Margin: Use this field to adjust the right margin of the page. Default is ‘0’.
Displayed Description in Label: Enter the description to be displayed in the label.
> Domestic Label Printing
Label Layout for Parcel Post: Label layout for Parcel Post specifies the number of labels per page and the size of the page. The layout must be valid for the product types of the items in the shipment. Valid Layouts are A4–4pp, A4–1pp, and Thermal–Label–A6–1pp.
Label Layout for Express Post: Label layout for Express Post specifies the number of labels per page and the size of the page. The layout must be valid for the product types of the items in the shipment. Valid Layouts are A4–1pp, A4–3pp, and Thermal–Label–A6–1pp.
> International Label Printing
Label Layout for International: The layout specifies the number of labels per page and the size of the page. The layout must be valid for the product types of the items in the shipment. Valid Layouts are A4-1pp A4-4pp Thermal-Label-A6-1pp.
Enable Commercial Value: Whether the item has commercial value (i.e. the goods are for resale). This is generated by the merchant and will be shown on the customers’ form and label. Possible options are:
Yes: On selecting ‘Yes’ admin needs to provide the description regarding the commercial value of the consignment in the ‘Enter Description’ field.
Enter Description: Enter the description to be displayed on the international label. [3]
No: On selecting ‘No’ admin needs to select the type of the consignment from the ‘Choose Classification Type for International Label Printing’ field.
Choose Classification Type for International Label Printing: This will be a dropdown list for selecting the type of consignment. Consignment types can be “Gift”, “Sample”, “Document”, or “Return”. [4]
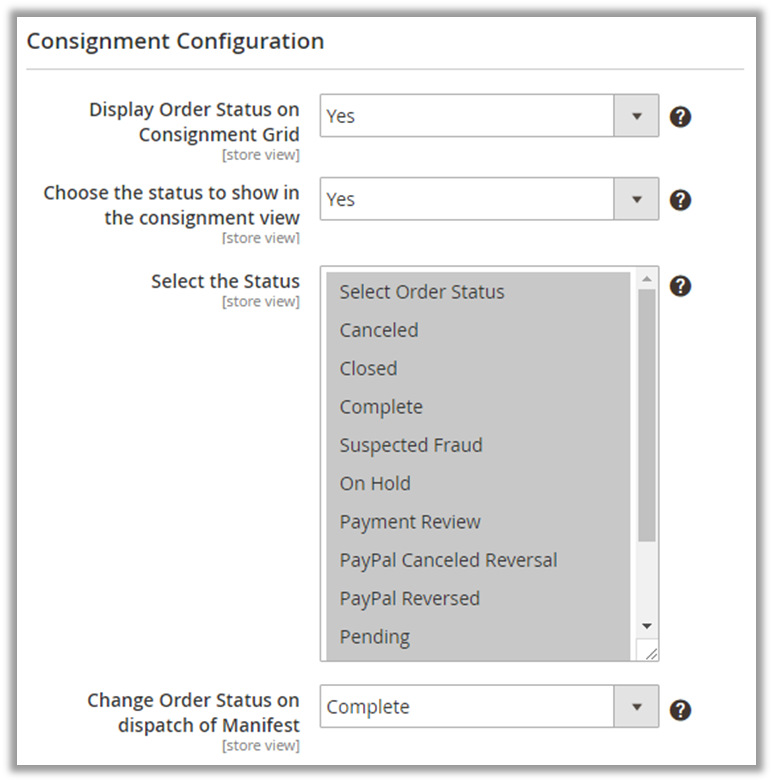
Consignment Configuration
Display Order Status on Consignment Grid: Set this option to ‘Yes’ to display the Magento order statuses for all the orders in the consignment view. Select: “Yes” or “No”.
Choose the status to show in the consignment view: By default, orders that have a status of ‘Pending’, ‘Processing’ or have an open consignment against them are displayed in the Consignment View. If you’d like to choose different order statuses to display in the Consignment View, set this option to ‘Yes’ Possible options are: “Yes” or “No”.
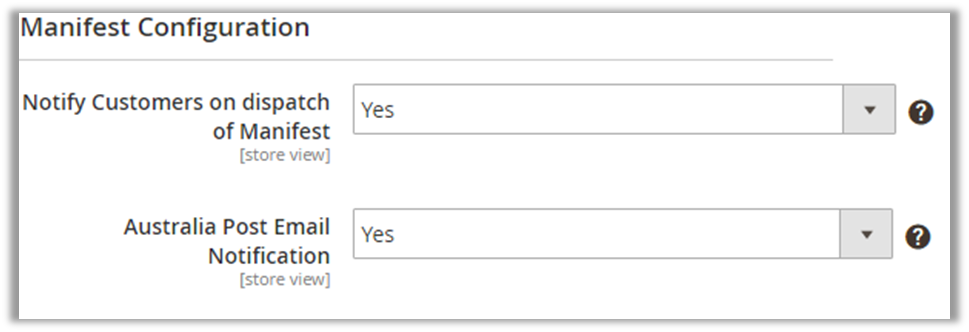
Manifest Configuration
Notify Customers on Dispatch of Manifest: Use this option to notify customers of tracking numbers when a manifest is dispatched. This default can be overridden when creating consignments. Possible options are: “Yes” or “No”.
Australia Post Email Notification: Default setting for using Australia Post’s email notification service on consignments. This default can be overridden when creating consignments. Possible options are: “Yes” or “No”.
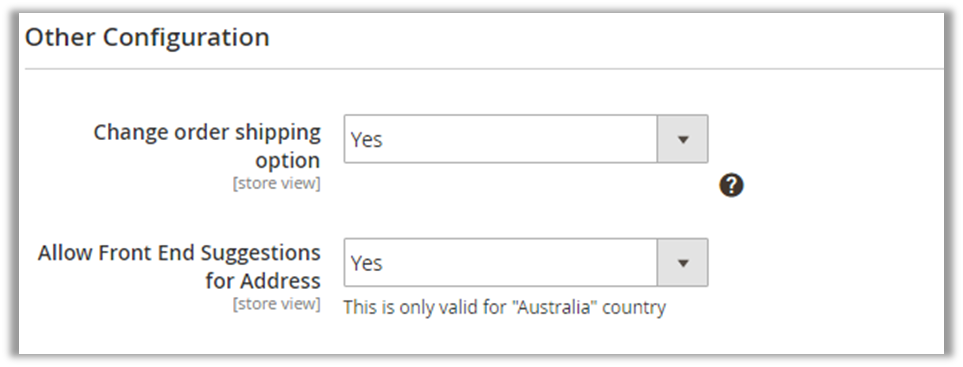
Other Configuration
Change order shipping option: Select this option to change the order’s current shipping option to other shipping options. Possible options are: “Yes” or “No”.
Allow Front End Suggestions for Address: It will allow admin to display the city suggestions on in checkout page and multi shipping address.
Handling Fees Configuration
Calculate Handling Fee: This option lets admin add additional cost on the top of the original shipping rates. It can be set to Fixed or Percentage.
Handling Fee: Enter the handling fee to be added to shipping charges. When the percentage option is selected, the amount entered in the “Handling Fee” will be considered as a percentage.
Australia Post Parcel Send
Consignment Management
First, the admin needs to ‘Create Shipment of Order’ manually.
For that, go to AUSTRALIA POST PARCEL SEND -> Consignment Management.
In this tab, the admin will get a list of consignments with the following details: [1]
Order #: The order Number of the Consignment.
Ship to Name: Customer name who has placed the order.
Status: Status of the consignment.
Consignment Weight (Kgs): Weight of the Consignment.
Order Weight (Kgs): Weight of the order
Is Valid Address? The address set by the customer for delivery is valid or not.
Consignment #: If the consignment for the order is already created then it’s number.
Shipping Method: The shipping method with which the order was generated.
Is Labels Created? Is the label for the consignment generated from the Parcel Send or not.
Is Labels Printed? If a label is generated, then it is printed or not.
Is Return Labels Printed? If a return order request is placed, then its return label is printed or not.
No. of Articles: Number of articles under this consignment.
Created On: Date of Consignment creation.
Modified On: Modification date of the consignment.
Click on Create Shipment of Order to generate Shipment Order. [1]
Submit Shipment
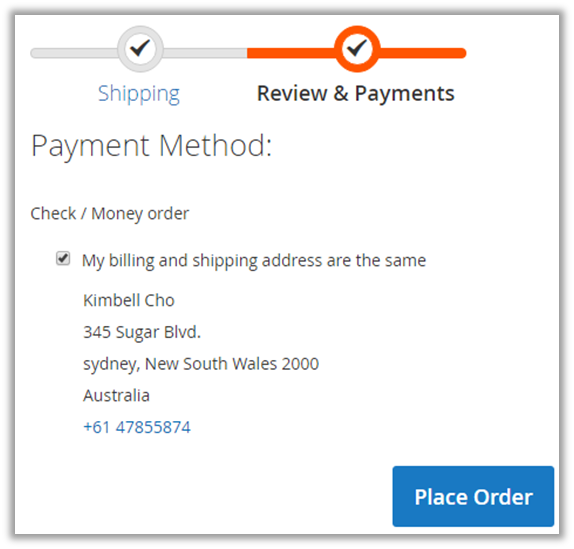
By clicking on Create Shipment of Order, the ‘Payment & Shipping Method’ page will be opened.
Here, the admin can edit the shipment details if required. Once everything is proper, click on Submit Shipment button to submit the shipment. [2]
Create Consignment
Once the shipment is created, Admin will be able to see the ‘Parcel Send Consignment’ tab for the order. In this tab, the admin can create a consignment for the order.
After selecting ‘Article Type’ and ‘Unit Value’, Admin can click on ‘Create Consignment’ to create a consignment for the order. [3]
Note: Article Type option will be displayed as per the Article Types created from the AUSTRALIA POST PARCEL SEND -> Article Types configuration.
For any specific consignment settings, the admin can change default consignment settings by clicking on change ‘Change Default consignment settings.’ Now click on the ‘Create Consignment’ button. [3]
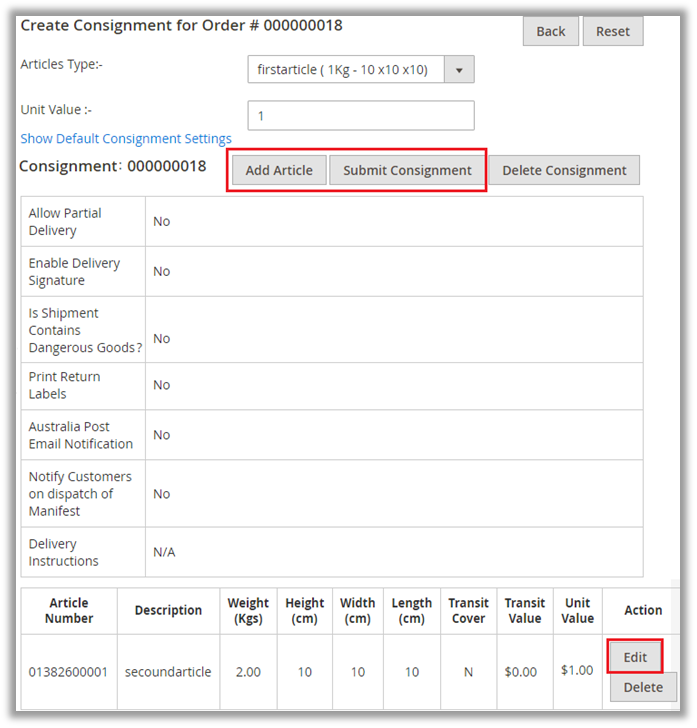
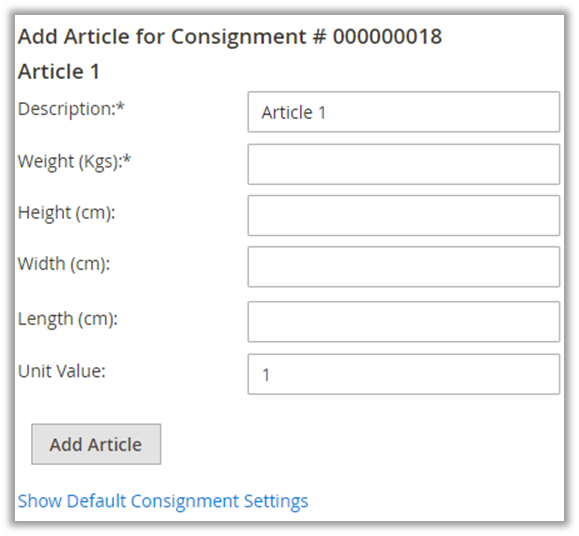
Now consignment is created. Admin can check all the details and edit if required. Admin can also add a custom article type. Click on Add Article button. [4]
While creating the consignment for the custom Article Type, the product attributes and dimensions (i.e. Length, Width, Height, and Weight) will be as per the default product attributes and dimensions if the values are empty.
If you want to edit the default values of attributes and dimensions, you can change them manually. Now, click on Submit Consignment and generate the label for the consignment. [5]
After checking all consignment details, Admin will be able to Submit Consignment to Parcel Send for getting the labels from ‘Parcel Send System’. [6]
Note:
The admin is facilitated with the option of updating the already created consignments and shipping addresses. Thereafter, they can submit the updated value again in Parcel Send and create the updated labels based on the updated value, and submit it again with the updated data.
One can update the consignment if it is neither submitted nor dispatched.
Manage Consignment
Once the shipment is generated (Consignment is submitted), the consignment number generated from the Australia Post will be displayed under the consignment column. [7]
To manage consignments, Go to: AUSTRALIA POST PARCEL SEND -> Consignment Management
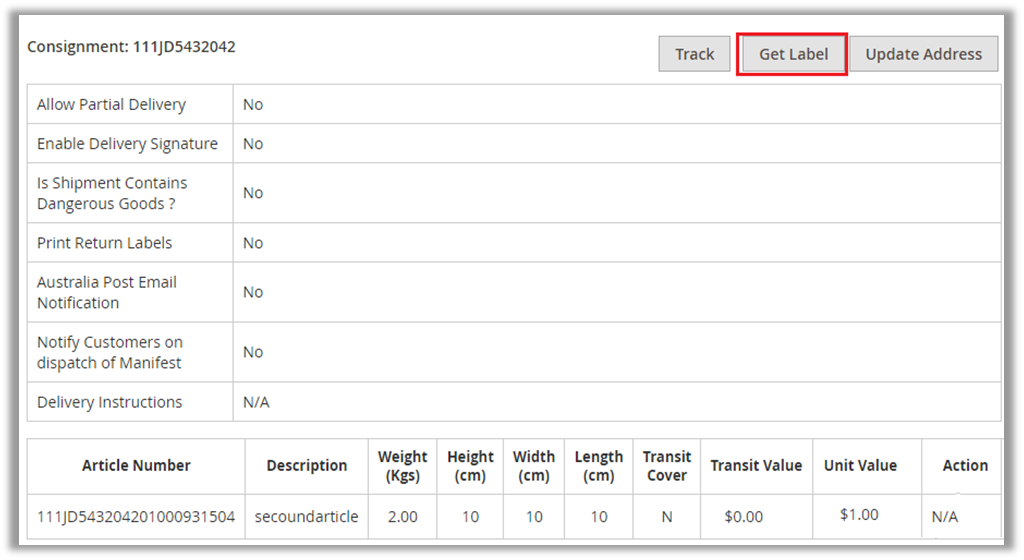
Get Label
When the consignment is submitted, Admin can generate the label. [8]
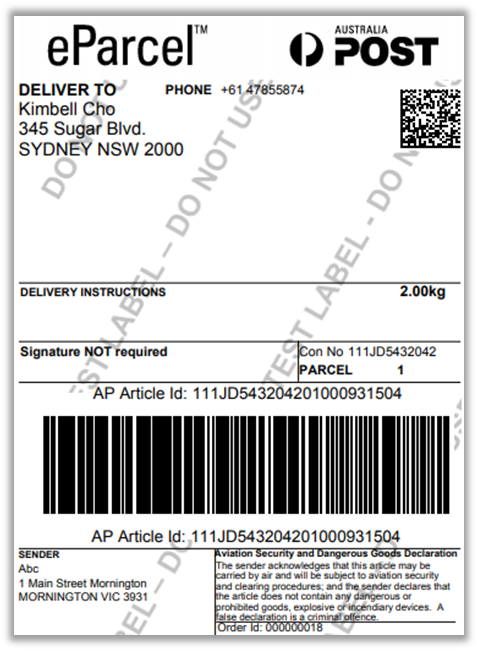
To generate the label, click on Get Label Admin will be able to print or download the labels and the labels will also be saved in the gateway for re-printing. [9]
Note: After generating the label and after downloading the label for the order, a ‘tick mark’ will appear under the ‘Is Label Created?’ column and ‘Is Label Printed?’ respectively for particular order. [10]
Add to Current Manifest
After generating and printing the labels, the admin can add the order to Manifest. Here the multiple orders can be added.
Admin should be able to add or remove the order to the manifest. Admin can add the order in the current manifest which was not dispatched.
For that, select multiple consignments and click on the ‘Actions’ dropdown. Admin will get the list of options, click on Add to Current Manifest option. [11]
After processing for seconds, the success message will be displayed. After adding consignment in the Manifest, a ‘tick mark’ will appear in the ‘Is Under Current Manifest?’ column. [12]
By clicking on the ‘Dispatch’ button, the admin can dispatch all the consignments of the current. [12] In the response, the admin will get the Manifest Summary report from Parcel Send. [13] Admin can check the Manifest’s Order Summary and the Manifest list from here. [14]
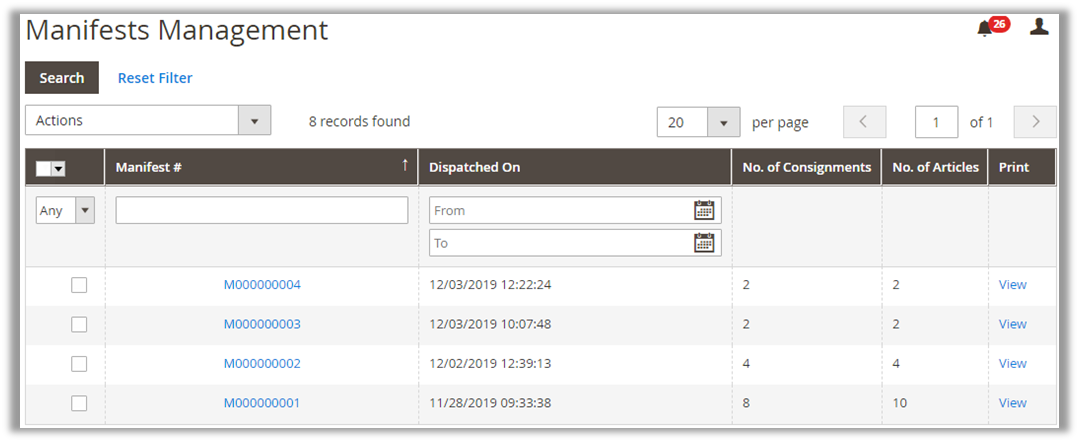
For a manifest summary, Go to AUSTRALIA POST PARCEL SEND -> Manifests Management option. Here the new Manifest is added and by clicking on the ‘View’ option, the admin can view its details and print it if needed. [15]
Mass Actions
From the Consignment Management, admin can easily perform the following “Mass Actions”:
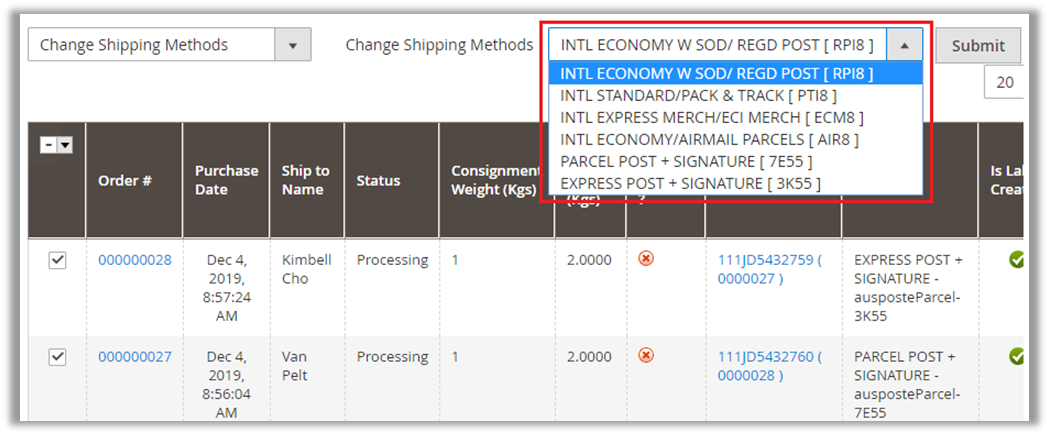
> Change Shipping Methods
Click on the ‘Action’ dropdown option, here the admin can find the ‘Change Shipping Methods’ option. Admin can assign similar shipping methods to selected multiple orders.
By selecting the ‘Change Shipping Methods’, the dropdown list of shipping methods will appear. Now select the required Shipping Methods and click on Submit button, the shipping methods will be changed.
> Mass Generate Shipments
When the Consignment is created, Admin will see a “Submit Consignment” button under the ‘Submit Consignment/Download Label’ column.
Using the Mass Generate Shipment option, the admin can select multiple orders and generate their combined shipment.
Admin will get the below message after generating the shipments.
> Mass Generate Labels
Using the Mass Generate Label option, Admin can generate a combined label for the selected orders based on the shipping method which was selected by the user at the time of inserting the shipment details and the label layout.
Admin will get the pdf of the combined label of the selected orders.
Note: To mass generate label you must install the library in your site root directory using the below command:
composer require clegginabox/pdf-merger:dev-master
> Remove from Current Manifest
Remove the consignment from the Current Manifest by clicking on the ‘Remove from Current Manifest’ option.
Note: Admin can remove the order from the Current Manifest only if the Consignment is not dispatched yet.
> Download Multiple Labels
Admin can download multiple Labels by selecting the orders in one pdf.
Manifest Management
Go to AUSTRALIA POST PARCEL SEND -> Manifests Management.
Admin can have a list of manifests that are associated with the store. Admin will be able to see Manifest Code along with Date of Manifest Dispatch, No. of Consignments in the manifest & No. of articles in it as well.
Admin can search the Manifests by inserting Manifest number or the Dispatch dates.
By clicking on any Manifest, the admin will be able to view manifest details along with Label & Tracking details for the consignments.
By clicking on the ‘View’ option, the pdf will open that Manifest.
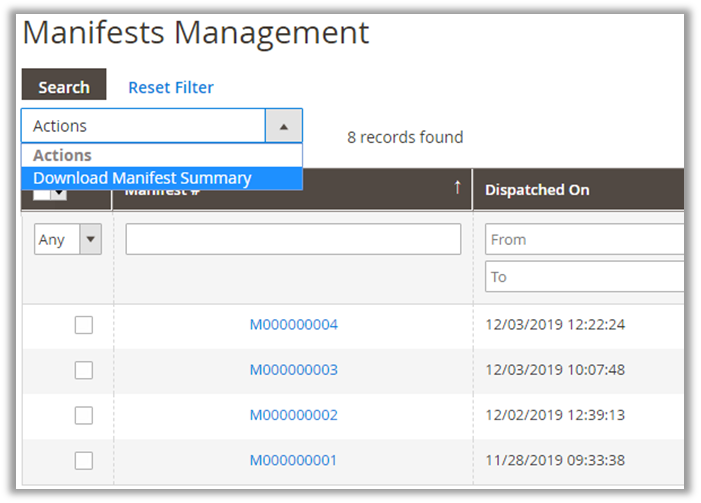
Admin can download the Manifest Summary from the list. By choosing the ‘Download Manifest Summary’ option from the ‘Actions’ dropdown list.
Article Type Management
Go to AUSTRALIA POST PARCEL SEND -> Article Types.
Now, a list of Article types that are created for the consignments can be viewed.
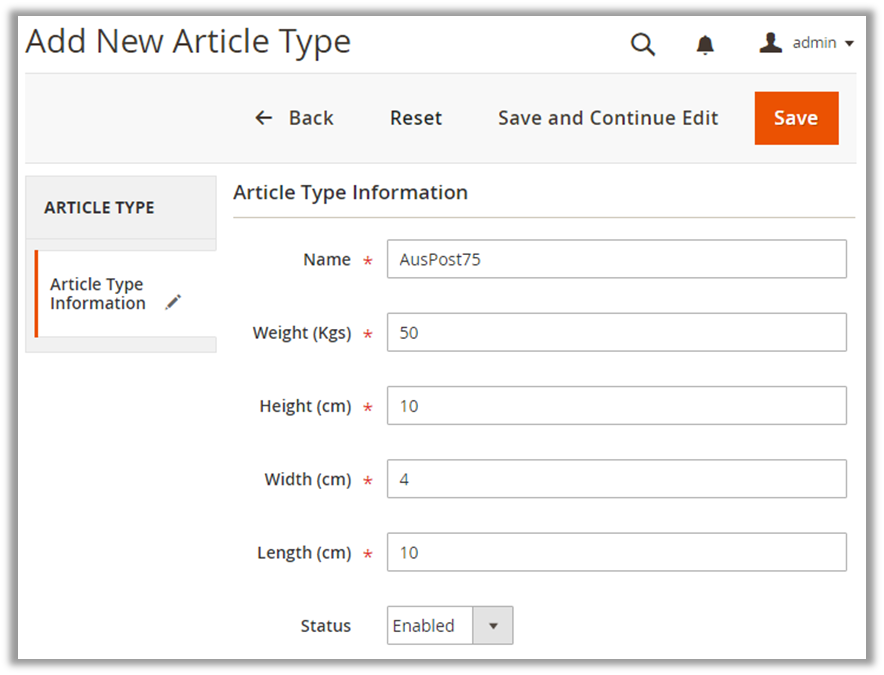
To add a new Article Type, click on ‘Add New Article Type’ Now enter the Article Type Name, Article Weight, Height, Width & Length along with the status of the Article Type.
Assign Shipping Types to Charge Codes
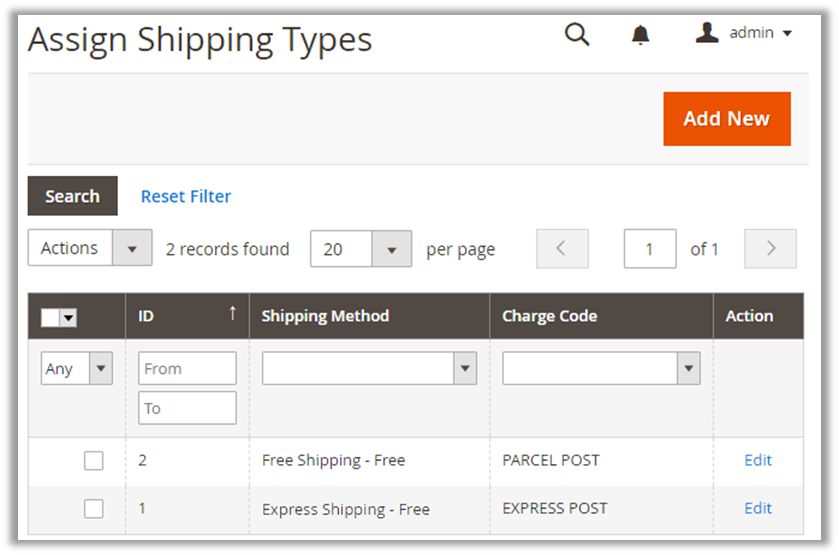
Go to AUSTRALIA POST PARCEL SEND -> Assign Shipping Types. Now a complete list of Shipping Type can be viewed. From this module, admin will be able to assign the Shipping Types.
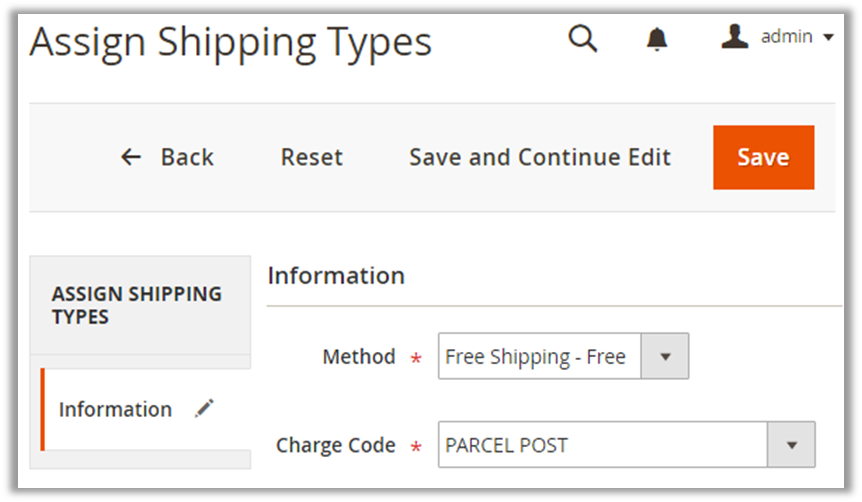
To add a new shipping type, click on ‘Add New’ By clicking on it admin will be redirected to the ‘Assign Shipping Types’ page from where Shipping method is to be selected and the Charge Code of the Shipping Type is to be selected. Lastly, click on ‘Save’ button to save the particular Shipping Type.
Points to Note
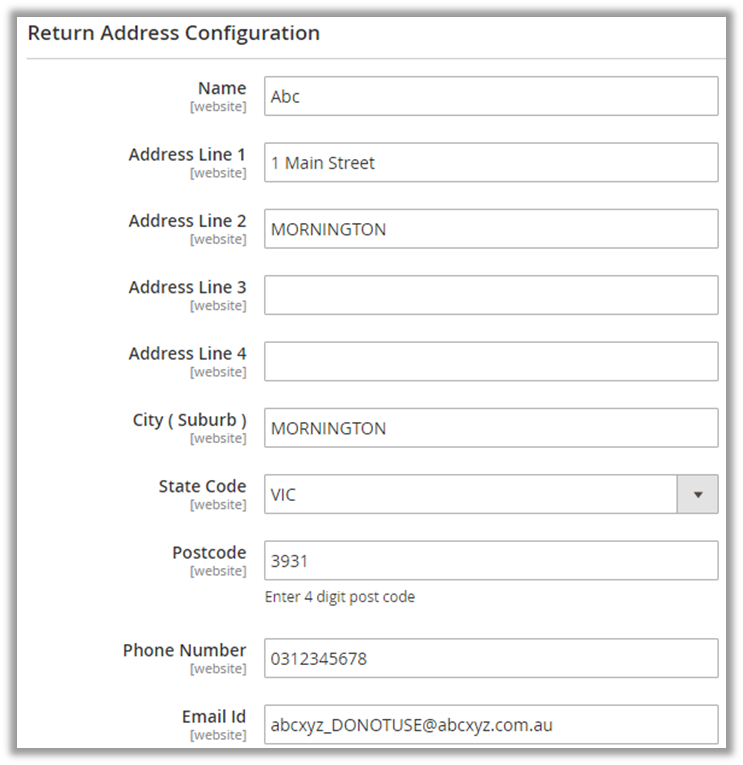
Configuration settings like address, API Key Username and Password must be valid as per Parcel Send Account.
Submit consignment to Parcel Send system after verifying all the consignments details
To get contract rates, required services must be enabled in Merchant’s Australia Post Business Account.
We will be using an intermediate database on our server to store the necessary details.
Contact Us
We simplify your business, offer unique business solution in digital web and IT landscapes.
Live Chat
Get instant support with our Live Chat.
Visit our product page at: https://www.appjetty.com/magento2-australia-post-parcel-send.htm and click on the Live Chat button for instant support.
Tickets
Raise tickets for your specific question!
Send an email to [email protected] or you can login to your account @ www.appjetty.com and click on My Support Tickets on your account dashboard, to get answers to your specific questions.
Customization:
If you would like to customize or discuss about additional feature for Australia Post Parcel Send, please write to [email protected]

![[1] General Label Printing](https://docs.appjetty.com/wp-content/uploads/2021/06/image015-7.png)
![[2] Domestic Label Printing](https://docs.appjetty.com/wp-content/uploads/2021/06/image016-7.png)
![[3] International Label Printing](https://docs.appjetty.com/wp-content/uploads/2021/06/image017-7.png)
![[4] International Label Printing (Thermal)](https://docs.appjetty.com/wp-content/uploads/2021/06/image018-7.png)



![[2] Shipping Method (Submit Shipment)](https://docs.appjetty.com/wp-content/uploads/2021/06/image026-4.png)
![[3] Shipment Created](https://docs.appjetty.com/wp-content/uploads/2021/06/image027-4.png)




![[12] Current Manifest & Dispatch](https://docs.appjetty.com/wp-content/uploads/2021/06/image036-3.png)
![[13] Manifest Summary Downloaded](https://docs.appjetty.com/wp-content/uploads/2021/06/image037-3.png)
![[14] Manifest Summary](https://docs.appjetty.com/wp-content/uploads/2021/06/image038-4.png)
![[15] New Manifest](https://docs.appjetty.com/wp-content/uploads/2021/06/image039-3.png)

![[3] Mass Generate Labels](https://docs.appjetty.com/wp-content/uploads/2021/06/image042-3.png)
![[4] Shipment Generated](https://docs.appjetty.com/wp-content/uploads/2021/06/image043-3.png)
![[5] Mass Generate Labels](https://docs.appjetty.com/wp-content/uploads/2021/06/image044-3.png)
![[6] Combined Labels](https://docs.appjetty.com/wp-content/uploads/2021/06/image045-3.png)
![[7] Remove from Current Manifest](https://docs.appjetty.com/wp-content/uploads/2021/06/image046-3.png)
![[8] Download Multiple Labels](https://docs.appjetty.com/wp-content/uploads/2021/06/image047-3.png)
