M2_MageMob App Builder
Version: 1.1.0
Compatibility:
Magento Enterprise Edition:
2.2.* to 2.4.*
Magento Community Edition:
2.0.* to 2.4.*
Device Compatibility:
Android: 5 Lollipop and above
iOS: iOS 12.0 and above
About MageMob App Builder
Introduction
AppJetty offers a mobility solution to your users in the form of MageMob Mobile App Builder and helps them to access your store and place orders through their mobile on the go.
You must have extension for store owners, which allows their customers to place orders from their mobile. It is easy to download and quite user-friendly for your customers. Your customers can view your store and entire features on their mobile and place orders anytime from anywhere the search.
Benefits of MageMob App Builder
Allows your customers to carry your store with them anywhere.
Extremely user-friendly, simple to manage by the merchants and easy to navigate by the end users.
Increases customers outreach due to mobility and uniqueness of smart phone.
Increases the overall bottom line of the business, benefiting the store owners.
More satisfied customers due to store accessibility from iPhone and Android smart phones.
Improves customer satisfaction and enhances online visibility of your business.
Offline Synchronization for Add To Cart products
Add-ons: Compatible with AppJetty’s Zipcode Validator and Delivery Date Scheduler
Installation & Activation
You need to configure the following installation steps and then you will require the activation.
Installation Steps
Manual Installation (Installing Magento 2 extension by copying code)
Step 1:
For Windows OS:
Go to <your Magento install dir>/app/code. Under that, create the folders using the following hierarchy:
Biztech
– Magemobcart
For Linux OS:
Enter the following commands keeping their order:
cd <your Magento install dir>/app/code mkdir -p Biztech/ Magemobcart
After this, find the Download Zip and extract all files and folders in Biztech/ Magemobcart
Step 2:
After the successful installation, you have to run the command on the Magento2 root directory- “php bin/magento setup: upgrade” and “php bin/magento setup:di:compile”
If you see blank page or permission error, go to Terminal (Linux)/ Command Prompt (Windows) and run the following command:
cd [magento root directory] [var]
run the following command
$ chmod –R 777 *
Step 3:
After running the command, log into the admin panel and clear the Cache.
Go to SYSTEM -> Tools (section) -> CACHE MANAGEMENT to clear the cache. [1]
Step 4:
After successful installation, you can see the ‘MageMob Mobile App Builder’ under the ‘APPJETTY’ tab inside STORES -> Configuration. [2]
You can also see MageMob Mobile App Builder in the drawer menu. [3]
Magento Backend Configuration
You need to configure the activation keys and different setups for the MageMob App Builder.
Extension Activation & Other Configuration
By clicking on Manage Configuration, you can activate the extension, set general configuration, and insert the Notification key for Android/iOS users.
Copy an activation key
Copy the activation key from the Order Confirmation Mail. OR
Log into your account at www.appjetty.com using the email and password you have provided at the checkout process.
Go to Downloadable Options and copy the activation key for the App Builder extension.
Activate the extension
Log into Magento Admin Panel. Navigate to the MAGEMOB APP BUILDER → Manage Configuration to configure the MageMob App Builder app settings. You can also reach out to the MageMob App Builder configuration by navigating STORES -> CONFIGURATION -> APPJETTY -> MageMob App Builder. [1]
You need to insert the activation key in the “Activation Key” for the App Builder extension and then click on the Save Config button. [2]
Select Store
When you enter and save the key it will be verified, and you can select the store where you need to use the App Builder extension. Click the Save Config button after making your selections. [2]
Now, MageMob Mobile App Builder Extension got activated.
MageMob App Builder Configuration
Now, after activating the extension, you must set other configurations. [3]
General Configurations
Enabled: Select Yes to enable the MageMob Mobile App Builder extension. The extension is disabled by default.
Search with Barcode: Select Yes to let your customers search products with barcodes.
Allowed CMS Pages For Mobile: Select the CMS page to display in the App.
Bottom Navigation
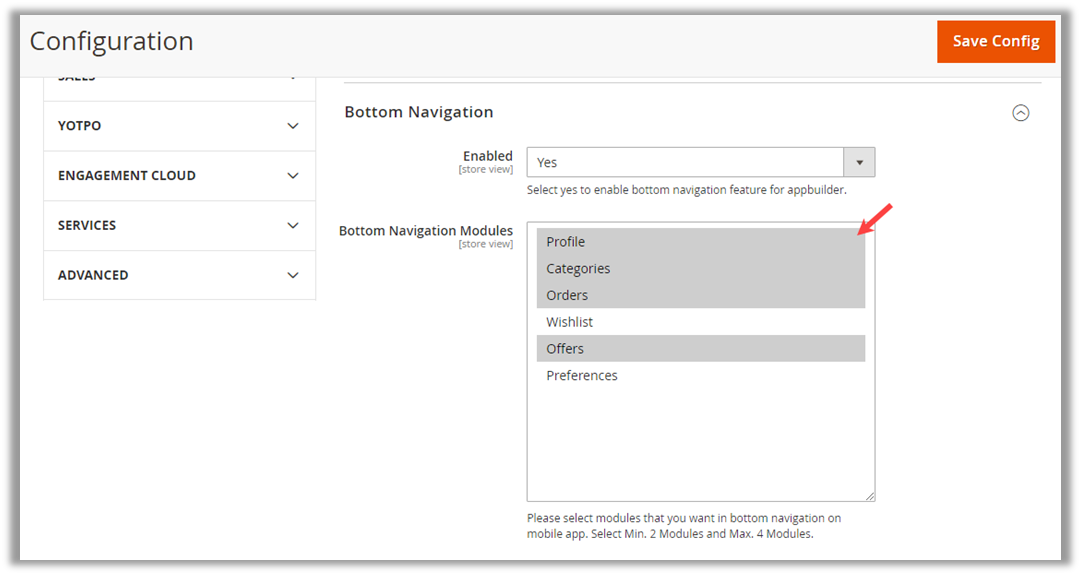
You can customize the bottom navigation feature for the App Builder. To enable the bottom navigation, you need to select Yes.
By selecting ‘Yes’, you will see the list of the “Bottom Navigation Modules”. You can select a minimum of 2 modules and a maximum of 4 modules from the list. The ‘Home page’ icon can’t be removed from the app.
Order Notification
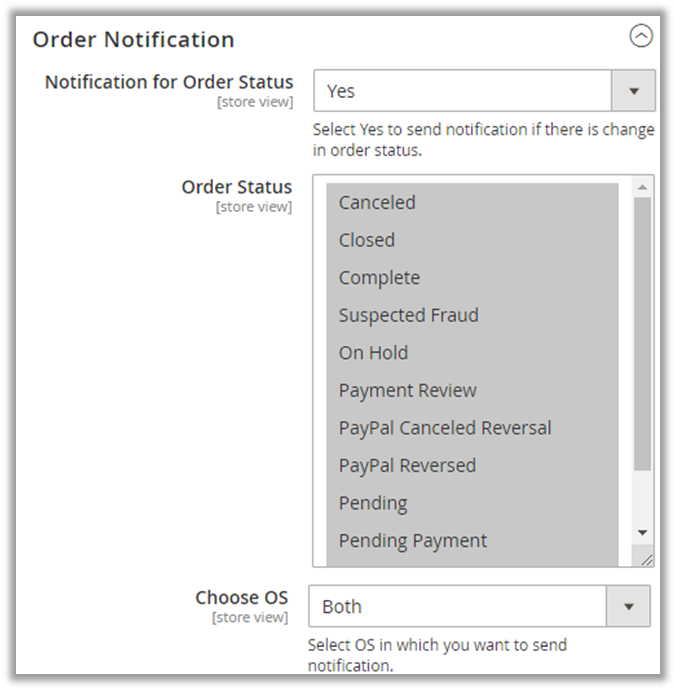
Notification for Order Status: Select ‘Yes’ to enable the notification for change in order status to be send to your customers.
Order Status: Select the status of order for which you would like to send the notification to your customers.
Choose OS: Select the OS from ‘Android’, ‘iOS’ or ‘Both’ for which you want to enable the notification module.
Theme Selection
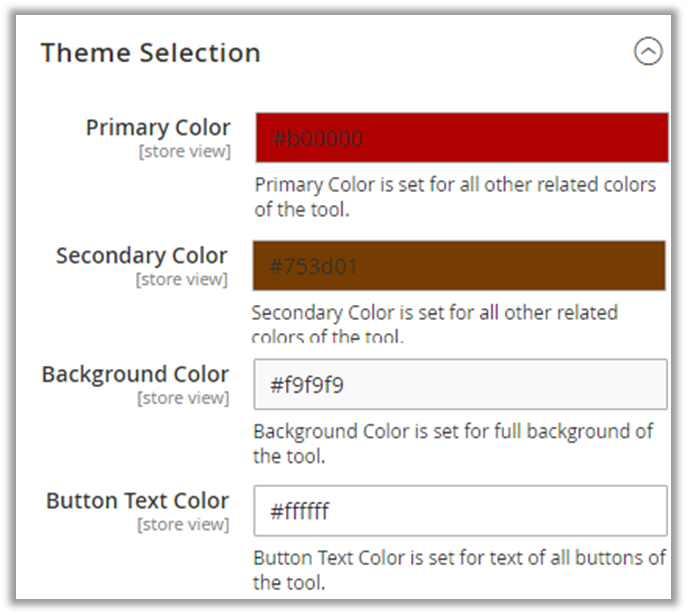
Theme Selection: You can set look and feel of your MageMob application.
Primary Color: This will be the base color of the application.
Secondary Color: This will be the background color of all buttons.
Background Color: This will be the background color of the application.
Button Text Color: This will be the text color of buttons throughout the app.
App Settings
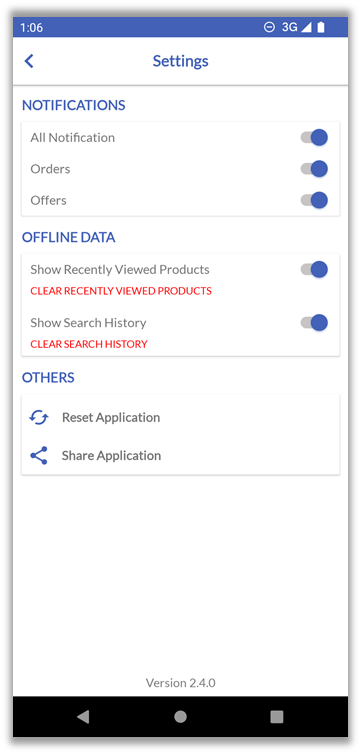
Users can manage various settings for the Magneto 2 store mobile application by clicking on Settings.
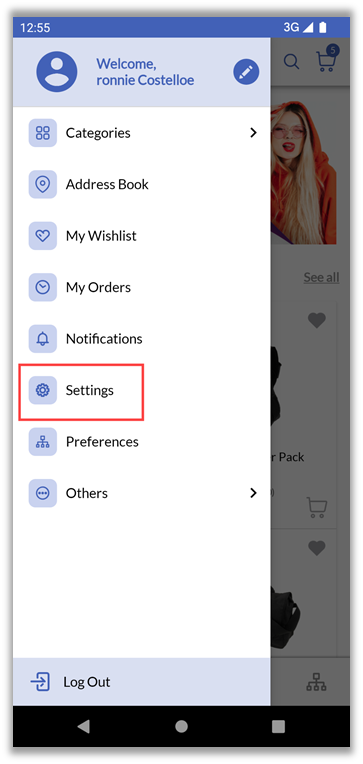
From the Settings page, the user can manage the following things: (Left screenshot)
Notifications: They can Enable/Disable the notification preferences based on which notification they want to get.
Note: Enable/Disable the notification appearance only available in Android App. While iOS does not allow to enable/disable the specific notifications. In iOS, we can disable all /enable all notifications.
Select Store: They can switch between multiple stores by tapping the ‘Store View’ dropdown icon.
Offline Data: Users will have the option to manage the following Offline Data:
Show Recently Viewed Products: Enable the ‘Recently View Products’ list and Clear it
Show Search History: Enable ‘Search History’ and Clear Search History.
Reset Application: It will clear the cache memory, remove the permission from the app and make it new installed.
Share this Application: Share the Application link to another user.
Notifications
You can check and manage the following “Notification” details:
– Notification History
– Notifications
– Abandoned Cart Notifications
Manage Notification History
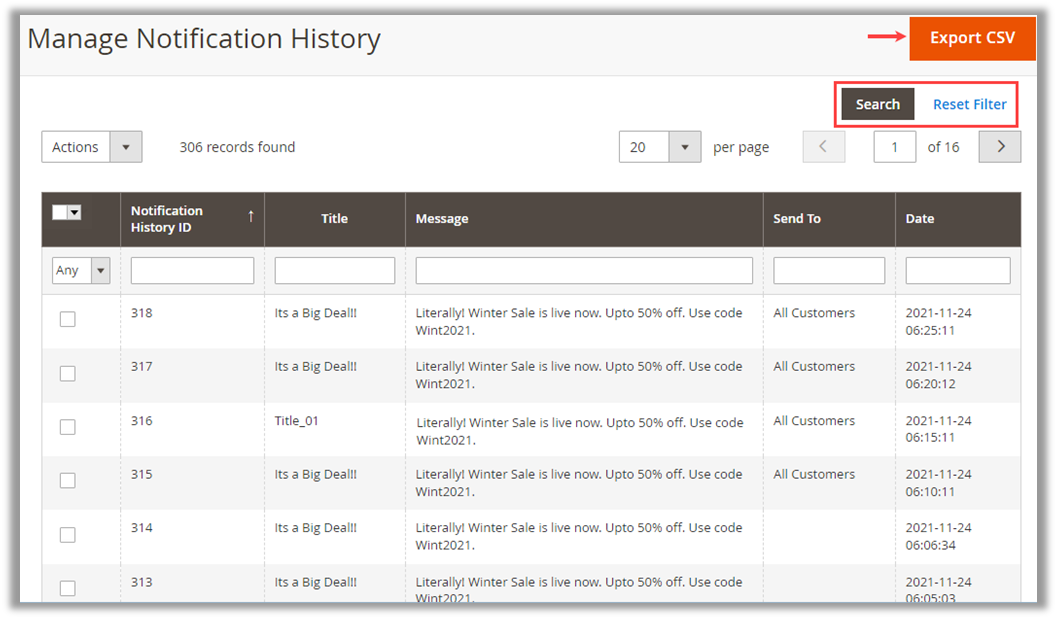
By clicking on Manage Notification History, you will navigate to the list of the notifications and check the notification that is sent.
Here, you will see the notification history in the grid view. You will see the details like Notification History ID, Title of the notification, Message, Send To (customer details), and Date with Time in tabular format.
You can search the specific notification history from the search options by inserting the text captions individually. You can also export all the records of notification history into a CSV file.
You can delete any notification by selecting the individual record or by making multiple selections of the records from the “Action”’ drop-down.
Manage Notification
You can add and manage the notifications by navigating to the MageMob App Builder → Manage Notification. You can make your customers aware of the special offers, discounts, upcoming products, etc. by sending these notifications. [1]
By clicking on Manage Notification, you will see the list of notifications in the grid view which are already created. You will see the details like ID, Title of the notification, Send Message To, Is Sent?, and Action options in the tabular format.
By clicking on Create Notification, you will be redirected to the “Add Notification” page to add a new notification as per the offers. [1]
You need to configure the following fields and options to create the notification: [2]
Notification Title: Insert the title to be displayed for notification. You (admin) can add the emojis in the title as well.
Choose File: To add an image for notification, click on the “Choose File” button and select the image which you want to upload.
Status: Select the status whether to be Enabled or Disabled.
Type: Select the type for which you want to send the notification. There are 3-types: [2]
Category: Select a “Category” for which you want to send a notification. [3]
Note: You will get the Category list as per the Catalog -> Categories.
Product: Select a particular “Product” for which you want to send a notification. [4]
Offer: Select an Offer and insert a URL. [5]
URL: After selecting Offer type, you need to provide a URL for notification to redirect users to that page that has notification details.
Send Message To: You can send notifications to “All Customers”, “Specific Customers”, or the specific “Customer Groups”. [6]
All Customers: If you select the “All Customers”, the notification will be sent to all the customers at the same time.
Specific Customers: If you select the “Specific Customer”, you need to select the specific customers from the list. The notification will be sent to only the selected customers (App logged-in customers) at the same time. [7]
Customer Groups: If you select the “Customer Group”, you need to select the specific customer group from the list. The notification will be sent to only the selected customer group(s) at the same time (App logged-in customers). [8]
Notification Message: Insert the relevant message about offers/discounts. You (admin) can add emojis to the message as well.
Choose OS: Select the OS from “Android”, “iOS” or “Both” for which you want to enable the notification. [9]
Schedule Notification
You can schedule the notification to send it to the app users at a specific time duration. You need to enable the “Schedule Status”. Once you enable the status, you will see the “Schedule Type” option. You can schedule One Time or Recurring notifications. [1]
One Time:
If you want to send the notification only for one time, you need to select the One Time from the Schedule Type drop-down. If All Customers are selected in the “Send Message To” drop-down, the notification will be sent to all the users (logged-in or non logged-in).
By selecting the ‘one time’, you need to schedule the date & time to send the notification on the specific time duration.
By clicking on the ‘calendar’ icon of the Schedule Date, you will see the calendar with the Month & Year on the header and Time (Hour & minute) below the dates. You can click on the Go Today button if you want to send the notification today only. [2]
Once you select the date & times and click on the Save & Send button, the app users will get the notification on their device as per the schedule.
Recurring:
If you want to send the notification multiple times, select the Recurring in the “Schedule Type” drop-down. You need to configure the following options: [3]
Recurring Type: You can send the notification day-wise or month-wise as per your requirement.
Once you select the “Recurring Type”, you need to select the dates. [4]
Schedule Start Date: From when you need to start to send the notification.
Schedule End Date: When you need to stop to send the notification.
If the “Recurring Type” is Day, the app users will get the notification on time of each day interval which is selected on schedule start date-time values. If the “Recurring Type” is Month, app users will get the notification on the date and time of each month interval which is selected on schedule start date-time values.
Once you have configured the Notification and inserted the required details, click on the Save & Send button to send the notification on the specified date & time. [5]
Once you click on the “Save & Send” button, the notification record will be listed. Users will get the notification on their app based on the Notification configuration in this section.
You can Export all the notification details into CSV and XML files by clicking on the Export CSV and Export XML respectively. [6]
You can search and filter the notifications. You can search the notification by inserting the text captions individually.
If you want to change or modify the notification details, then click on the Edit button. If the notification is already sent, you will get the Resend button to send the notification again as per requirement. You can send/resend the notification manually as per need. [7]
You can delete any unwanted notification. For that, you need to select that notification and click on the ‘delete’ option from the ‘Action’ drop-down. [8]
Manage Abandoned Cart Notification
You can remind the customers about the products that are added to the cart but are still pending checkout. By navigating to MageMob App Builder → Manage Abandoned Cart Notification, you will be redirected to the list page.
You will see the list of abandoned cart notifications in the grid view which are already created. You will see the details like ID, Title of the notification, Message detail, Status, Time Interval, and Action options in the tabular format. [1]
By clicking on the Create Notification button, you can create a new notification for the abandoned carts. [1]
You will be redirected to the “Add Abandoned Cart Notification” page to configure the details of the notification. You need to configure the following fields and details: [2]
Abandoned Cart Notification Title: Insert the title to be displayed for the abandoned cart notification.
Abandoned Cart Notification Title For Multiple Items: Insert the title to be displayed when the users have multiple items in their cart.
For both types of notification titles, you can insert the dynamic variable for category and product so that the customers will get the category/product name in the notification. You can also add emojis for both titles.
Notification Message: Insert the relevant message about offers/discounts. You (/admin) can add emojis to the message as well.
Choose File: To add an image for notification, click on the ‘Choose File’ button and select the image which you want to upload.
Status: Select the status whether to be Enabled or Disabled.
Time Interval (Hours): Set the time interval to send the abandoned cart notification.
For example, if you have inserted a time interval of 4 hours, the abandoned cart notification will be sent to the customer whose cart is abandoned and still pending checkout for more than 4 hours.
How you send notification?: If you want to send the notification repetitively until the abandoned cart is cleared, you must select either Once for sending the notification or Repeat for sending the notification repetitively.
After configuring the abandoned cart, you need to click on the Save button to save the notification for the abandoned cart. You will see the newly added abandoned cart notification in the list.
You can change the “Status” of the notification and delete any unwanted notification from the list. [3]
First, you need to select the specific notification, and then from the ‘Action’ drop-down, you can delete the notification and change the status of the notification.
You can also select multiple notifications to perform such actions (Delete & Change Status). [4]
Manage Home Page Layout
Admin can showcase the products on the App’s dashboard by configuring various blocks from Magento Backend. Go to MageMob App Builder -> Manage Home Page Layout. You can manage and Add a new Layout.
By clicking on ‘Manage Home Page Layout’, you will see already added layouts in the list view. You will see the details like Layout ID, Layout Name, Store Name, and Action option in tabular format.
You can manage home pages based on your store views.
Note: At a time only one layout can be activated for one store view.
Add Layout
You can add a new layout as per your need by clicking on Add Layout button (top-right corner) from the listing page. You will be redirected to the Add Layout page where you need to insert the following details:
Layout Title: Enter the Layout title.
Store Views: Select the Store that you want to display the layout in.
Apply This Layout: By ticking this checkbox, this layout will be applied.
After inserting all the details, click on the Save Layout button. As you click on it, the Layout will be displayed in the list of Home Page Layouts.
Already applied Layout will be displayed in Active Layout status. By clicking on Apply as default button, the App’s Home page will be displayed based on that Layout.
Edit Layout
By clicking on the Edit button of any Layout, you will be redirected to the “Edit Layout” page with different blocks displayed on the left side:
> Featured Categories
> Products Grid
> Products Horizontal Slider
> Banner Offer Slider
> Countdown Timer Banner
> Recently Accessed Products
There are 6 blocks provided to set the layout of the app. You can add any block by clicking on the Plus icon.
Note:
You can add only one block for “Recently Accessed Products” but, you can add unlimited blocks for other blocks in layout to display on the app’s home page.
Being an Admin, you will have full control to manage and customize the homepage.
By clicking on the ‘Edit’ icon, you can edit the Layouts and by clicking on the ‘Remove’ icon, you can remove the Layout.
Featured Categories
You can select the N-Number of products in the Featured Categories block on the Home Page layout of the app.
Blocks will be horizontally slidable. [1]
By clicking on ‘Edit’ icon, a popup window will open named Edit Featured Category Block. [2]
Here you can add and manage the category blocks as per your need.
As per the configuration in the Edited Featured Category Block, the horizontal slider of the ‘Featured categories’ will display in the home page layout of the Mobile app.
You can Add / Edit the following fields for the Featured Category Block: [3]
Select Display Type: Select the Category image display. There are two options: Square and Circle.
Featured Category Block Title: Inset the name of the Title to display in the home page layout of the app.
Add New Featured Category: By clicking on the Add New Featured Category button, the Featured category-related options will appear. [3]
Now, add the category details and select the category: [4]
Category Title: Insert Category Title.
Select Image Type: Upload from the local drive or insert URL of an image to display.
Status: Select the status, ‘Enabled’ or ‘Disabled’.
Select Category: Select the category for which you want to display the block.
Sort Order: Insert the position of the category to display in the slider.
Note: Categories will appear in the drop-down option as per the configured from Catalog -> Categories. [5]
After inserting the information, click on the Save button to save the details. The record will be displayed on the Featured Category list. [6]
Products Grid
You can display the products in grid view by selecting the products from Magento Backend. You must select a minimum of 4 products to display in Product Grid. [1]
You can select the N-Number of products for the Product Grid. More buttons will be displayed to check more products from the Product Grid in-app. By clicking on the ‘Edit’ icon, a popup window will open named Edit Product Grid. [2]
Here, you can insert the details regarding Product Grid and select the images which you want to display on Product Grid in App. [2]
Component Title: Add a relevant title that will be displayed above the product grid block in the app.
Select Product Type: You will have two options to choose products to be displayed:
From a Category :
As you select From a Category, you must select the Category from the ‘Select Category’ dropdown and select products based on the selected category. [3]
Custom Products:
By selecting this option, you will have a whole list of products and from that list, select the products which you want to display under the product grid in-app. [4]
By clicking on the Save button, product selection will be saved and displayed in the application.
Product Horizontal Slider
Configuring from the Magento backend, you can display the products which are Bestseller, New arrival, and many other products in horizontal view in the app.
By clicking on the ‘Edit’ icon, a popup window will open named Edit Product Horizontal Slider. Insert the details which you want to display in the app:
Component Title: Insert the name of Product Horizontal Slider.
Select Product Type: Select the required Product Type. You will have the option to choose products based on your need.
Best Seller Products: Bestselling products based on the sales will be displayed.
New Products: Newly arrived products will be displayed. You can display new products based on category wise and default.
From a Category: Products will be displayed based on the selected categories from the backend.
Custom Products: As you select the ‘Custom Products’, you will get the list of the products.
By clicking on Save Button, product selection will be saved and displayed in the application.
Banners Slider
You can display the Banners of the new collections or product discount Offers on the home page of app. By clicking on the ‘Edit’ icon, a popup window will open named Edit Banner Slider. [1]
If banners are already created, you will get the list of Banners with the details in the end. You can edit/delete those banners as per your need.
Insert and select the following details to display the Banners/Offers in the app: [2]
Banner Title: Insert relevant title related to Banner or Offer.
Select Image Type: Select URL of image or Upload from the local drive.
Status: Enable/Disable the Banner slider.
Type: You will have three type to manage the content of banners:
Category: If you select the Category, the app user will be redirected to the product listing page based on the selected category here. [3]
Product: If you select the Product, app user will be redirected to the Product detail page based on Product selection here. [4]
Offer: The user will be redirected to the browser view in the app as per inserted URL. [5]
After inserting and selecting the details, click on the Save button. You will get the slider in the app.
Countdown Timer
You can add a block (banner) with the countdown timer view. To display the countdown timer in the banner, you need to configure the timer banner. [1] By clicking on the ‘edit’ icon, you will get the popup of “Edit Countdown Timer Banner”. [2]
You will see the list of existing countdown timer banners with configured details. You can edit/delete the banner as per your requirement.
To add a new countdown timer banner, click on the Add New Countdown Timer Banner button. By clicking on it, you will see the fields for the countdown timer to configure.
Banner Title: Insert the relevant name of the title for the timer banner i.e. few hours left, just a matter of time, etc.
Select Image Type: You will have three options to select the image. [3]
If you select the URL from the drop-down, you need to insert the web link (image URL) to get the image. If you select the Upload from the drop-down, you need to upload the image from your system (local drive).
If you select the None, the timer banner will be displayed without any image. Also, if you select the “None”, there will not be any position alignment configuration.
Status: Select the status, ‘Enabled’ or ‘Disabled’. You can enable only one banner at a time.
Select Redirect Type: You will have three different options to choose products to display. [4]
Category: If you select the Category, the customers will be redirected to the product listing page based on the selected category here. [5]
Product: If you select the Product, the app user will be redirected to the product detail page based on Product selection here. [6]
Offer: The user will be redirected to the browser view in the app as per inserted URL. [7]
Offer Link: Insert the URL to redirect the users.
Countdown Start Time: Select the date & time from the calendar when you start the countdown timer banner to be displayed in the app. By clicking on the ‘calendar’ icon, the calendar will appear. [8]
You can select the month and year from the header. You can see the slider to set the time on which you want to start displaying the timer banner. By clicking on the “Now” button, it will take the current time. When the date & time are selected, click on the “Done” button.
Countdown Time Validity: Similar to ‘Countdown Start Date’, you need to select the date and time when you want to disable the countdown timer from the app.
Timer Style: You can select the timer appearance by selecting the style as Simple or as Block. [9]
If you select “Simple”, the customers will see the default timer view in the app. But, if you select the “Block”, you need to select the Block Style either as “Circle” or “Square”.
Timer Background Color: You can customize the background of the timer that will be displayed in the app. By clicking on the edit box, you will get the custom color picker tool to choose the color for the timer background as per your store’s theme. [10]
Timer Text Color: You can customize the text color of the timer (digits) that will be displayed in the app. By clicking on the edit box, you will get the custom color picker tool to choose the color for the text as per your store’s theme.
Timer Position Alignment: You can set the position of the timer in the banner. If you have disabled this option, the customers will see the default position of the timer banner. [11]
Timer Position Alignment Type: You can select any position among the total of 9 different positions from the drop-down.
Disable existing enabled banner: By ticking the checkbox, you can disable the existing enabled banner.
Now, after configuring the countdown timer banner, you need to click on the Save button to save the banner. If you want to continue to add a new banner, you can click on the Save & Add New button.
Recently Accessed Products
You can add a block of Recently Accessed Products in the Home Page layout. It will display the last 20 products in a horizontal slider view.
Manage Offers
You can display ongoing and exciting offers to customers in the mobile app. You can create offer banners by navigating to the Mage Mob App Builder → Manage Offers.
You will be redirected to the list of the offers where you can see the details like ID, Title, Offer Thumbnail, Status, Sort Order, and Action in tabular format.
You can edit the existing offer if you want to make any changes to it. You can add a new offer as per requirement.
By clicking on the New Offer, you will be redirected to the “New Offer” page where you need to configure the following details for the Offer:
Offer Title: Insert the relevant name of the offer that will be displayed as the offer title.
Store Views: Select the store(s) on which you want to display the offer.
Choose File: Upload any designed image file to display the offer.
Status: Enable/Disable the status as per requirement.
Type: Select the redirection when the users press on the banner from the mobile app. You will have three types for offer banner redirection:
Category: Select the specific category from the ‘Choose Category’ drop-down list for the offer. The users will get redirection to the product listing page of that category when they click on the offer banner.
Product: Select the specific product from the ‘Choose Product’ drop-down list for the offer. The users will get the redirection to the product detail page when they click on the offer banner.
Offer: Insert the URL for the offer and the users will get redirection to the web view (In-app browser view) where the URL will be loaded when the users click on the offer banner.
Sort Order: Insert the position (number) of the category to display on the Offers page in the mobile app.
After configuring the details, click on the Save button to save the offer banner.
Note: To enable the ‘Offers’ tab and display the offer banners in the mobile app, you must select the Offers at Bottom Navigation configuration from the “Manage Configuration” (Store-level configuration).
If you have selected the Offers module from the “Bottom Navigation Modules”, only then the users will see the “Offers” tab and different offers based on the Store selection from the offers configuration page.
Mobile App (Frontend View)
Magento 2 MageMob Mobile App Builder is a mobile app extension that helps you to build a custom mobile app for your Magento 2 Store easily and quickly. Apps built with MageMob Mobile App Builder are optimized for both Android and iOS platforms and mobile responsive also.
After configuring the MageMob App Builder from Magento 2 Backend, the user can access the app’s features.
Login and Registration
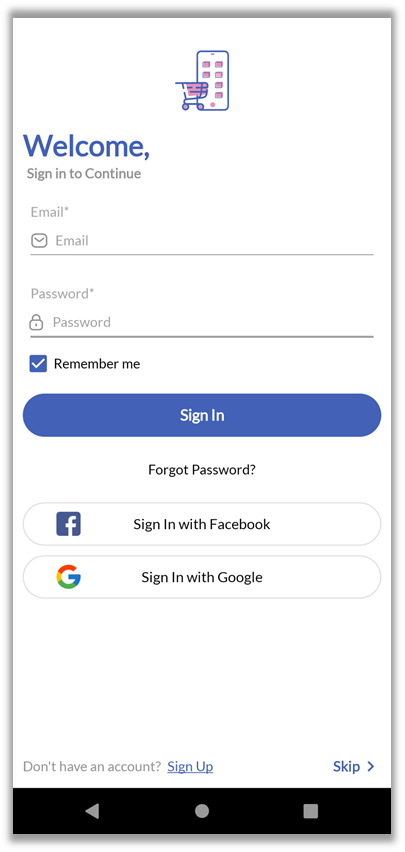
MageMob Mobile App Builder allows users to log in with a registered email id and passwords.
Another way to log in with social media accounts like Facebook or Google. On that page, the user needs to enter the email id and password of the existing social media account.
Skip: It also allows users to visit the app without registering themselves by clicking on Skip.
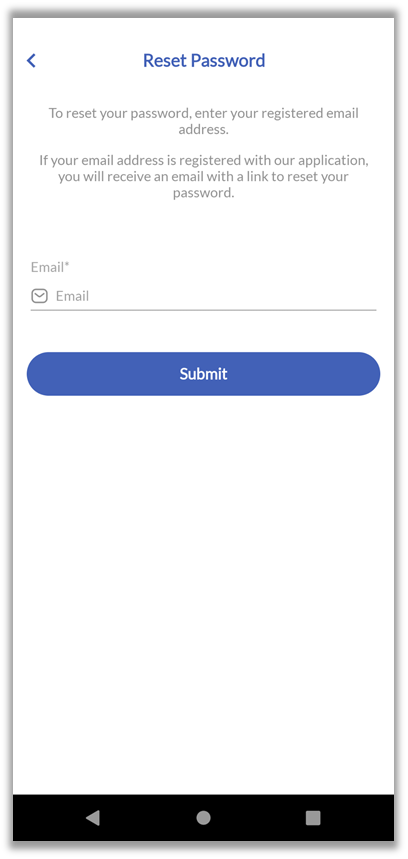
If users forgot or misplaced their password, they can click on RESET PASSWORD HERE which is provided on the page and thus can be reset by providing a registered email address.
Note: To check out the products, the users must have Sign Up.
Registration
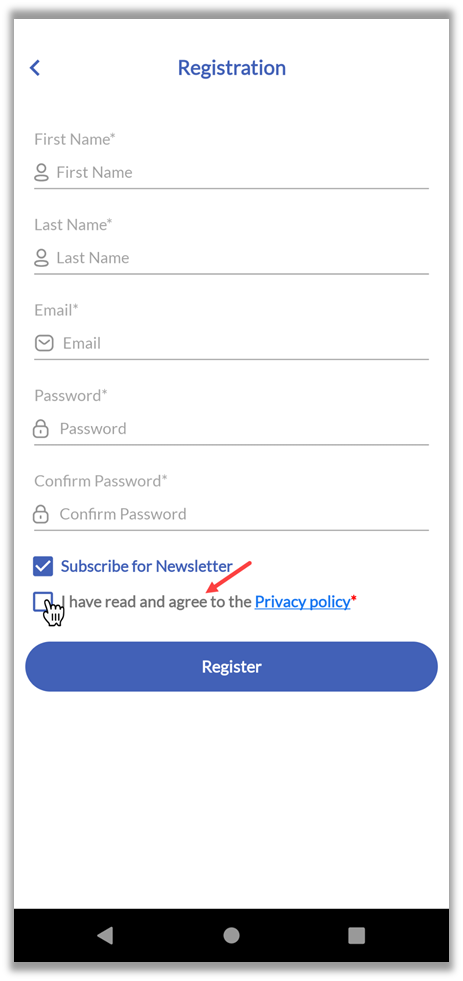
If user is not registered yet, user can register themselves with the store directly from the application by clicking on REGISTER HERE link from the Login page.
User must enter basic details like First Name, Last Name, Email Address and Password for registration.
If you have enabled the GDPR from the Magento admin side, the users will see the Privacy & Policy checkbox for agreement the terms.
User can also Subscribe for Newsletter, by clicking and will be notified for upcoming offers via mail or receive any important news on registered email address.
Dashboard Screen (Home Page)
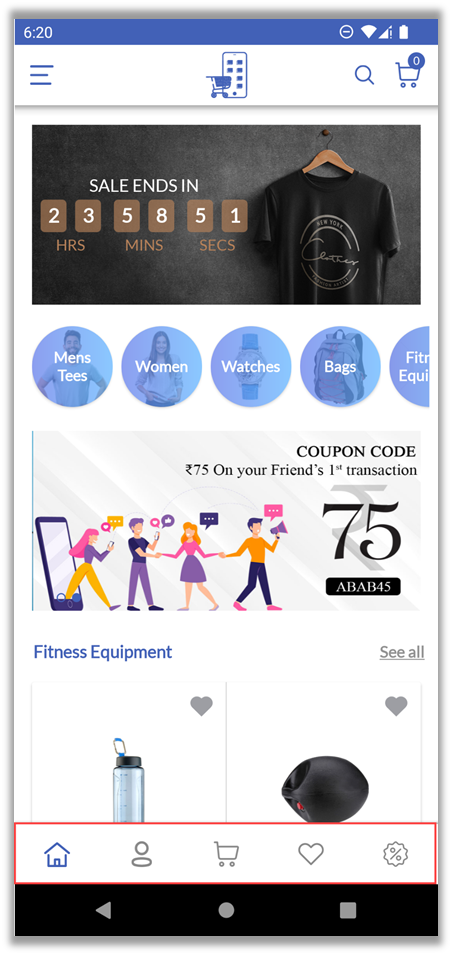
After configuring the layouts in Manage Home Page Layout from Magento backend, the dashboard screen will be displayed as per the configured sequence.
On the header, there are mainly navigation points in the menu:
> Category Menu
> Search Product
> HOME icon
> Notification icon
> Cart
The users will see the modules in the footer (bottom) as selected in the “Bottom Navigation Modules” from the Magento backend.
Category Menu
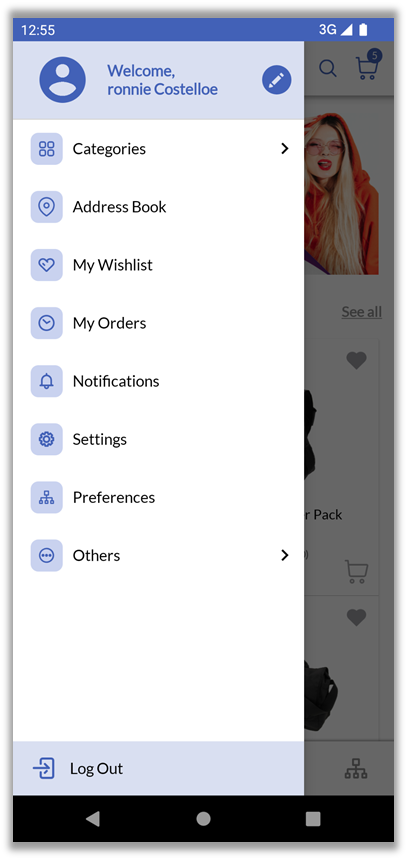
By clicking on icon, the drawer will slide from the left.
The menu drawer consists of the Product Categories and their subcategories that are configured from the backend.
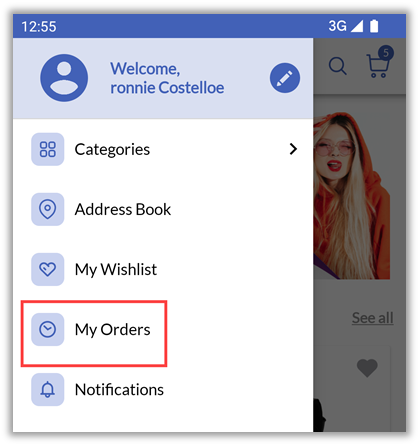
The header of the drawer menu contains the details of User profile. For the Logged in users, it provides modules like Wish List, Orders & Addresses.
Note: If user is not logged in, it will display as Welcome, Guest!
Preferences
User can select the Website, Store & Currency which are configured from the backend.
Menu drawer will also consist of CMS Pages which are selected from the backend configuration:
> About Us
> Contact Us
> Our Policy
> FAQs
From where user will be able to navigate to various CMS pages.
Category
If you have selected the Category to display in the bottom navigation from the MageMob App Builder Configuration (Magento admin side), the users will see the Categories tab in the bottom navigation.
By pressing the ‘Categories’ tab from the bottom navigation, the users will see the categories in the nested format as configured from the Magento admin side.
By pressing on the specific category, the users will be redirected to the product listing page of that category.
Home Page: Search Product
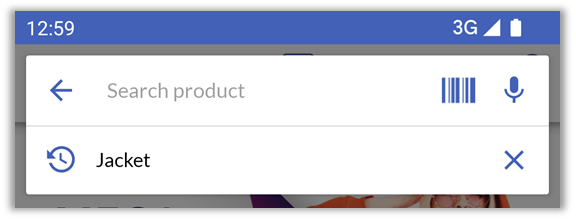
User can search the Product by pressing search icon.
Users will get the last searched 5-products in the dropdown list under the Search product text box.
Users can search for any product by inserting the name, caption, or SKU of the product.
Users can search any product using Barcode Scanner which is enabled from the Stores -> Configuration -> Search with Barcode Scanner option under the General Configuration.
Also, ‘voice search’ is available for searching products for both Android and iOS.
Notification
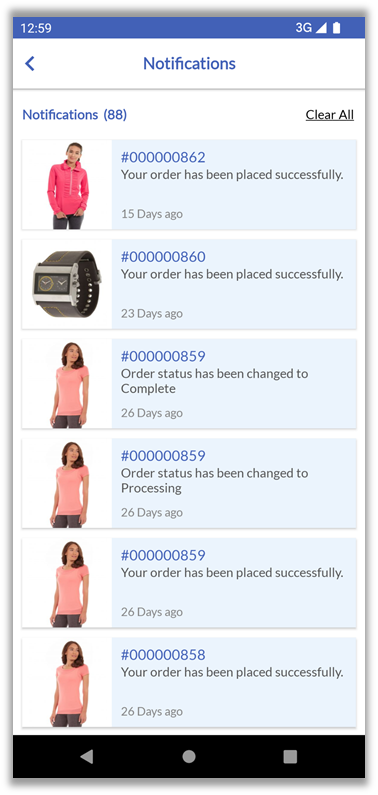
By clicking on notification icon, user can check the notification related to orders and its status.
Notifications can be removed by pressing Clear All.
In this page, some notification tabs are highlighted with blue color, it shows that notifications are unread, others are already read by user.
By swiping left it will show the ‘delete’ icon to remove that notification.
Shopping Cart
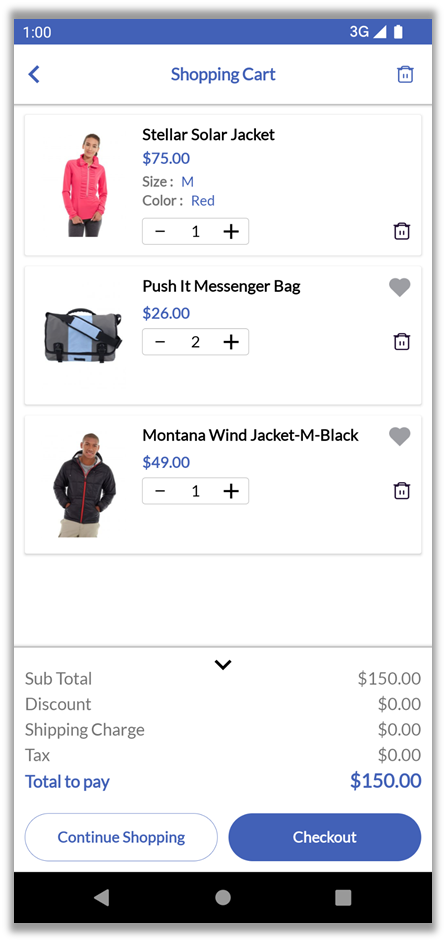
By clicking on the Cart icon, users can manage the items which they have added to the cart.
User can manage the quantity of product, proceed to checkout by tapping on Checkout button and remove product from the cart by tapping on Remove button.
Note: By adding product into Wishlist it will remove from cart.
User can continue shopping by tapping on Continue Shopping button. By tapping on it, user will be redirected to the Dashboard and continue searching other products.
Preferences
Select Website
Under the Preferences, the users can see the Website option with the selected Website. Users can change the Website by tapping on the Website option and selecting another website.
User will get the list of the Websites as per the backend configuration and tap on the website which he/she wants.
Note: If you have purchased ‘Multiple’ domains, only then the user will get the Website option enabled under the Preferences. But if you have the ‘Single’ domain, the Website option will not available.
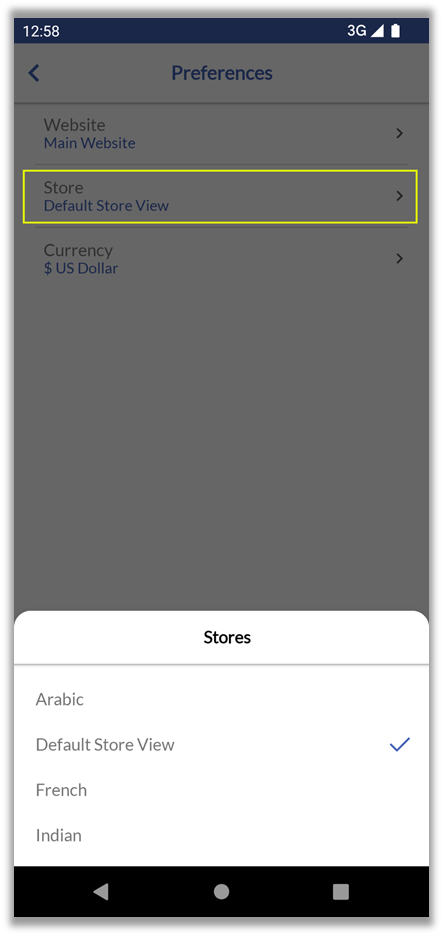
Select Store
Under the Preferences, User can see the Store option with the name of the selected Store. Users can change the Store by tapping on the Store option and selecting another Store.
User will get the list of the Stores as per the backend configuration and by tapping any Store, the Store will be selected.
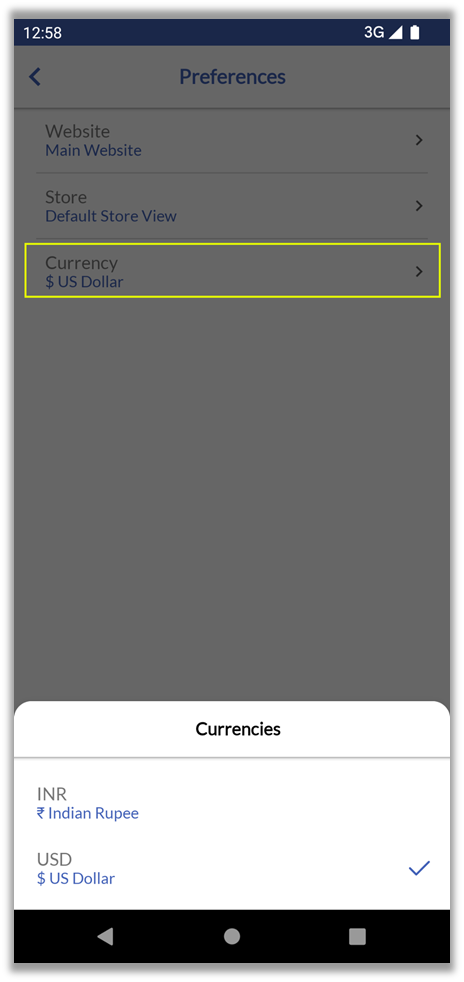
Select Currency
Under the Preferences, the User can see the Currency option with the already selected Currency. Users can change the currency by tapping on the Currency option and selecting another Currency.
Users will get the list of the Currency as per the backend configuration and by tapping any currency, the Currency will be selected.
Product Page
You can check the listing of the products, filter the products, and check the product details.
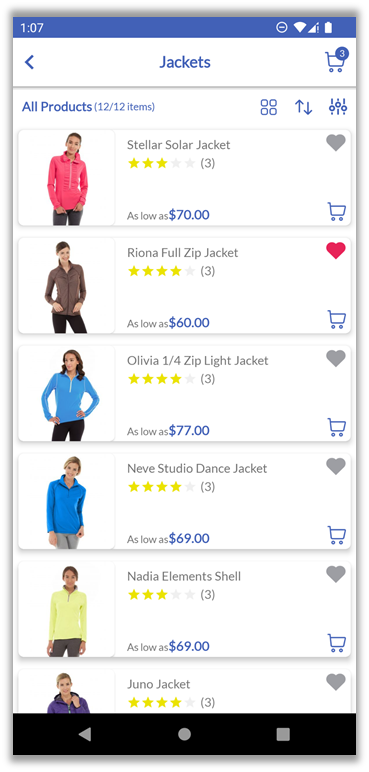
Product Listing Page
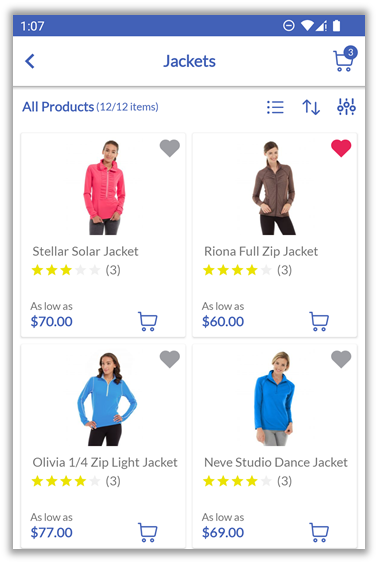
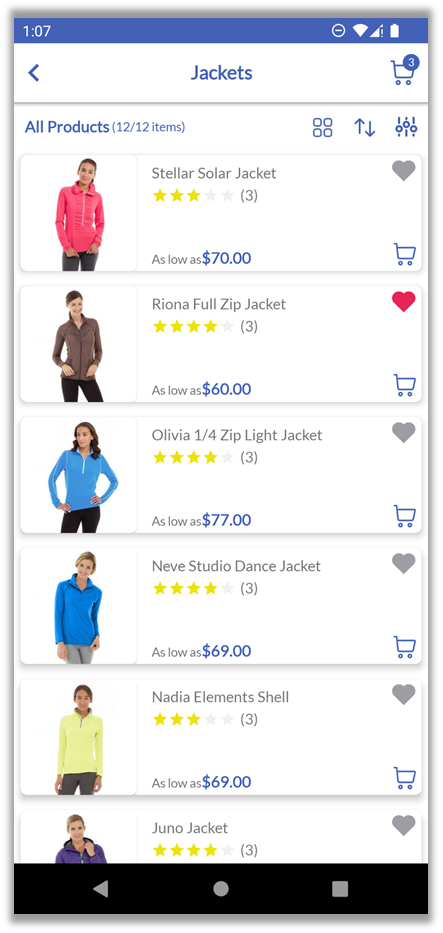
The product listing page of any category displays the product details with basic details like Product Name, Price, Ratings, Wishlist, and Cart.
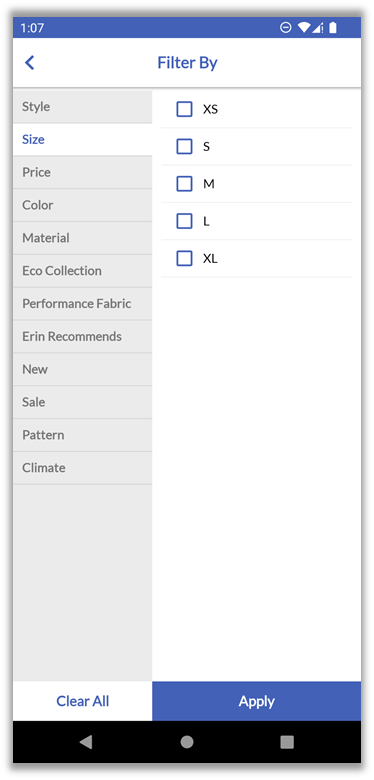
It can also sort by price low to high, high to low, and filtered with different options like category, color, size, etc. by tapping on the ‘Filter’ icon.
Users can view the product in Grid view by tapping on the ‘Grid view’ icon and get back to the List view by clicking on the ‘List view’ icon.
Product Detail Page
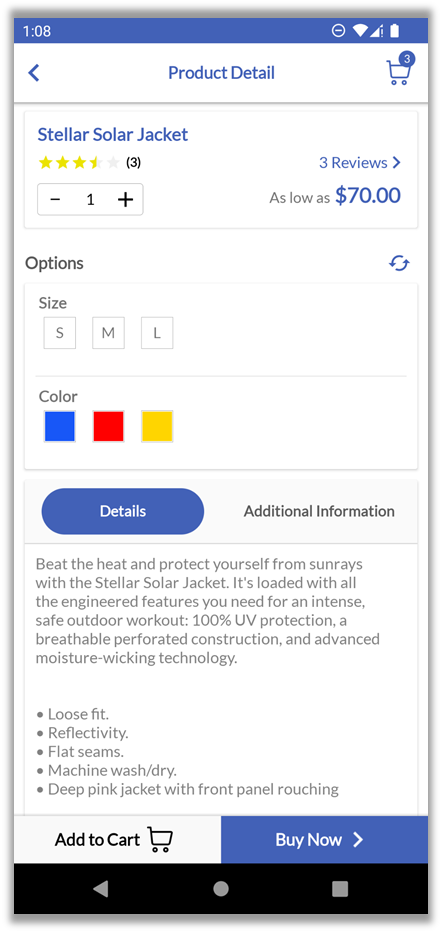
The product detail page of any product displays the product details with basic details like Product Name, Price, Ratings, Size, Color, and details with options “Add to Cart” and “Buy Now”.
As you ‘tap’ on the product from the listing page, it will redirect to the product details page in which the user can find the product’s price, quantity to add, reviews & ratings, size & color options, by scrolling down the detailed descriptions for the product, and buttons to add product in Cart or Buy Now to proceed to checkout.
Users can Share products via different social media platforms and add products into Wishlist by tapping on icons.
Note: You can enable/disable the Wishlist option from the Store Configuration.
Product Checkout Page
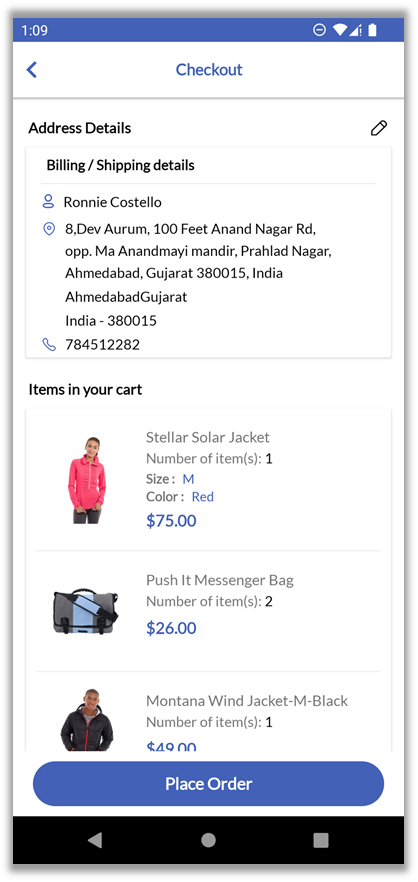
Users can Check out shopping from the cart or directly tap the Buy Now button from the product details page.
Note: If the shipping address is not added yet or if you are a guest user, users will be redirected to Add New Address page. After saving the Address, users will redirect to the check-out page.
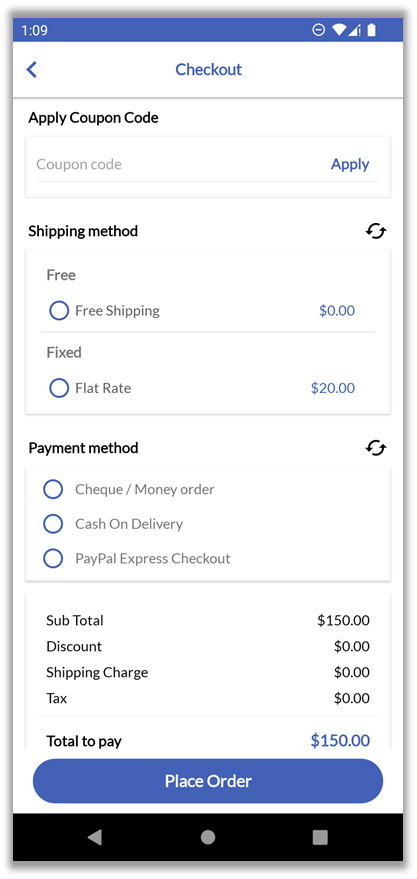
After selecting the address, they can insert a Coupon Code if available, select relevant Shipping Method and Payment Method.
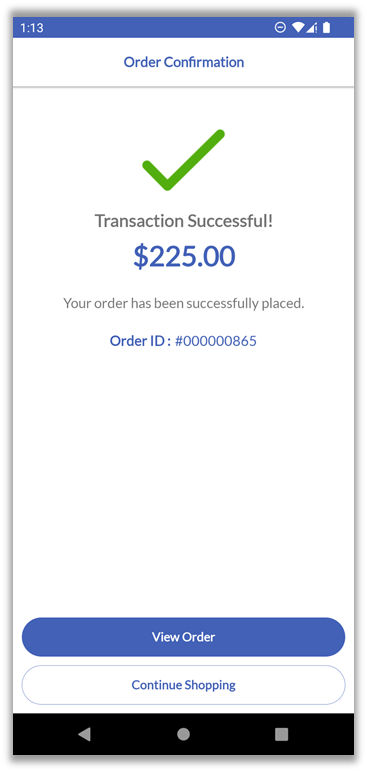
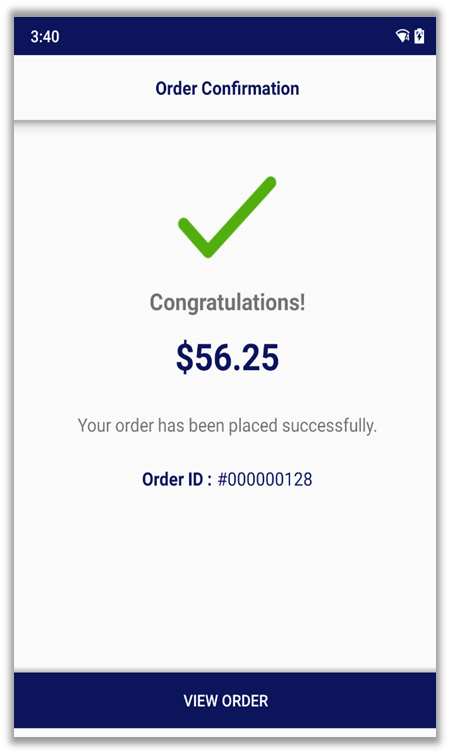
By tapping the Place Order button, the Order will be placed, and the user will be redirected to the Order Confirmation page.
Countdown Timer Banner
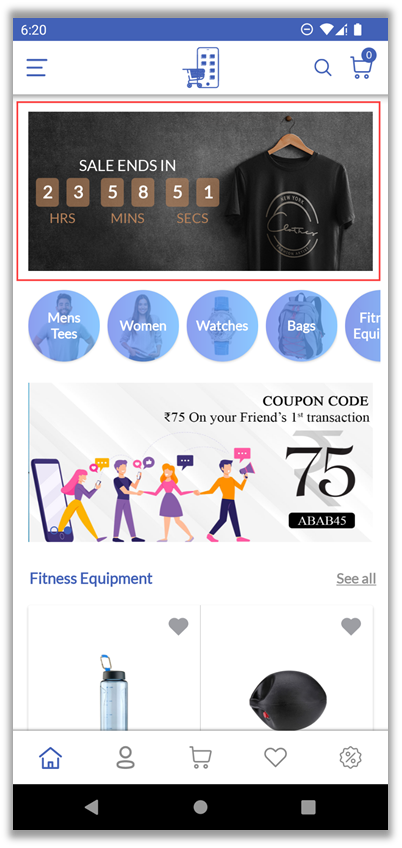
If you have configured the Countdown Timer Banner from the Manage Home Page Layout (Magento admin side), the users will see the discounts/offers in the countdown timer banner.
For the countdown timer banner, you can configure the banner background, timer text color, and overall appearances by managing the countdown timer banner from the Magento admin side.
Offers tab
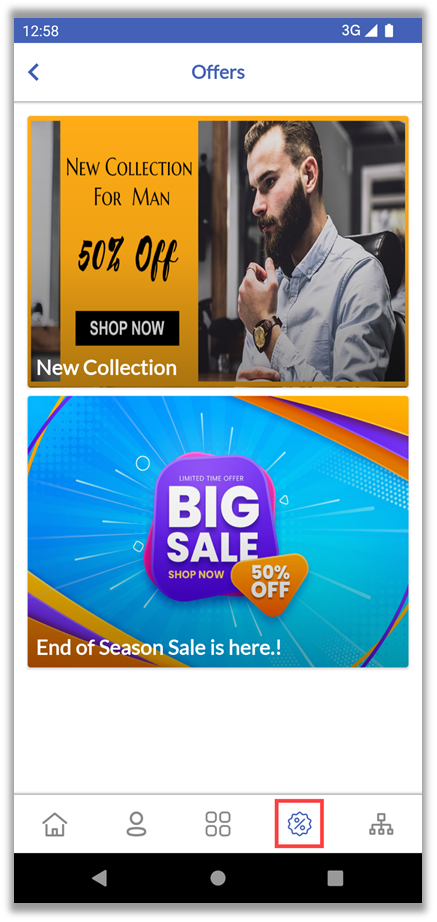
If you have added and configured the offer banners from the Magento admin side (Manage Offers) and selected the Offers from the “Bottom Navigation Modules” (Store-level), the users can access the Offers tab from the mobile app. (Left image)
When the users press on the “Offers” tab, they will be redirected to the offers page and see the different offers. (Right image) By pressing on any offer banner, the users will be redirected to the specific page as per the configured redirection option from the Magento backend (Manage Offers).
Offline Sync (Products in Cart)
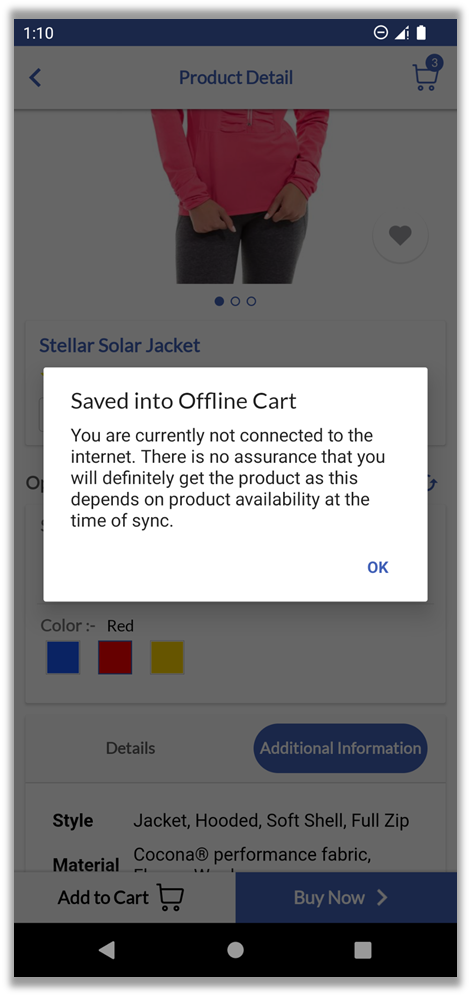
The users can also add the product to the cart even if they don’t have an internet connection. They can add the products to the cart in offline mode. Once they are connected to the internet, they will get the Sync Cart confirmation in the popup.
If the users want to sync the products that are already added to the cart, they need to click on the OK button, and the offline products in the cart will be synced.
When the users access the app without the internet, all the traversal data like Homepage, Wishlist, Product Listing, Product Detail, etc. will be saved in the storage. So, the users can see that traversal history when they suddenly go offline.
Order Confirmation Page
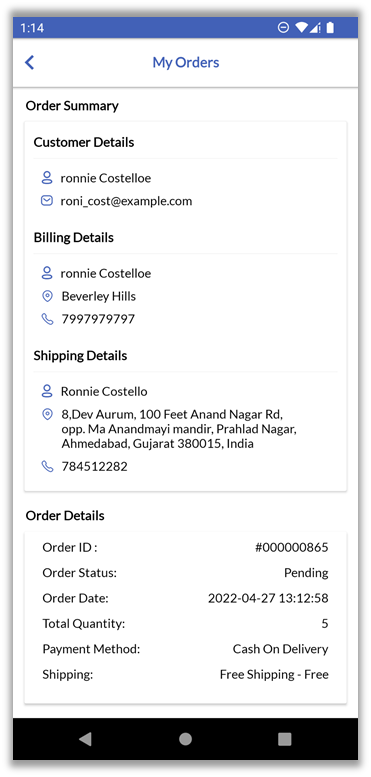
It gives confirmation for placing an order successfully and provides an Order ID number to track the order at the time of delivery. It also provides buttons to continue your shopping and view orders which display ordered details.
By tapping on the View Order button, they will be redirected to the Order Details page. Users can check the Order Summary on the Order Details page. Users can Reorder and Cancel the order as per requirement.
Note:
User can cancel the Order if the order status is still in place, once the order comes in Processing, it cannot be canceled.
MageMob App Builder also supports custom status of Magento which will be displayed on the Order list and detail page. You can create/update the custom status from Stores ➤ Settings ➤ Order Status in the backend.
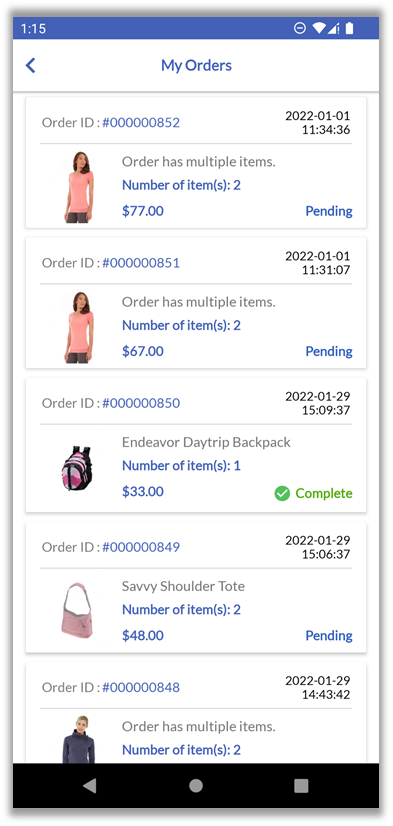
Track Order Listing Page
Logged in user can track the order by tapping on Orders in the Category slider. By tapping on Orders, users get a list of all placed orders with order status and tracking information.
By tapping on any order, it will show details about delivery and other information. The Track Order button will appear if it is configured from the Magento backend. By tapping on it, user will get the information related to the order under Order Tracking page.
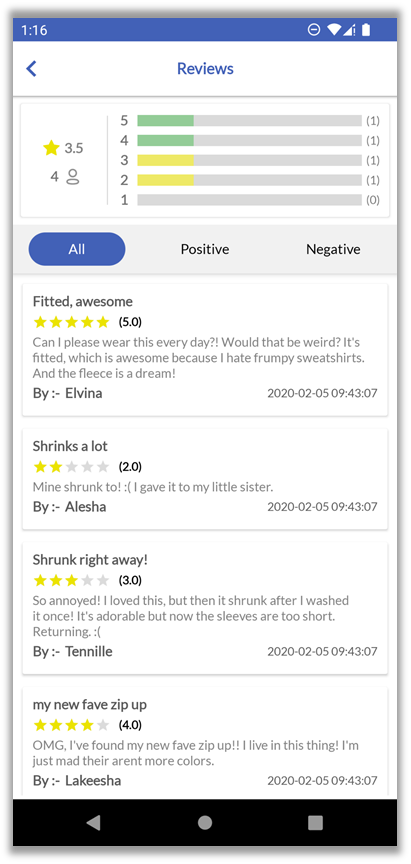
Product Review Page
Here, you can see the list of reviews given by different customers for the product. It can also be filtered by Positive and Negative options.
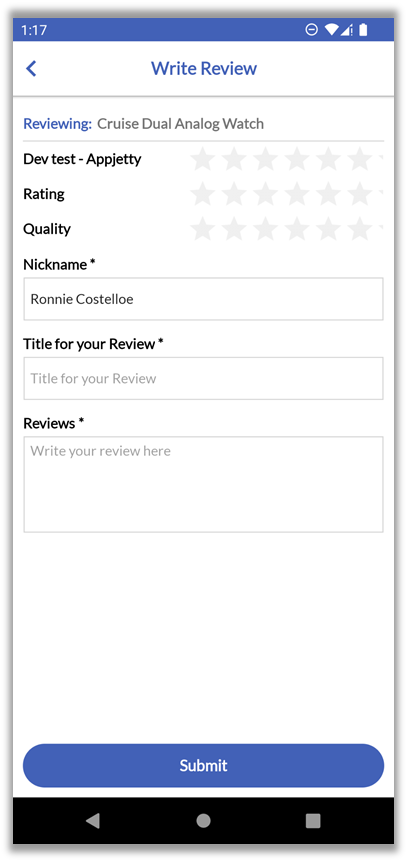
Write Review page will appear after the completion of an order. Users can share reviews about the purchased product by adding reviews for the product and giving ratings for price, value, and quality of received products.
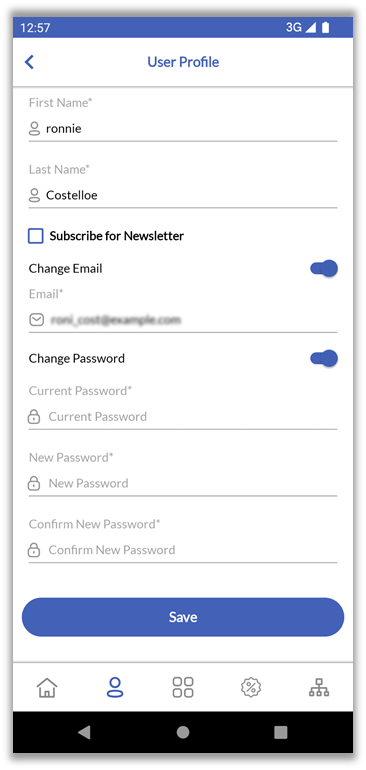
User Profile
If user is logged in, the options related to User Profile will be displayed:
> Wish List > Orders > Addresses.
By tapping on ‘edit’ icon, User Profile page will be redirected. User can check own profile and update the details by tapping ‘edit’ button.
By tapping on key button, user can update old password. User can sign out by tapping Off icon.
Wishlist Screen
Users can manage Wishlist by adding & removing the products.
The product is added to the Wishlist from the Product listing page or from the Product details page by clicking on the Wishlist icon. You can add to the cart by clicking on the Cart icon.
To clear the whole Wishlist, tap on the Clear All button. All the added products will be removed.
Note: You can make changes to the Wishlist option from the backend configuration. For that navigate to Stores -> Configuration -> Customers -> Wish List -> Under the ‘General Option’, you can Enable/Disable the Wishlist option for the Mobile app.
Address Page
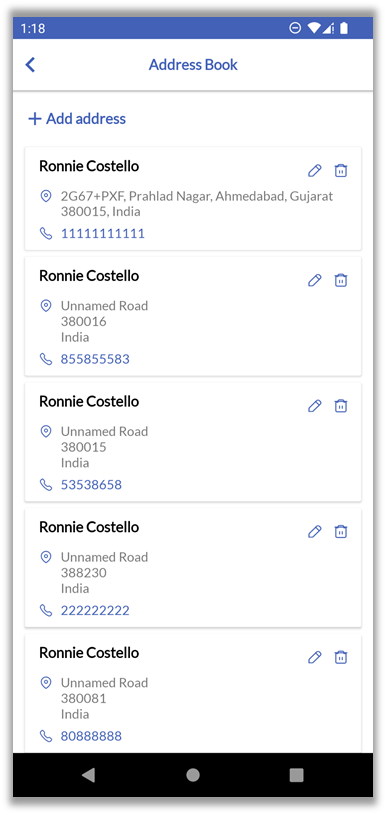
Users can add the address to ship the order by clicking on the add button in the top right corner. Here you need to define address details like street, city, postal code, etc. Users can also manage addresses by editing or removing saved addresses.
Users can also find the address which they want to save on google Maps by placing a pointer to that address. It will fetch directly to defined address fields.
Note: You can manage the Zip/Postal Code and Region (State) as mandatory or non-mandatory fields based on the configuration from the backend.
Abandoned Cart
The users would get the notification of the Abandoned Cart if they missed the checkout of their shopping. The notification will be displayed as configured from the Magento admin side (Manage Abandoned Cart Notification).
If multiple products are in the cart, the users will get abandoned cart notifications for the multiple products if you have added the dynamic variable.
Order Bifurcation
Order Bifurcation (Magento Admin)
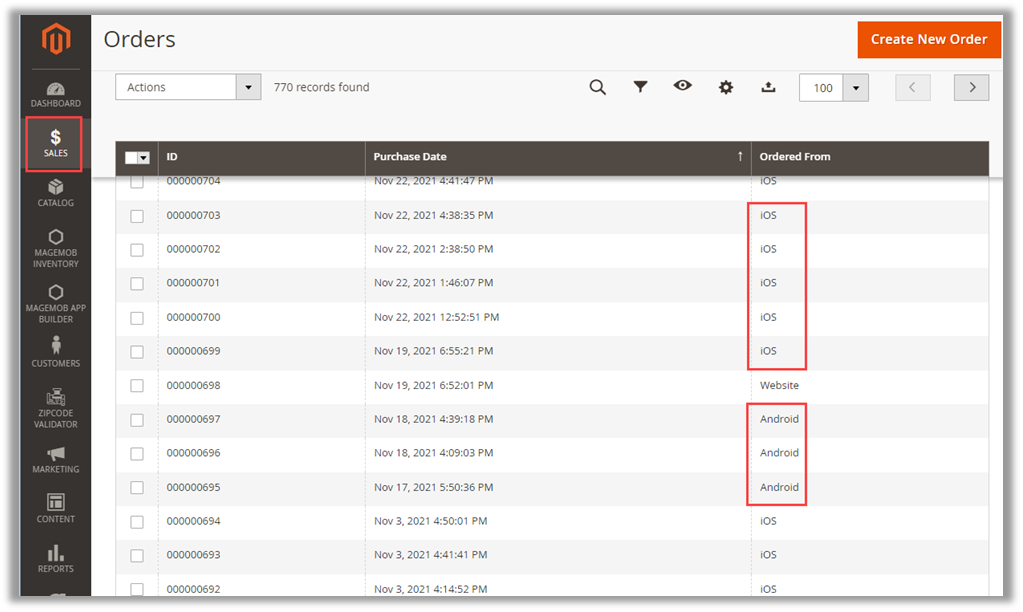
You can check the placed order by navigating to the Sales → Orders from the Magento Backend.
Once the customers place the orders from the MageMob App Builder, the admin can check on which mobile OS they have placed the orders from the Magento backend (Orders).
From the Orders listing page, you will see the Ordered From column. If the customer has placed the order from the “Android” device, you will see the order highlighted as Android in the column. But, if the customer has placed the order from the “iOS” device then the order gets highlighted as iOS in the column.
Note: The other orders that are not placed from any mobile device will be highlighted as Website in the column.
Deep Linking (Product Sharing)
Sometimes Web links don’t work with native mobile apps. So, the ‘Deep Linking’ comes into the picture. Deep Links allows the mobile app to push to a specific page within an app versus simply opening it. [1]
If two users have the MageMob App Builder application installed on their phone and they want to share products with each other, one user shares the product URL from the sharing option from the product detail page to the second user. [2]
A link will be shared via any messenger. 2nd User will get that shared product link in messenger. [3]
Now, if 2nduser clicks on the URL which is sent by the 1st user and has the application installed on the phone, the app user will be redirected directly to the detail page of that product in the application. [4]
Note: If the app is not installed, either it will redirect to the play store or open in the web browser.
Firebase Analytics
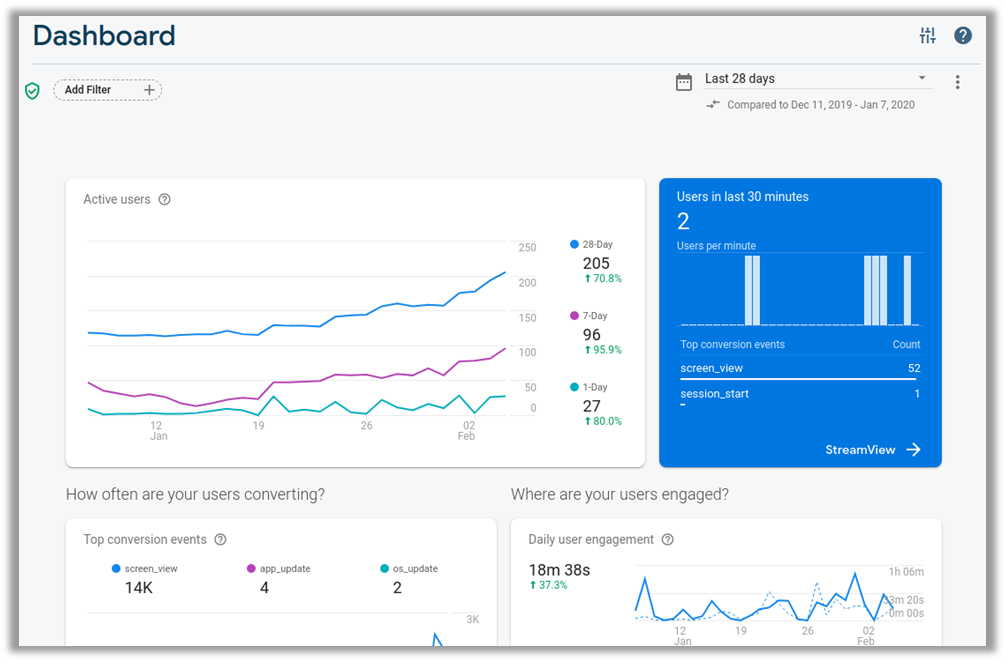
Admin can track daily user engagement, device details of users, country location, and crash analytics as well.
If any user is facing any crash while using an application, then we can get an idea from the analytics report and update the application if required.
Points to Note
Products in all the modules of MageMob App Builder will only be visible if they are assigned to the website selected while purchasing the Extension.
You can try our MageMob Mobile App Builder demo app from Play Store or App Store.
App Store link: https://itunes.apple.com/us/app/magemob-cart-customer-mobile/id1039362898?mt=8
Play Store link: https://play.google.com/store/apps/details?id=com.biztech.magemobcart
You will require the active extensions of AppJetty’s Zipcode Validator and Delivery Date Scheduler to be compatible with App Builder.
Contact Us
We simplify your business, offer unique business solution in digital web and IT landscapes.
Live Chat
Get instant support with our Live Chat.
Visit our product page at: https://www.appjetty.com/magento-magemob-app-builder.htm and click on the Live Chat button for instant support.
Tickets
Raise tickets for your specific question!
Send an email to [email protected] Or you can login to your account @ www.appjetty.com and click on My Support Tickets on your account dashboard, to get answers to your specific questions.
Customization
If you would like to customize or discuss about additional feature for MageMob App Builder, please write to [email protected]
![[1] Flush Magento Cache](https://docs.appjetty.com/wp-content/uploads/2022/01/image003.png)
![[2] APPJETY- MageMob App Builder](https://docs.appjetty.com/wp-content/uploads/2022/01/image004.png)
![[3] MAGEMOB APP BUILDER](https://docs.appjetty.com/wp-content/uploads/2022/01/image005.png)
![[1] MAGEMOB APP BUILDER Conf.](https://docs.appjetty.com/wp-content/uploads/2022/01/image006.png)
![[2] Activation Key](https://docs.appjetty.com/wp-content/uploads/2022/01/image007.png)
![[3] Magemob App Builder Backend Conf.](https://docs.appjetty.com/wp-content/uploads/2022/01/image008-1.png)




![[1] Create Notification](https://docs.appjetty.com/wp-content/uploads/2022/01/image018.png)
![[2] Notification Configuration](https://docs.appjetty.com/wp-content/uploads/2022/01/image019.png)
![[3] Type-Category](https://docs.appjetty.com/wp-content/uploads/2022/01/image020.png)
![[4] Type-Category](https://docs.appjetty.com/wp-content/uploads/2022/01/image021.png)
![[5] Type-Offer](https://docs.appjetty.com/wp-content/uploads/2022/01/image022.png)
![[6] Send Message To](https://docs.appjetty.com/wp-content/uploads/2022/01/image023.png)
![[7] Select Customer(s)](https://docs.appjetty.com/wp-content/uploads/2022/01/image024.png)
![[8] Select Customer Group](https://docs.appjetty.com/wp-content/uploads/2022/01/image025.png)
![[9] Choose OS](https://docs.appjetty.com/wp-content/uploads/2022/01/image026.png)
![[1] Select Schedule Type:](https://docs.appjetty.com/wp-content/uploads/2022/01/image027.png)
![[2] Schedule Type: One Time](https://docs.appjetty.com/wp-content/uploads/2022/01/image028.png)
![[3] Select Recurring Type](https://docs.appjetty.com/wp-content/uploads/2022/01/image029.png)
![[4] Calendar View](https://docs.appjetty.com/wp-content/uploads/2022/01/image030.png)
![[5] Recurring- Month](https://docs.appjetty.com/wp-content/uploads/2022/01/image031.png)
![[6] Export in CSV & XML](https://docs.appjetty.com/wp-content/uploads/2022/01/image032.png)
![[7] Edit & Resend](https://docs.appjetty.com/wp-content/uploads/2022/01/image033.png)
![[8] Actions- Bulk Delete](https://docs.appjetty.com/wp-content/uploads/2022/01/image034.png)
![[1] Create Notification](https://docs.appjetty.com/wp-content/uploads/2022/01/image035.png)
![[2] Add Abandoned Cart Noti.](https://docs.appjetty.com/wp-content/uploads/2022/01/image036.png)
![[3] Change Status](https://docs.appjetty.com/wp-content/uploads/2022/01/image037.png)
![[4] Bulk Actions- Status & Delete](https://docs.appjetty.com/wp-content/uploads/2022/01/image038.png)


![[1] Home Page Layout](https://docs.appjetty.com/wp-content/uploads/2022/01/image047.png)
![[2] Edit Feature Block](https://docs.appjetty.com/wp-content/uploads/2022/01/image048.png)
![[3] Feature Category Block Conf.](https://docs.appjetty.com/wp-content/uploads/2022/01/image049.png)
![[4] Edit Feature Category Block](https://docs.appjetty.com/wp-content/uploads/2022/01/image050.png)
![[5] Feature Category Block](https://docs.appjetty.com/wp-content/uploads/2022/01/image051.png)
![[6] Featured Category list](https://docs.appjetty.com/wp-content/uploads/2022/01/image052.png)
![[1] Product Grid](https://docs.appjetty.com/wp-content/uploads/2022/01/image053.png)
![[2] Configure Product Grid](https://docs.appjetty.com/wp-content/uploads/2022/01/image054.png)
![[3] Select Category](https://docs.appjetty.com/wp-content/uploads/2022/01/image055.png)
![[4] Custom Products](https://docs.appjetty.com/wp-content/uploads/2022/01/image056.png)


![[1] Banner/Offers slider](https://docs.appjetty.com/wp-content/uploads/2022/01/image059.png)
![[2] Banner Slider Configuration](https://docs.appjetty.com/wp-content/uploads/2022/01/image060.png)
![[3] Category Type](https://docs.appjetty.com/wp-content/uploads/2022/01/image061.png)
![[4] Product Type](https://docs.appjetty.com/wp-content/uploads/2022/01/image062.png)
![[5] Insert Offer Link](https://docs.appjetty.com/wp-content/uploads/2022/01/image063.png)
![[1] Edit Countdown Timer](https://docs.appjetty.com/wp-content/uploads/2022/01/image064.png)
![[2] Select Image Upload](https://docs.appjetty.com/wp-content/uploads/2022/01/image065.png)
![[3] Image Upload](https://docs.appjetty.com/wp-content/uploads/2022/01/image066.png)
![[4] Select Redirect Type](https://docs.appjetty.com/wp-content/uploads/2022/01/image067.png)
![[5] Display Category](https://docs.appjetty.com/wp-content/uploads/2022/01/image068.png)
![[6] Display Product](https://docs.appjetty.com/wp-content/uploads/2022/01/image069.png)
![[7] Display Offer](https://docs.appjetty.com/wp-content/uploads/2022/01/image063-1.png)
![[8] Select Dates for Countdown Banner](https://docs.appjetty.com/wp-content/uploads/2022/01/image070.png)
![[09] Timer Block Type](https://docs.appjetty.com/wp-content/uploads/2022/01/image071.png)
![[10] Timer Color Configuration](https://docs.appjetty.com/wp-content/uploads/2022/01/image072.png)
![[11] Timer Position Alignment](https://docs.appjetty.com/wp-content/uploads/2022/01/image073.png)


![[5]](https://docs.appjetty.com/wp-content/uploads/2022/01/image079.png)










![[1] Deep Linking (Prod. Sharing)](https://docs.appjetty.com/wp-content/uploads/2022/01/image140-1.png)
![[2] Share Product](https://docs.appjetty.com/wp-content/uploads/2022/01/image309.png)
![[3] Message](https://docs.appjetty.com/wp-content/uploads/2022/01/image312.png)
![[4] Product Detail](https://docs.appjetty.com/wp-content/uploads/2022/01/image314.png)
