Magento2 Geolocation Redirect
Geolocation Redirect
Version: 1.0.4
Compatibility:
Community Edition:
2.2. *, 2.3. *, 2.4.*
About M2_Geolocation Redirect
Introduction
Ready to localize your customers’ shopping experience? Do it with AppJetty’s Magento 2 Geolocation Redirect plugin. It is packed with features of store geo-localization, flexibility in redirection, store security, and more.
Our feature-rich “M2 Geolocation Redirect” enables you to offer your customers language-based localization and enhance their experience. Seamlessly broaden your business outreach through the features of multilingual and multi-currency support our Geolocation Redirect offers.
Benefits of Geolocation Redirect
Easy to Install and configure the Geolocation Redirect with Currency
Manage Multiple Domains
Create a language-specific domain and specify the countries for the same to redirect customers from all those countries to it.
Prompt to ask the user for switching the store with our popup for redirection
Give your customers the freedom to choose a specific store view by displaying the popup message.
Add Rules for Geolocation
Add the rules to manage the stores by selecting the countries and currencies.
Popup message to Visitors
Select the popup style to display the visitors when they access the stores from their region.
Block Request
Block the unwanted traffic visiting your store by selecting a particular country or entering malicious IP addresses.
Navigate to the Blocked Visitors
Select a popup message or navigate to a specific page to the visitor whose county/IP is blocked.
Prerequisites
Admin should have a Magento Account.
Admin should sign up with the MaxMind Geolocation to get access key.
Admin should have configured the Stores and Currency Rates.
Gelolocation Redirect Installation
You can install the Geolocation Plugin in two ways:
> Manually > via Composer
Installation Steps
Manual Installation (Installing Magento 2 extension by copying code)
Step 1:
For Windows OS:
Go to <your Magento install dir>/app/code. Under that, create the folders using following hierarchy:
Biztech
– Geolocation
For Linux OS:
Enter the following commands while keeping their order:
cd <your Magento install dir>/app/code
mkdir -p Biztech/ Geoip
After this, find the Download Zip and extract all files and folders in the folder you just created Biztech/Geoip.
Step 2:
After the successful installation you have to run the command on Magento 2 root directory:
“php bin/magento setup:upgrade”
If you see a blank page or permission error, go to Terminal (Linux)/Command Prompt(Windows).
cd [magento root directory][var]
run the following command
$ chmod –R 777 *
Step 3:
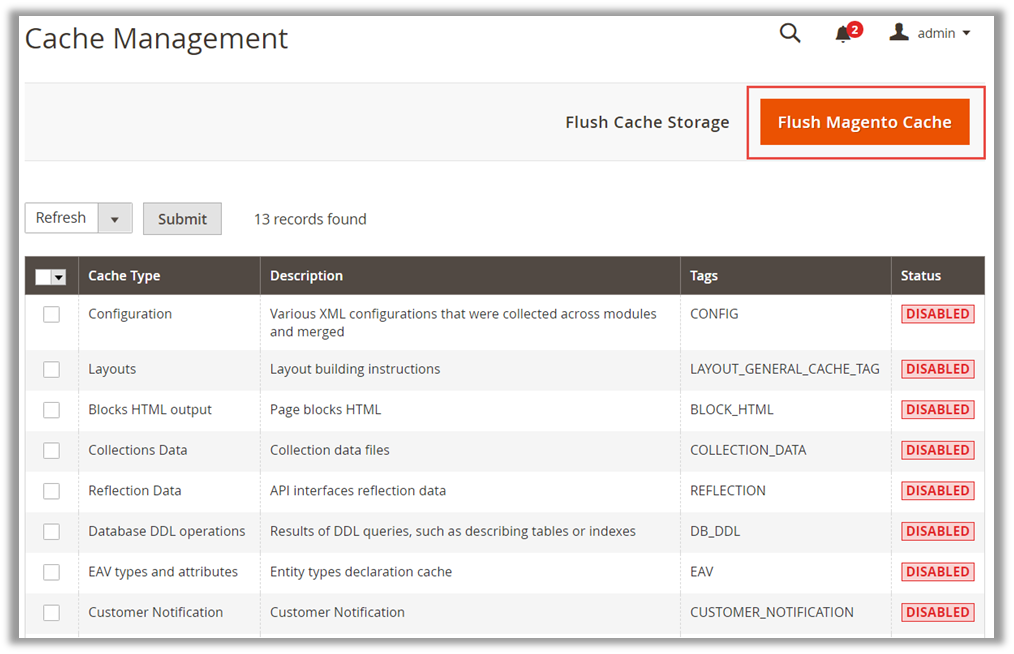
After running the command, log into the admin panel and clear the Cache. Go to SYSTEM -> Tools (section) -> CACHE MANAGEMENT to clear the cache.
Step 4:
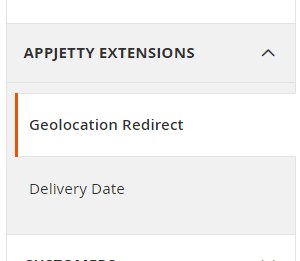
After successful installation, you can see the ‘GeoIP Redirect’ under APPJETTY EXTENSIONS tab inside STORES -> CONFIGURATION.
Installation via Composer
Step 1:
Create a new folder on your preferable server path. Add Extension zip archive into the created folder.
Step 2:
Use Your SSH details to connect to your server. After connecting to the SSH, change your working directory with one of your Magento setup paths using the below command:
cd /PATH/TO_YOUR_MAGENTO_SETUP_PATH
Step 3:
Now you have to define the folder with the extension’s archive as a repository for composer reference. For this, run the Composer command:
composer config repositories.biztech artifact /ABSOLUTE_PATH_TO_ZIP_Archive_FOLDER/
For Example:
composer config repositories.biztech artifact /Packages/Biztech/
After executing this command, it will automatically add Repository Details in composer.json file.
Step 4:
Perform the following command for installation of the module:
composer require biztech/geolocation
Step 5:
After successful installation using the above command you can verify the module status using the below command:
php bin/magento module:status
You can check the newly added module in the List of disabled modules.
Step 6:
Now you can upgrade your setup using the below command.
php bin/magento setup:upgrade
It will enable the module and it should be doing the automated process required by Magento.
Step 7:
You can now compile the modules using the below command.
php bin/magento setup:di:compile
Step 8:
In case if you have to update our extension from a composer you can use the below command:
composer update biztech/geolocation
But before using that command you should have placed the latest Extension zip archive into the /ABSOLUTE_PATH_TO_ZIP_Archive_FOLDER/
After executing the above command your module is updated and now you just have to run the upgrade command same as step 6 and compile command same as step 7.
Once the installation is successful, scroll down to activate the extension.
Geolocation Module Activation
Get Activation Key
Copy the activation key from the Order Confirmation Mail.
OR
Log into your account at www.appjetty.com using the registered email and password you have provided at the checkout process.
Go to Downloadable Options and copy the activation key for the Geolocation Redirect extension.
Insert Activation Key
Log into Magento Admin Panel and navigate to Geolocation Redirect -> Geolocation Configuration. (STORES -> Configuration -> APPJETTY)
Here you will find the Geolocation Module Activation option:
Activation Key: Enter the activation key for the “Geolocation Redirect” extension.
Select Store: Select the Stores where you need to use the GeoIP extension. Click on the ‘Save Config’ button after your selections.
Now, the Geolocation extension got activated! You should set Geolocation Configurations.
Geolocation (Backend) Configuration
Geolocation Redirect- Backend Configuration
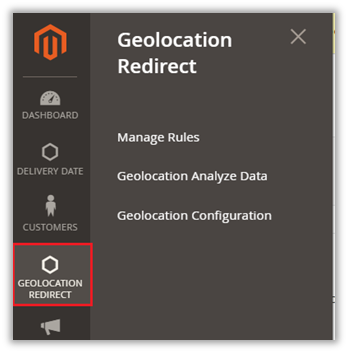
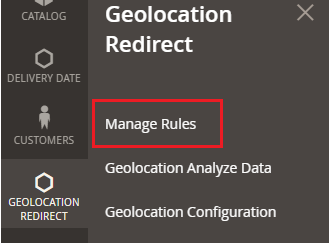
Once you installed the module, the GEOLOCATION REDIRECT menu can see in the Magento navigation pane.
From here you can Configure the Geolocation for the store, Manage Rules for Stores by selecting the Country with Currency and Analyze the Geolocation Data.
MaxMind Geolocation Configuration
Activation & MaxMind Geolocation Configuration
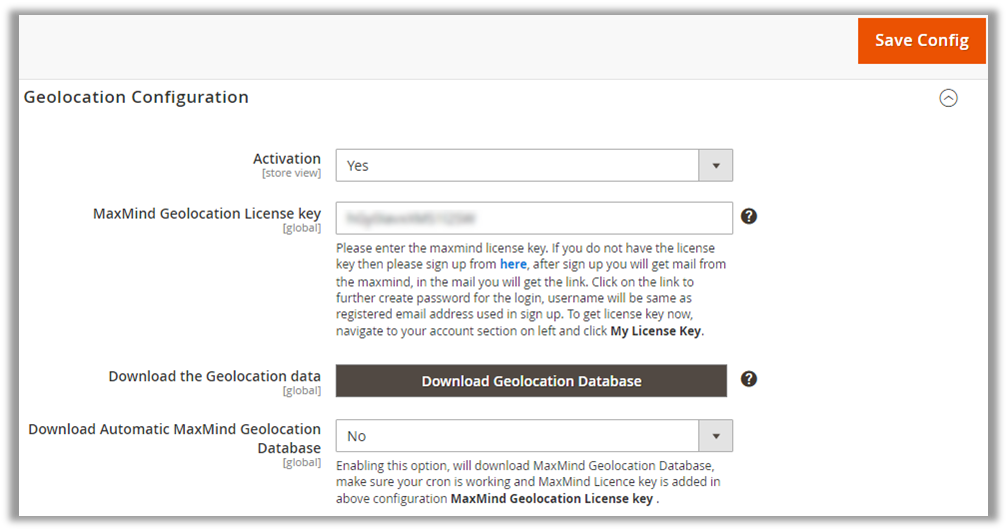
After activation, navigate to the configuration option from Geolocation Redirect -> Geolocation Configuration.
Activation: Select Yes to enable activation of the Geolocation.
MaxMind Geolocation License Key: Please enter the MaxMind license key details to get the Geographical location of the user when they visit your web store.
Note: If you do not have the license key then please sign up from here, after signing up you will get mail from the MaxMind, in the mail, you will get the link. Click on the link to further create a password for the login, the username will be the same as the registered email address used to sign up. To get the license key now, navigate to your account section on left and click My License Key.
Download the Geolocation Data: Click on this button to get the Geolocation Database.
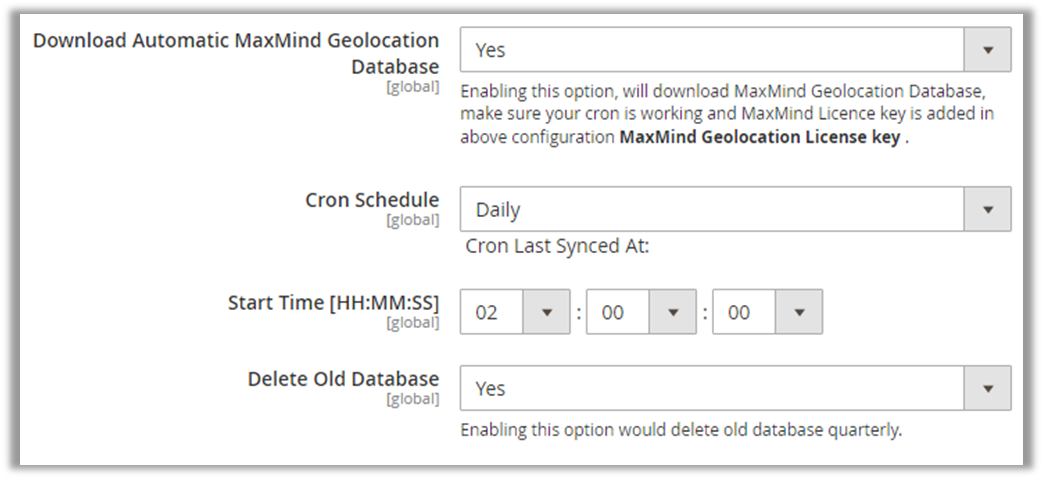
Download Automatic MaxMind Geolocation Database: Enable this option to download the MaxMind Geolocation Database automatically.
Note: To enable the automatic download option for MaxMind Geolocation Database, you must have set the ‘CRON schedule’ with the ‘Time’.
Cron Schedule: You can schedule the Cron Daily / Weekly / Monthly basis as per your need. You can see the last synced detail of the Cron.
Start Time [HH:MM:SS]: Insert the time when do you want to download the Geolocation Database.
Delete Old Database: By enabling this option, your database will delete quarterly.
Popup on Switching Store
You can configure the popup to display when the customers switch the store.
Prompt user to ask for switching store and currency: By selecting Yes to this option, the user will get the popup to switch store and currency as per the geolocation detected.
Note: If you have selected No, this option will be disabled, and the store & currency will switch automatically as per the geolocation detected.
You can add Popup Title, Message (Content), Redirection Button Text.
Popup Title: Insert a Popup Title i.e. ‘Auto Store Switching’.
Popup Message: Insert an instructive message to redirect to another store.
Popup Redirect button text: Insert a text caption of the redirection button.
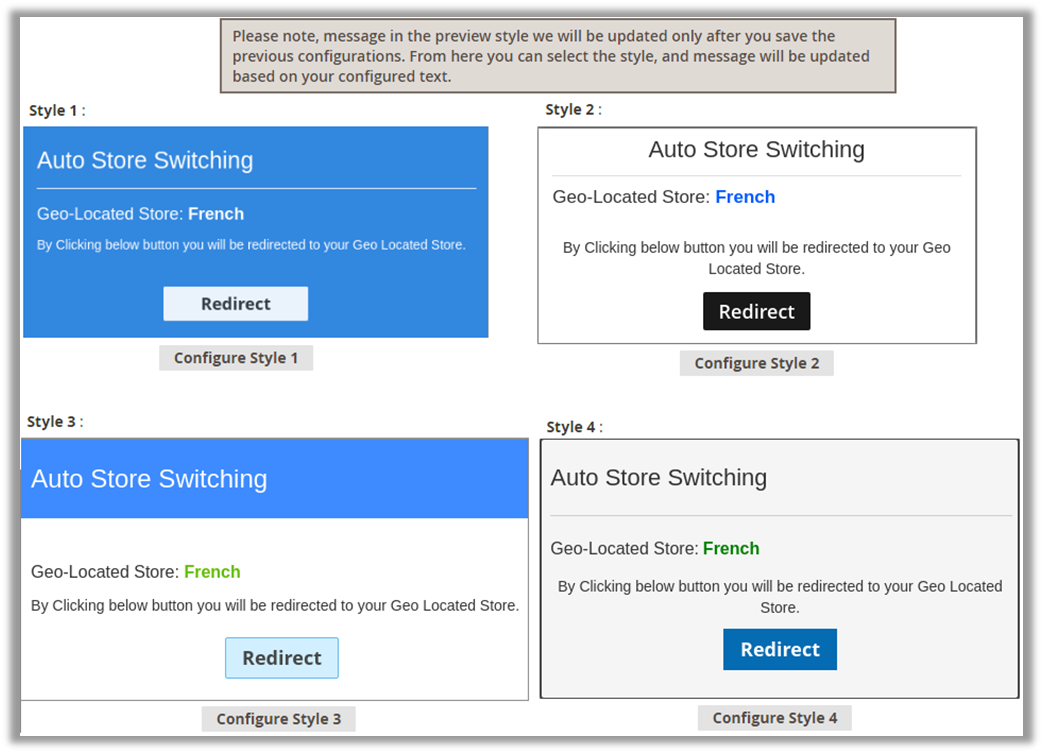
> Popup Style Preview:
Select Popup Style: Select the ‘Popup Style’ to display the customers when they switch the store. The Popup preview is also provided to select the popup as per your choice.
By clicking on Configure Style 1, a “Style 1” popup redirect will be selected.
Block Visitors
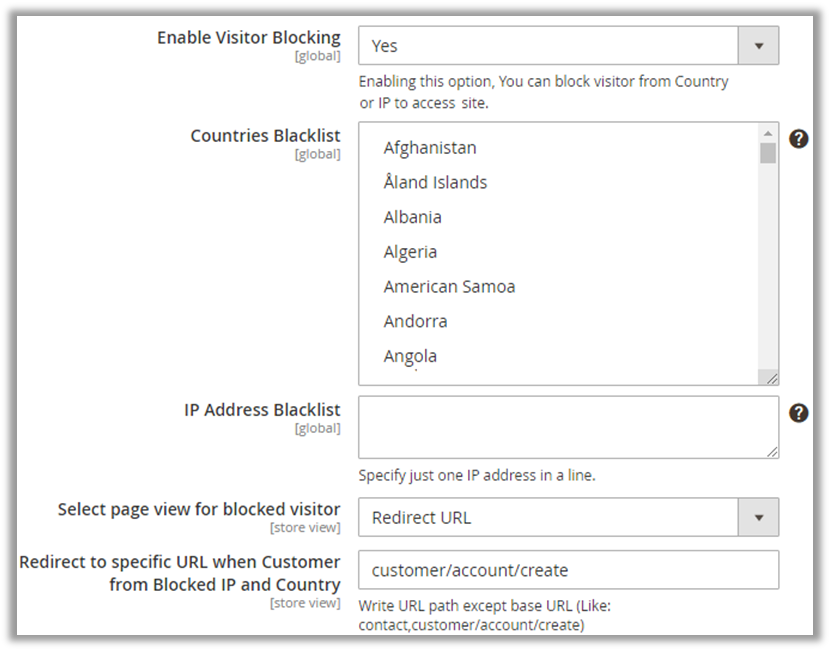
You can block the unwanted users or traffic to your store by entering the IP address(es) manually or selecting the country from the Country List.
– Enable Visitor Blocking: Enable this option to block the users to your store.
– Countries Blacklist: You can block unwanted users or traffic from any country. Select the country(s) to blacklist and not allow to access your Website.
– IP Address Blacklist: You can also block unwanted users or traffic by inserting the IP address(es) manually.
Note: You need to insert a single IP Address per line.
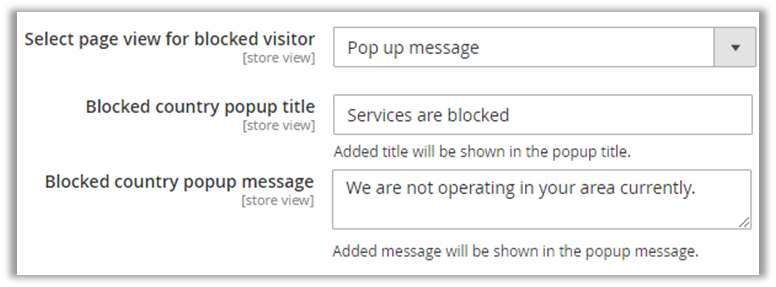
Select page view for the blocked visitors: To block visitors, you can display the Pop-up message or redirect to the specific page by selecting the Redirect URL option.
You need to insert just the URL path of the store to redirect the customer to that page. If you have selected the ‘Popup message’, you need to insert the popup title and message.
After inserting & selecting the required details for “Geolocation Configuration,” click on the Save Config button. After saving the Geolocation Configuration, you need to set up for the Store & Currency under the Manage Rules.
Manage Rules
Navigate to Geolocation Redirect -> Manage Rules menu to configure the Store & Currency by selecting the country and the Store for that selected country.
You will get the list of existing Geolocation Rules in grid view. You can edit any by clicking on the Edit option under the ‘Action’ column.
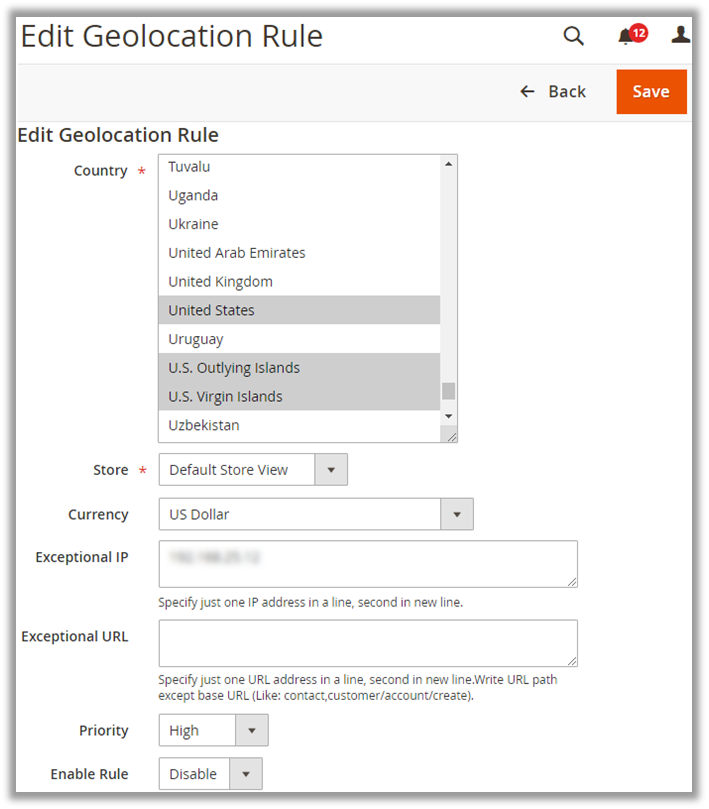
From here, you can add a new rule to redirect the website based on the user geolocation. Click on Add New Rule button to add and configure the store & currency or ‘Edit’ any store.
Select the required details:
– Country: Select the Country of the visitors.
– Store: Select the Store from the drop-down option to which you want to redirect the visitors. You will get the store’s list as per the Store Configuration.
Note: You can select the multiple countries for a single store by holding the ‘Ctrl’ and Mouse click.
– Currency: Select the currency to display on the store for product rates. You can configure the currency from the Stores à Currency Rates under the Currency menu.
For a specific Geolocation Rule, you can insert exceptional IP & URL:
– Exceptional IP: You can exclude the visitor from redirection by inserting the IP address. The visitor will not be able to switch the store. If you have multiple IP addresses, you need to insert one IP per line.
– Exceptional URL: The visitor will be redirected to the default store for added exceptional URL.
– Priority: Set the priority. High priority selected rule will be considered first for redirection in case there are any other rules added in the backend.
– Enable Rule: Enable/Disable the rule as per your business requirement.
After configuring the rules for the store, click on the Save button.
Note: Geolocation Rule can be set only for one store by selecting the multiple countries if required. But you cannot add a new Geolocation Rule for the Web Store for which you have already added the Rule.
Filter Rules & Actions
Filter Option
When you are managing many stores at a time, the filer option is provided to search and view the Geolocation Rules based on the selection of Country, Currency, Priority, Status, and Exceptional IP & URL.
After selecting the details for the filter, click on Apply Filters button, the Geolocation Rules will appear based on the Filter selection.
Actions
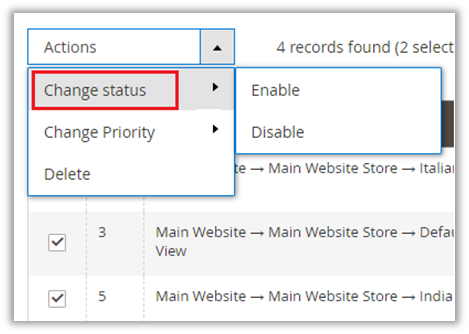
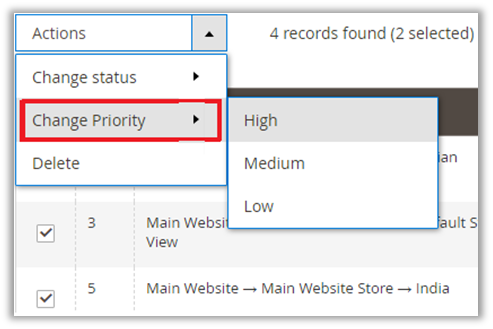
The mass actions are provided for the Geolocation Rules. By clicking on the Action option, you can change the Status and Priority for the selected Geolocation Rules. You can delete the Rule(s) as well.
Geolocation Analyze Data
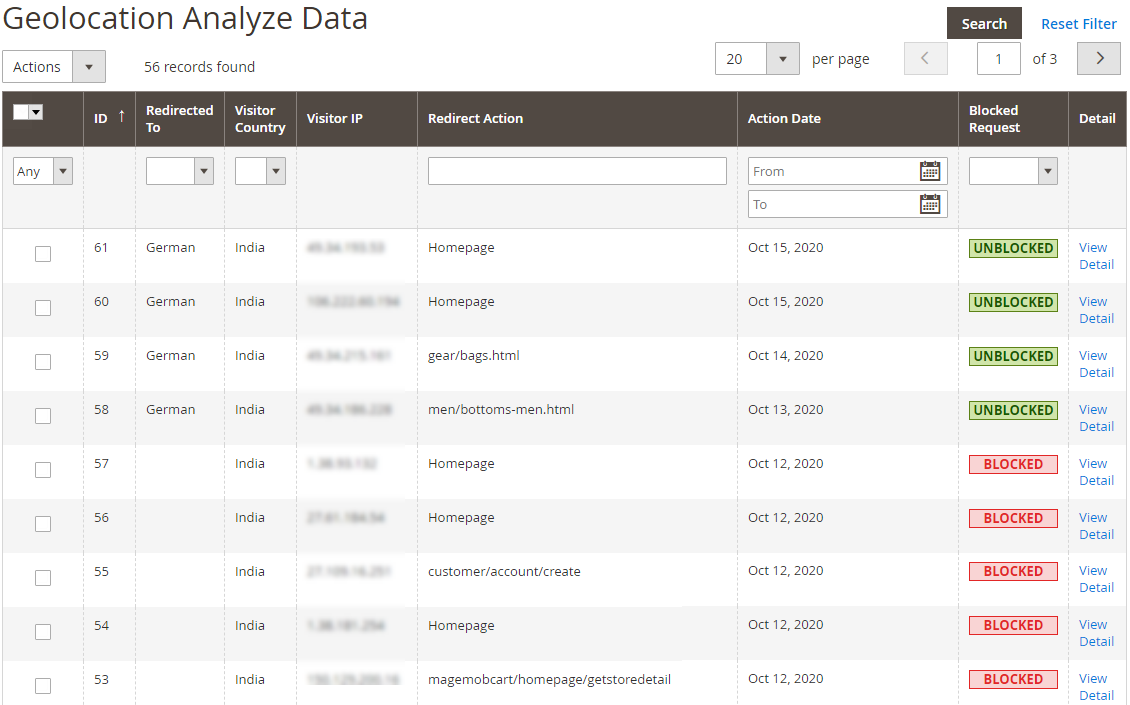
Navigate to Geolocation Redirect -> Analyze to check the data with the details who visits your store. You will get the details of Redirection, Visitor’s Country, IP, Redirection Action with the Date, Block status.
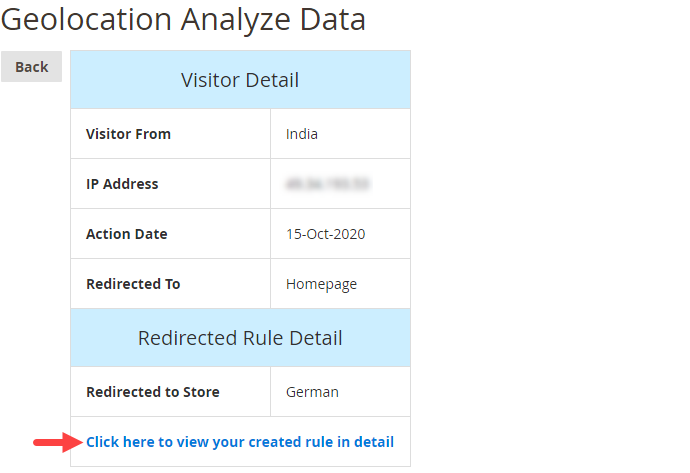
By clicking on the View Detail, you will get the Visitor’s details in summary. You can also navigate to the Rule that you have created.
Frontend View (Store View)
As per the GeoIP Configuration and GeoIP Rules, your webstore will redirect the visitors accordingly.
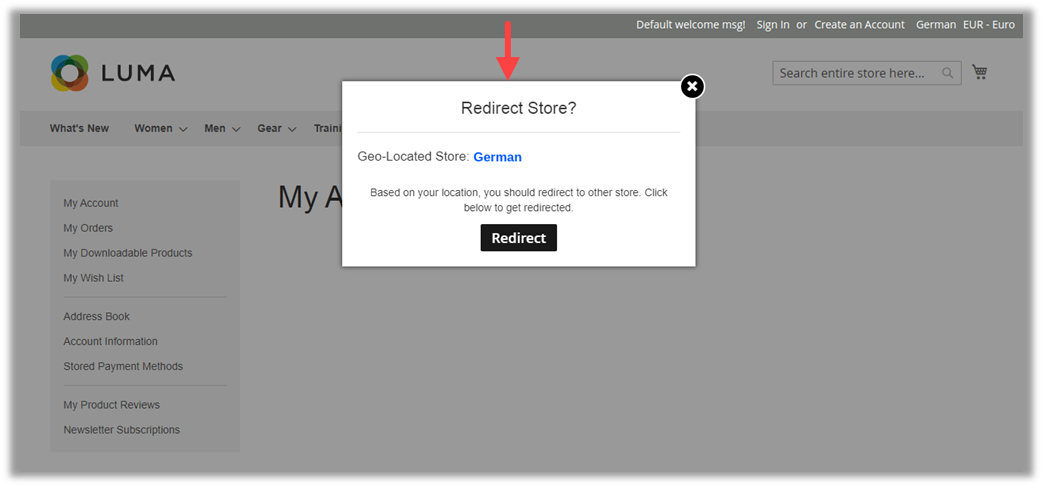
When your customers will visit the webstore, they will get the popup if you have enabled the Prompt user to ask for switching store option.
By pressing Redirect button, they will be redirected to the webstore which is managed in the GeoIP Rules.
But if the customer Cancelled the popup, they would stay on the default store only, but they can select the store view manually.
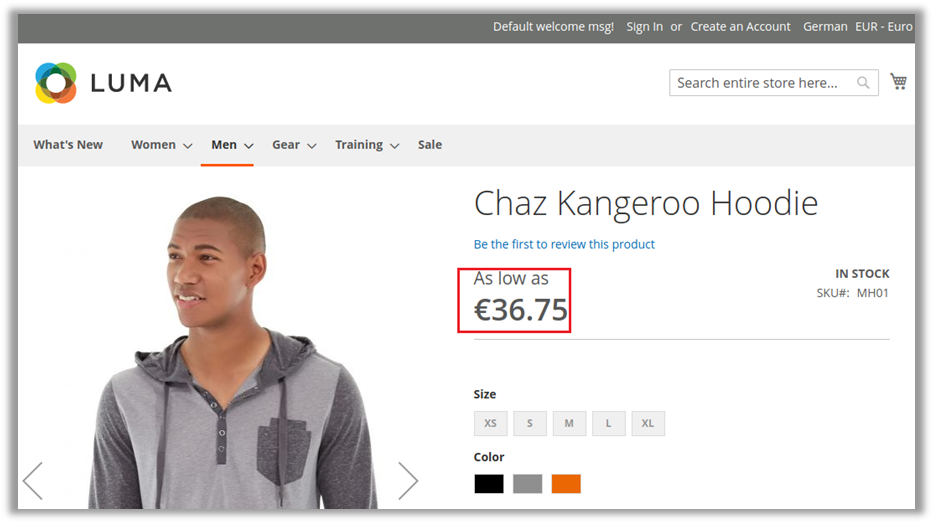
Once your customer clicks on Redirect, they will be redirected to that country’s specific store. As per above screenshot, the customer will be redirected to the German store and the currency will be displayed i.e. Euro in the product rates.
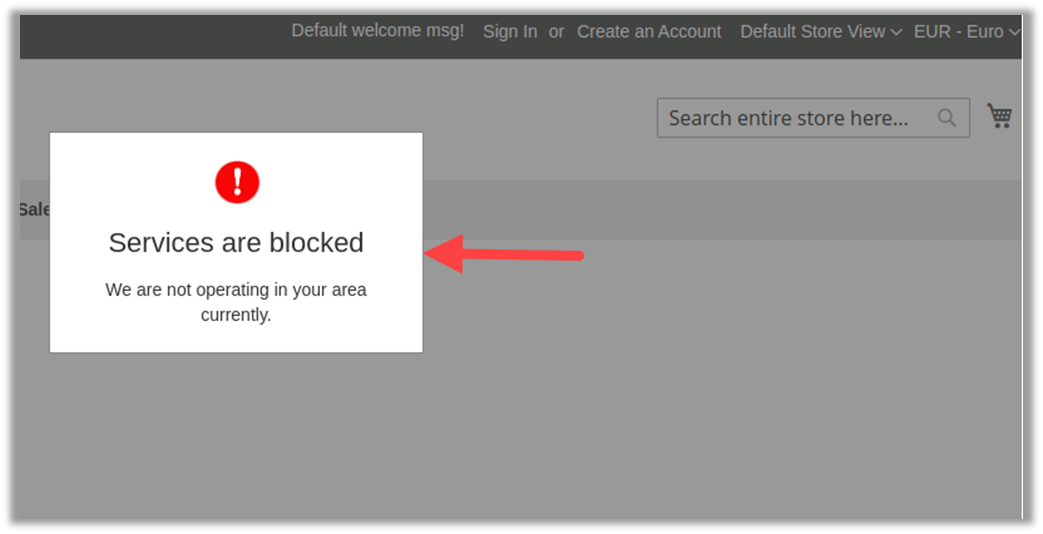
If the visiting customer’s county is blocked, the customer will get the popup message as you set or ask to navigate to specific page.
If you have enabled the Magento “Manual Store Switcher” and “Manual Currency Switcher” from GeoIP Configuration, the customer can manually select the store or/and currency.
Points to Note
You must sign up to MaxMind GeoIP to get the License key to get the Geolocation of the visitors.
You can get sign up from here.
GeoIP Rule can be set only for one store by selecting the multiple countries if required. But you cannot add new GeoIP Rule for the Web Store for which you have already added the Rule
Contact Us
We simplify your business, offer unique business solution in digital web and IT landscapes.
Live Chat
Get instant support with our Live Chat.
Visit our product page at: appjetty.com/magento2-geoip-store-switcher and click on the Live Chat button for instant support.
Tickets
Raise tickets for your specific question!
Send an email to [email protected] or you can login to your account @ appjetty.com and click on My Support Tickets on your account dashboard, to get answers to your specific questions.
Customization:
If you would like to customize or discuss about additional feature for GeoIP Redirect, please write to [email protected]
