SugarCRM SURVEY ROCKET (Ultimate)
SURVEY ROCKET (Ultimate)
Version: 5.5.0
SugarCRM Compatibility:
Professional Edition 7.6.* to 12.2
Enterprise Edition 7.6.* to 25.2 (Sell, Serve)
Introduction
AppJetty provides an effective solution in the form of Survey Rocket – a SugarCRM based Plugin which is helpful for entrepreneurs to conduct surveys.
Know your customers better by sending them a Survey questionnaire with several important questions; answer to which can affect your business strategies. Let your customers tell their preferences and give you an honest feedback about your services.
Benefits of Survey Rocket
Searching for a solution for improving customer satisfaction? Survey Rocket helps you to collect and store the valuable feedback of your customers.
– Survey Rocket helps you to bridge the gap between businesses and customers. It allows you to sneak into the hearts of your customers.
– Get to know the value of your products/services and the improvements required if any.
– Feedback could be helpful from a marketing and sales point of view.
– Create eye-catching surveys with industry specific themes and prebuilt questionnaires which the customers will tend to fill up.
– The survey questionnaires can have different answer types.
– Generate various types of reports based on different statistics.
– Send Feedback using WhatsApp/SMS.
– Generate the Comparison & Cross Tab Reports to compare the Survey and Questions.
– Now providing support for SugarCRM 14.2 and PHP 8.3.
Prerequisites
Following points must be followed before starting Installation.
– You should login as an Administrator in SugarCRM.
– Check that your SugarCRM Instance is compatible with Survey Rocket.
– You must have a valid License key.
– If you are installing Survey Rocket, make sure there isn’t any older version of Survey Rocket Plug-in already installed on SugarCRM. If there is any, you will have to uninstall that plug-in first.
– Make sure that CRON is configured for the scheduler Jobs.
– Outbound email must be set for the SugarCRM system. Survey Emails uses the SugarCRM Outbound Email Account.
Note: If you are already using Survey Rocket and are upgrading to a newer version, then you need to put your SugarCRM system under maintenance mode (To avoid survey submission entries). Once the Upgradation is complete, you can exit the maintenance mode.
Installation & Activation
You will see how to install and activate the “Survey Rocket” into the SugarCRM.
Installation
To start with the installation, Log-in as Administrator into SugarCRM. Go to the Administration page and click on ‘Module Loader’ to install the package.
Browse the zip file and click on ‘Upload’ button under Module Loader screen. After uploading package, click on the ‘Install’ button to install the package.
Click on ‘Commit’ button to finish the installation. After successful installation, you can see ‘Survey Rocket’ Plug-in in Installed plug-in list on Module Loader page.
Now, you need to repair your SugarCRM Instance. For that go to Administration page and click on ‘Repair’ link, then click on ‘Quick Repair and Rebuild’ link.
Configuration
Get Activation Key
Get the activation key from the Order Confirmation Mail. OR
Login to your AppJetty account then go to downloadable options and copy the activation key for the Survey Rocket plug-in.
Activate Your Plugin
After successful package installation, you need to validate your license and activate your Survey Rocket from Survey Rocket Configuration panel.
Log-in to your SugarCRM as admin and go to Administrator Page. You can see the ‘Survey Rocket’ section on this page.
Now, click on ‘License Configuration’ link, this will re-direct you to License Configuration tab.
Enter License activation key provided by AppJetty. Validate your license by clicking on the ‘Validate’ button.
After successful license validation, you can enable the plug-in by selecting ‘Enable’ option from the selection list and then click on ‘Save’ button.
Now, your Survey Rocket plug-in will be activated.
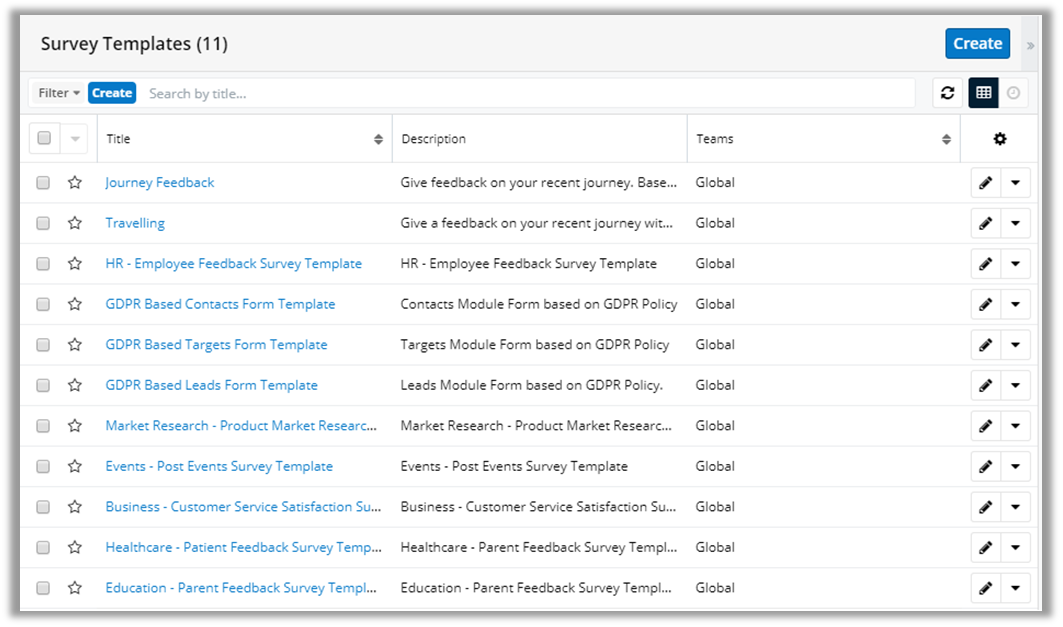
Create a Survey
How to Create a Survey?
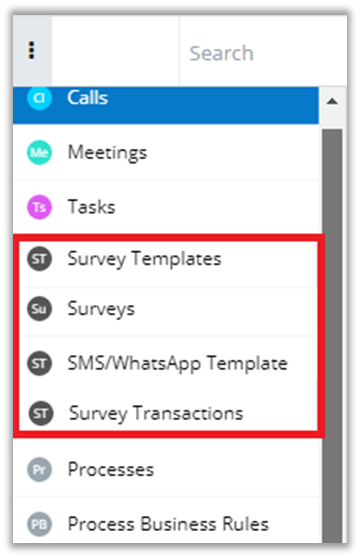
After getting the activation key and plugin, you will get the Survey options in SugarCRM menu.
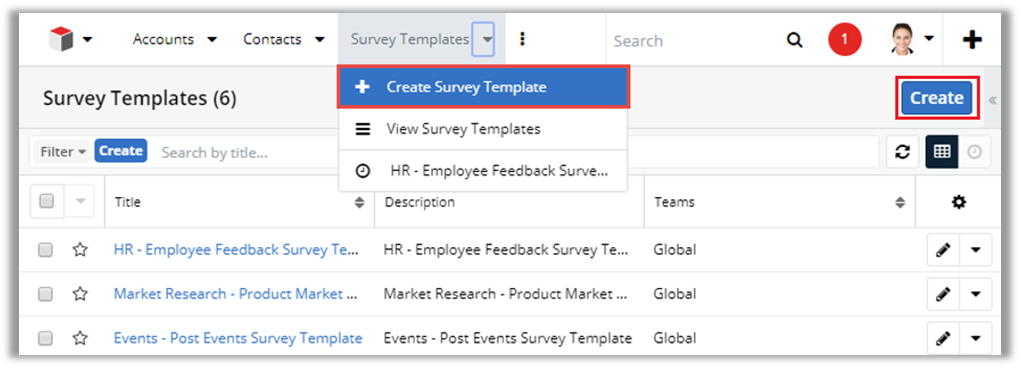
User can design a new ‘Survey Form’ in three ways:
Edit & redesign an existed “Survey Template” and use it to create multiple surveys.
Build a “New Survey” from Scratch.
(Template Creation -> Create Survey)
Directly Creating a Survey from the ‘Surveys’ page.
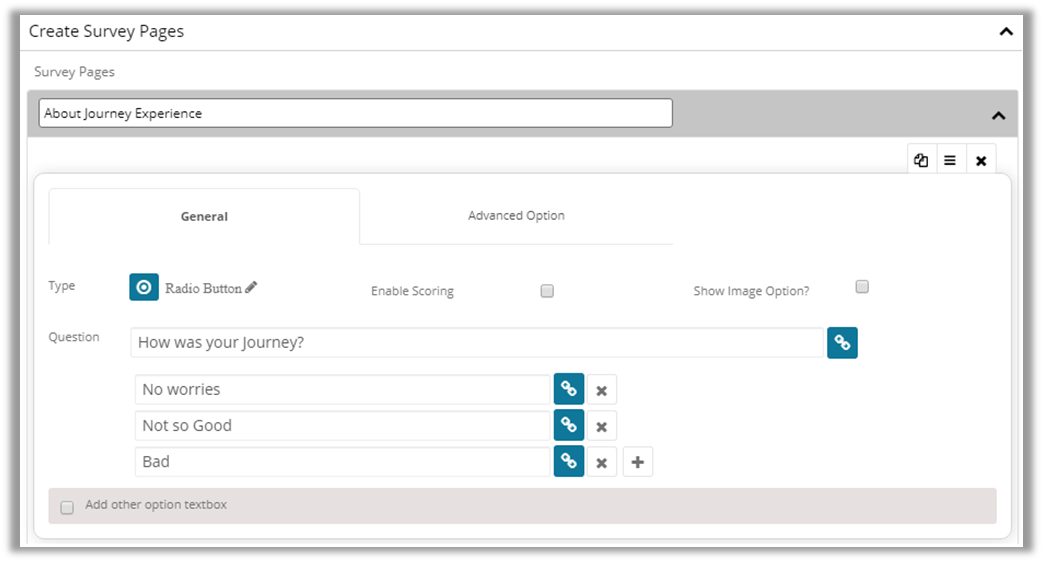
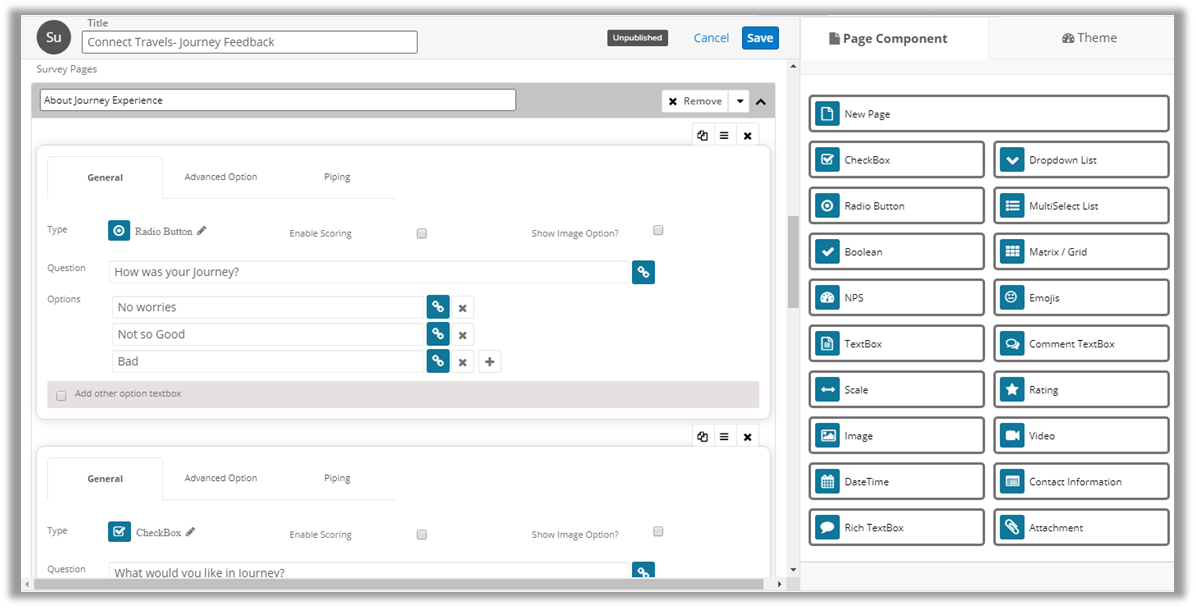
Adding Questions on the Survey Page
The first step to building your survey template is adding questions. You can edit questions if the template is already created.
“Survey Rocket” provides various Question Types with Advance Option to create ‘Survey Form’ with pagination.
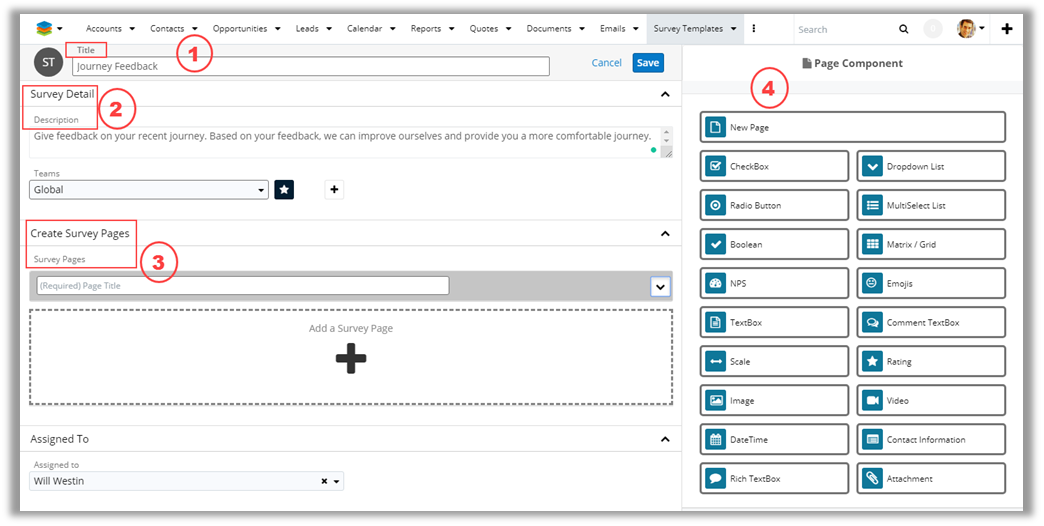
Title: Add a title for Survey Template. It will be based on the subject you are creating a Survey.
Survey Detail: Add a description about the Survey in details.
Create Survey Pages: Add Title or Name of the Survey Page.
Page Component: From here you can add required Questions related to your survey by drag & drop.
To add a question to a page, just drag & drop that question type to the survey page.
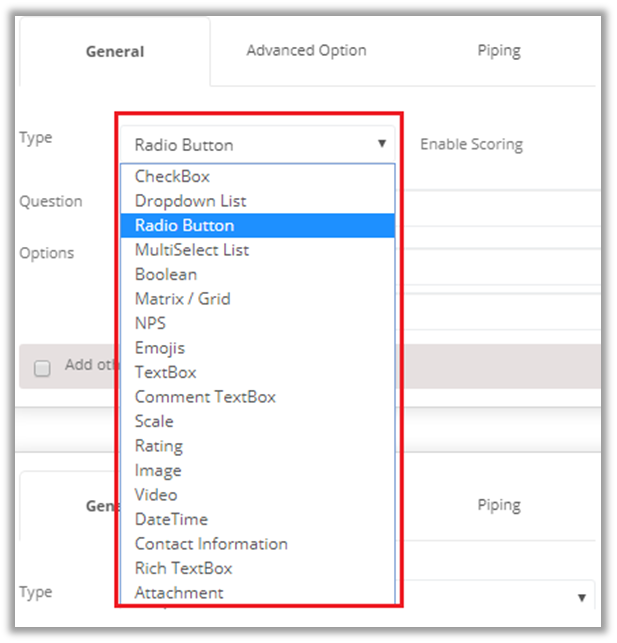
The various Question Type with the description:
| Survey Question Types | Description |
| Multi Select List | Allows your respondent to choose one answer (or multiple answers) from your list of choices. |
| Dropdown List | Provide a dropdown list of answer choices for the respondents to choose from. Use a dropdown question when you need to ask a multiple choice, single answer question but want to save space. |
| Rating | Use a Rating Answer type if you want respondents to evaluate something based on your question. |
| Textbox | Add a single textbox to your survey when you want respondents to write in a short text or numerical answer to your question. Also allows setting data type like integer, floating, charring limit. |
| Comment Textbox | Use the comment or essay box to collect open-ended, written feedback from respondents. |
| Contact Information | This is the collection of multiple short text or numerical answers with a single question. Use this question type to collect a respondent’s relevant contact information, including name, address, email, and phone number. |
| Radio Button | Provides a Radio button list of answer choices for respondents to choose from. Also allows adding image in the answer option. |
| Checkbox | Allows your respondent to select one or multiple answers from your checkbox list of answer choices. Also allows adding image in the answer option. |
| Scale | This a single-row rating scale which allows evaluation based on weight. A Rating Scale question, commonly known as a Likert Scale, is a variation of the Matrix question where you can assign weights to each answer choice. |
| Matrix/Grid | This is a multi-row checkbox or radio button field. You can set the matrix question to collect multiple answers or only one answer per row. You also have the option to turn the matrix question into a rating scale when you want to assign weights to respondents’ answers. |
| Date/Time | Allows respondents to enter a specific date and/or time. |
| Attachment | The Attachment question type allows you to have your respondents upload a file as part of their survey response. |
| Boolean | Allows respondents to switch something on or off. Respondents can choose between Yes OR No using a checkbox. |
| Image | Let’s you insert an image into your survey by uploading an image file or specifying the URL of an image on the web. |
| Video | Let’s you insert a video into your survey by specifying the URL of a video on the web. |
| Rich Text Box | Add additional text in a survey form and edit them using the rich text box option. |
| Emojis | Use 5-point rating scale to evaluate rating based on range of sentiments from negative to neutral to positive. |
| NPS |
Let’s you collect responses and segment them on a 0-10-point scale into promoters, passives and detractors. |
Advanced Options
Advanced Options includes question validations.
You can add Help tips for each Survey Question. Help Tips are text you can set to guide respondents during the survey. For example, if you think you may need to clarify a term used in a question, you can use a tip to clarify the term.
If you want to make any question mandatory for respondents during survey, tick the Is Required box.
You can sort the options alphabetical wise by ticking on Sortable.
To separate the Question with a horizontal line, ‘tick’ the Add Question Separator? option.
You can choose the display option either from Vertical or Horizontal.
Note: Different Question Types have different question validation and options.
As you save the Template, you will redirect to Survey Template Detail View.
You can edit questions of the template at any time, but editing limitations apply once the survey has been sent to targeted audience.
Once you ‘Save’ a survey template, you will be able to create multiple Surveys using that template.
Creating a New Survey Form
You can ‘Create Survey’ from the Template list if you want to use any template or you can ‘Create Survey’ directly from the Surveys page as well.
You will find the following pages to create a Survey From:
-> Detail Page -> Survey Welcome page -> Survey Pages
-> Survey Thank You Page -> Advance Survey Configuration (Automatic Survey Reminders)
Survey Details page
Insert all the necessary details for the Survey Form.
Survey Title will be copied from the Template if you are creating a Survey from the Template else insert it as per you Survey subject.
Upload a logo and can set background image if any.
Insert the duration of the Survey, when you want to ‘Start’ and want to ‘End’ by inserting Starting and Ending Date & Time.
Like Survey Title, the Description will be copied from the Template which you can edit and change as per your survey subject or else insert it.
Insert Footer Content as per your business identity.
By ticking Allow Redundant Answer option, the customer can send in multiple responses from a single IP and the last submitted response will be stored as final.
Survey Pages options
Add/Edit Questions
You will get the pre-defined Survey Pages if you are creating the Survey from the Template else you need to insert the details of Survey pages.
You can edit the inserted Survey Pages as per your requirement and you can insert other Questions from the Page Component by drag & drop feature to the Survey Page.
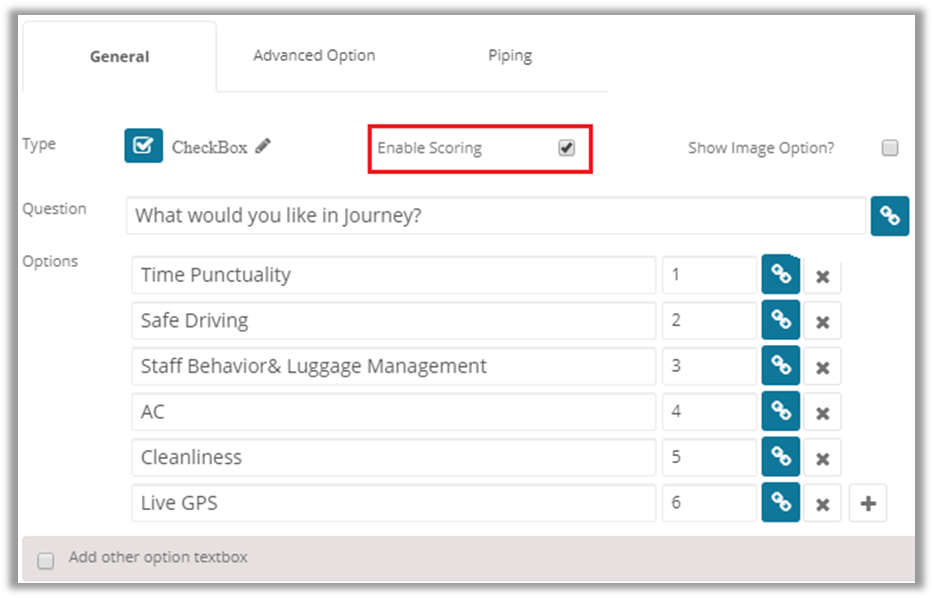
Enable Scoring option
Scoring feature can be enabled for 4 types of questions:
-> Checkbox -> Dropdown list -> Radio Button -> Multi Select List -> Boolean
To enable scoring while creating survey, tick the Enable Scoring checkbox. This will enable boxes to enter scores besides the answer choices.
Once the respondent fills in the whole survey, the overall score can be analyzed in the Survey Reports.
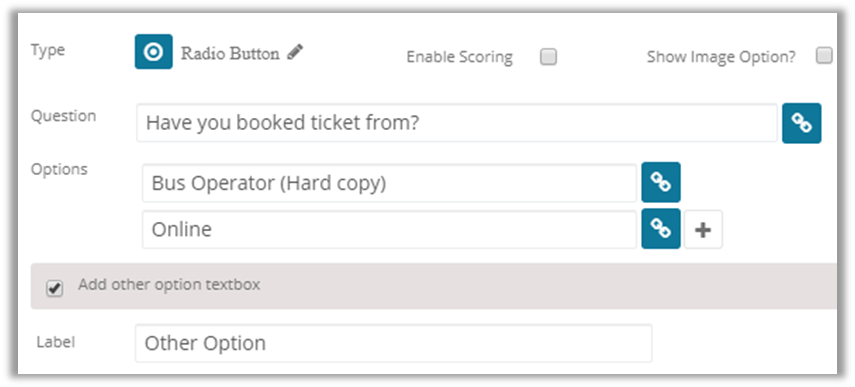
Other option Textbox
To allow respondents to give some other answer than those mentioned in the options, the ‘Other’ option feature can be used.
This option can be enabled when you have selected the Multi-choice Question type:
-> Checkbox -> Dropdown list -> Radio Button -> Multi Select List
Tick the Add other option textbox to add an extra blank field along with the answer choices.
You can also change the Label as per Survey to match the question.
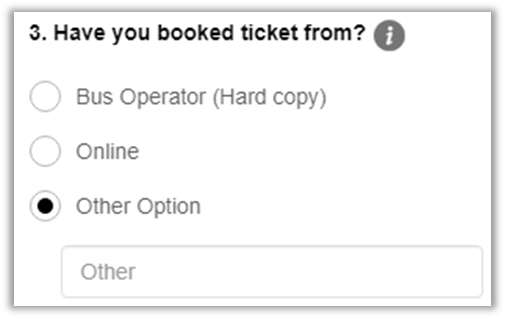
Survey Preview (Front End View) of “Add Other option textbox”
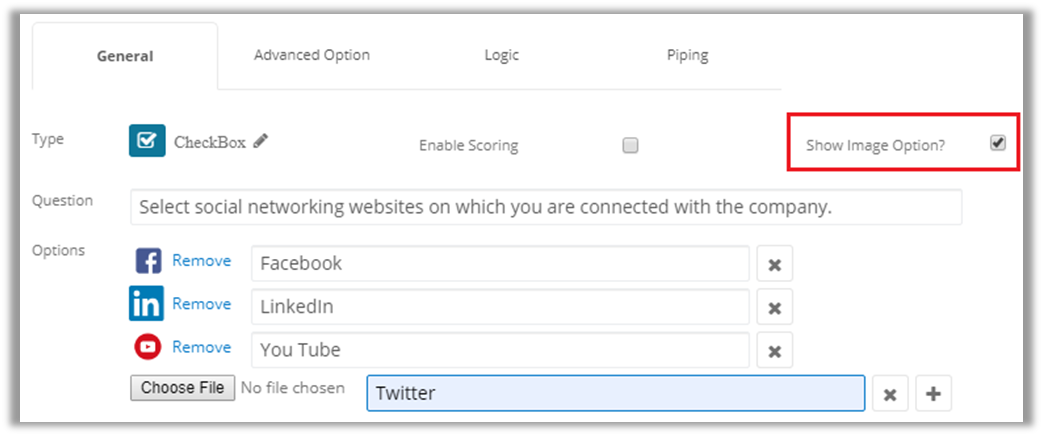
Show Image option
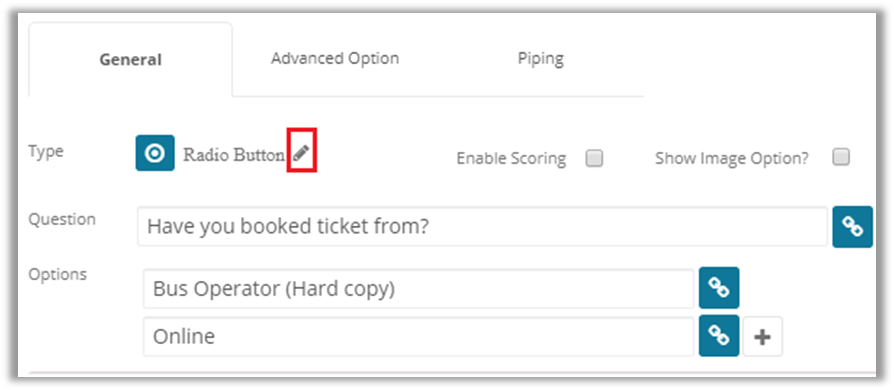
Radio Button and Check Box question type can have ‘images’ as their options.
You can show the image icons in the options. For that tick the Show Image Option checkbox.
Using this option, you can provide the selection to the customer about Social Media or another selection based on the image or icons.
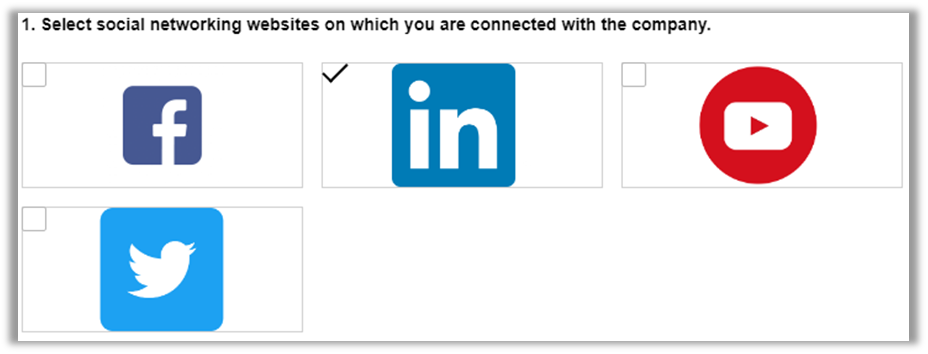
Survey View (Front End View)
The selected image icon will be displayed as options in the Survey.
Attachment Question Type
After drag & drop the ‘Attachment Question’ type, you can give the option to attach any file from the Survey Page.
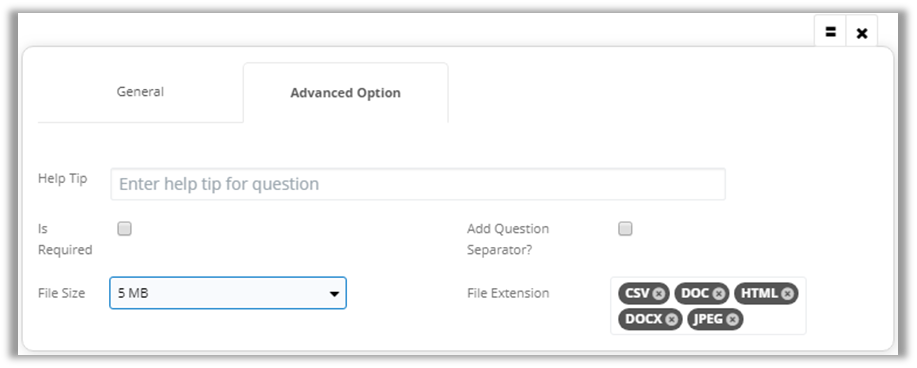
Under “Advanced Option” available within Attachment Question Type, user can restrict file upload size and file extensions for particular file upload. Upload size can range between 1 MB – 5 MB.
Supported types for file extensions are csv, doc, docx, html, htm, jpg, jpeg, ods, odt, pdf, png, ppt, pps, rtf, sxw, tab, txt, text, tsv, xls, xlsx.
These restrictions applied to the question give validations to survey responder at time of survey submission.
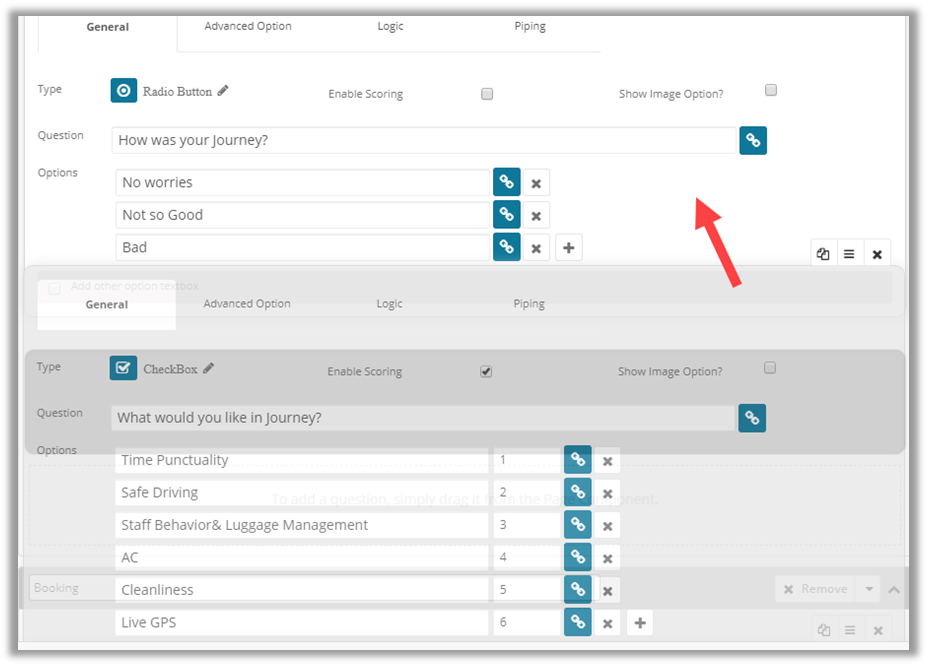
Add Section Header
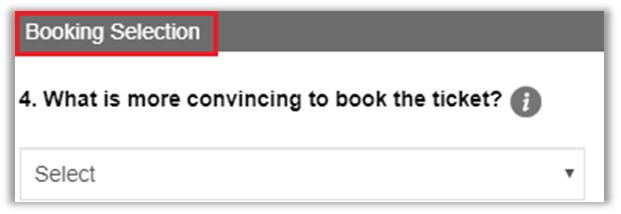
To add a ‘section header’ inside a Survey Page, click on the ‘Section Header’ icon on the top right corner of a question.
This will add a ‘Section Header’ above that question. By doing so you can categorize questions into different sections in a single page.
Survey Page View (Front End View)
You will see the “Section Header” in the Survey Page. Section Header separate the Questions.
Clone Survey Question
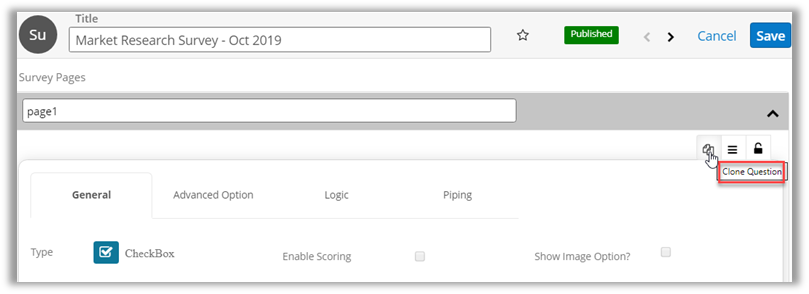
To copy an existing question, click on the ‘Clone Question’ button in page section.
By clicking on the ‘Clone Question’ button, it will show you a pop up to select the page (if you have created multiple pages in the survey) where you want to copy that question.
While copying the survey, only basic details will be copied like question title, answer options, and advance configurations.
Advance Survey Configuration
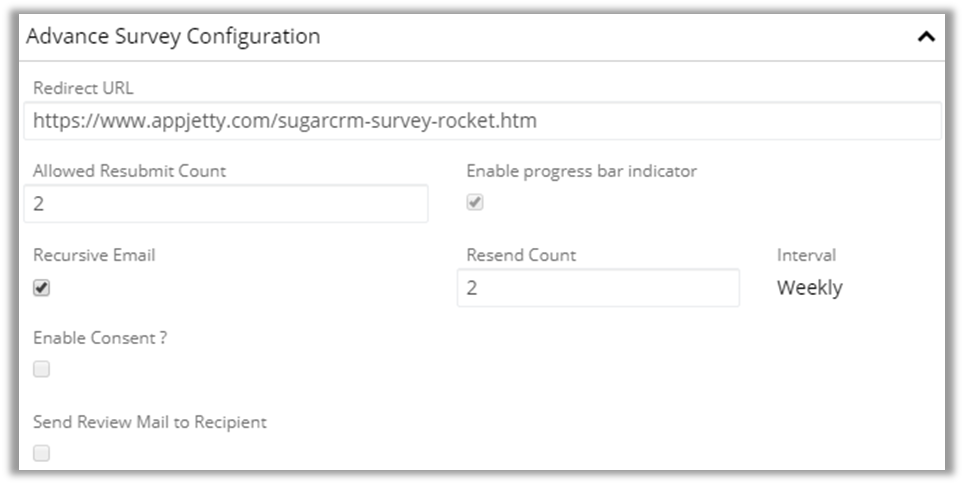
If you want to redirect the responder to any webpage after submission of Survey, insert the Redirect URL.
To allow the submission of Survey more than one time, insert the no. of Resubmit Count.
‘Tick’ the Enable Progress bar indicator option to display the progress of pages with number on Survey page on header.
Send automated reminder email for the survey to a recipient who hasn’t responded in a certain time frame.
To send a reminder email, check Recursive Email checkbox and choose an interval (Weekly/Monthly) to set how often the reminder mail should be sent. You can also decide the number of times you want to send reminders.
‘Tick’ the Enable Consent to display any Note or Terms & Condition. Insert the Description as per your Consent details or note.
‘Tick’ the Send Review Mail to Recipient to send the response mail after the submission of the survey/feedback.
By ticking this option, the default Email content edit box will open. You can edit as per your requirement.
Data Piping
Data Piping allows you to pre-fill your survey form with the existing CRM data. At the same time, you can also update your CRM records using your survey responses.
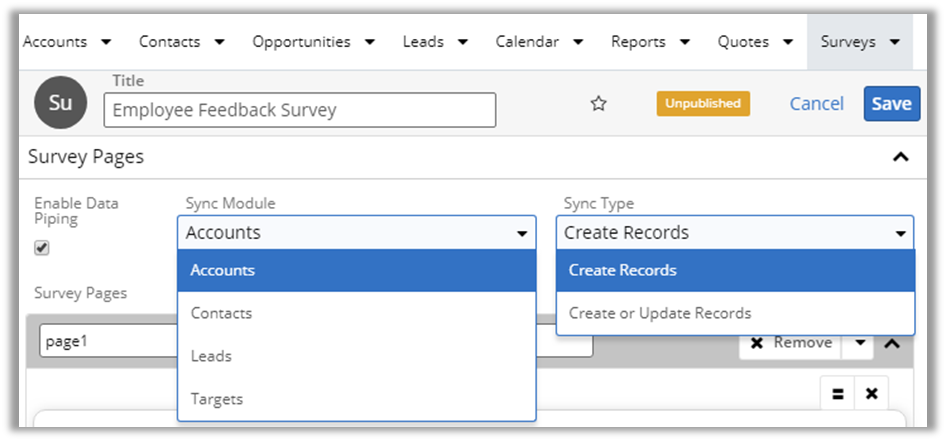
To enable Data Piping for your survey, check the ‘Enable Data Piping’ check box.
Now select a module from the following: Accounts, Contacts Leads or Targets
This will Pre-fill the data into survey submission form and/or update the records in that module on survey submission by a respondent.
You can also create a new record in the selected module.
To create a new record in the selected module, choose ‘Create Records’ option from the ‘Sync Type’ field.
To update an already existing record or to create a new record (if no such record exists), choose ‘Create or Update Records’ option from the ‘Sync Type’ field.
Enabling ‘Data Piping’ will add a new ‘Piping’ in each question.
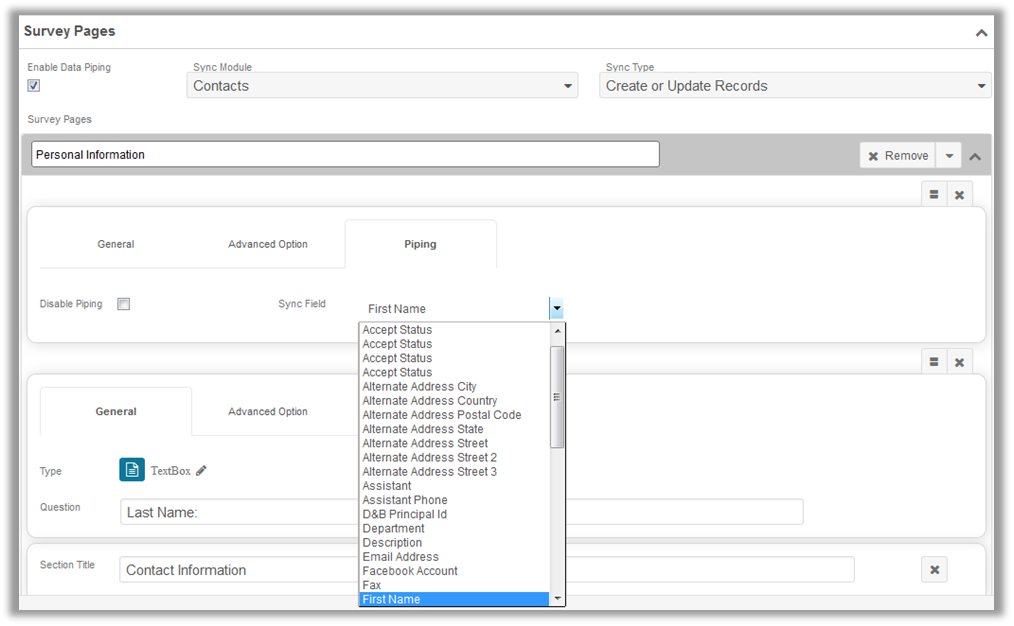
Now sync your survey questions with the fields of your selected module. To sync a question with a CRM field, navigate to the ‘Piping’ tab in that question.
There will be a ‘Sync Field’ dropdown with all the possible fields from the selected module. Choose a field with which you wish to sync the question.
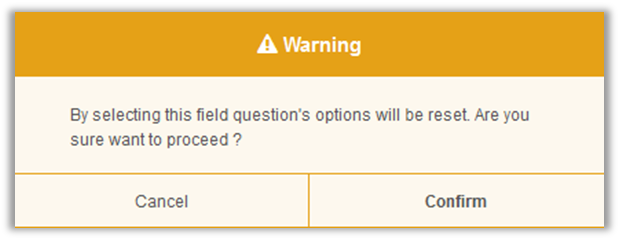
While mapping fields with the survey questions, there might be some fields which already have some predefined values in it. A popup will appear to sync those values with your answer choices. Click on ‘Confirm’ to sync the values.
If Data Piping is enabled, you will have to include all the mandatory fields of the selected sync module in your survey. If all mandatory fields are not included then an error message will appear.
Also, all questions with mandatory fields should be marked as required. If any of the questions with a mandatory field is not marked as required then a warning message will appear.
Click on ‘Confirm’ to make all such questions as required.
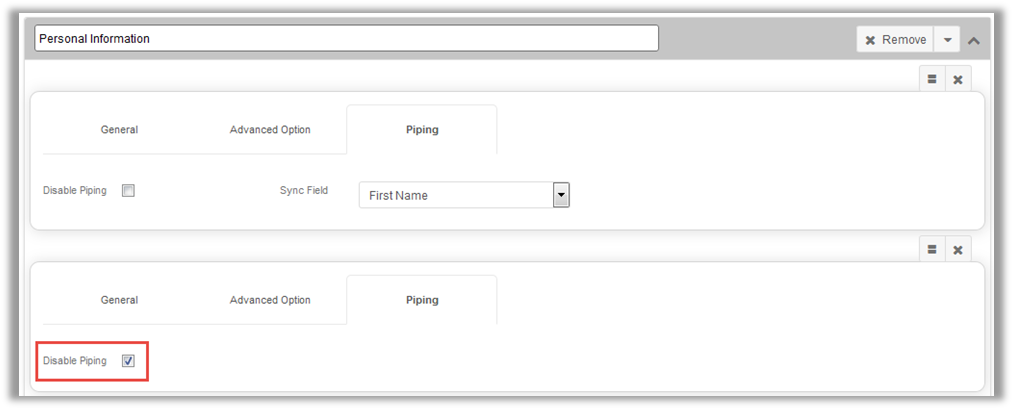
You can also disable Data Piping for a particular question. To disable Data Piping, check the ‘Disable Piping’ checkbox.
Once you finish syncing all the questions, save the survey.
Note: Once data piping is enabled for a module, you can do mapping only for that selected module. If you are changing the selected module after mapping the fields then you will have to remap the fields for the newly selected module.
Surveys with Data Piping are not qualified for Survey Automation.
Pre-filled Data will only appear for existing CRM contacts. If Data Piping is enabled for surveys which are shared online (Web links) then there won’t be any pre-filled data to display and records will be created (not updated) in the selected sync module.
Applying Skip Logic
Skip Logic feature allows you to customize your survey for each respondent by applying logic to the answer choices. Based on a respondent’s answer, branching logic will be created as per the conditions defined by you.
Skip Logic sample:
To apply Skip Logic, you must create the Survey and save it. Once you save a survey, edit that survey which will enable the Logic tab.
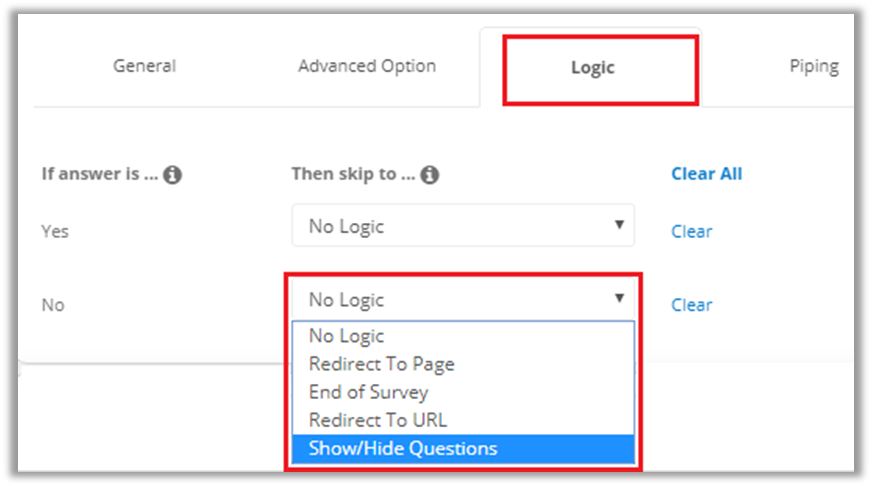
Click on the ‘Logic’ tab to set the logic for a question.
To redirect a respondent to a later page in survey, select ‘Redirect to Page’ option from the dropdown and then select the Page on which the redirection must occur.
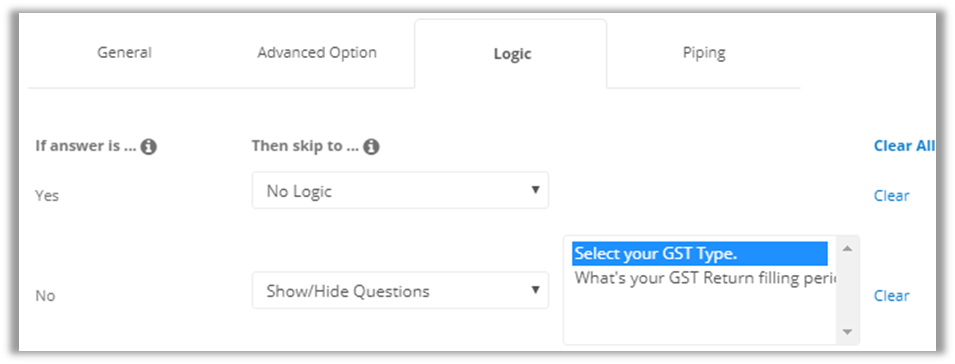
To hide questions and show them during survey based on the responses, select ‘Show/Hide Questions’ option from the dropdown and then select the questions.
These questions will be hidden during survey and will be shown only when the respondent chooses the option on which the logic is applied.
To redirect a respondent to an external URL, select ‘Redirect to URL’ option from the dropdown and then mention the URL on which the redirection must occur.
To redirect a respondent to the end of a survey, select ‘End of Survey’ option from the dropdown.
You can only apply ‘Show/Hide Questions’ logic for questions which comes after the current question.
Other Options of Survey
Generate Shareable Link
For sending out surveys to people other than the existing CRM records or to send surveys using a web-link, use the shareable web link feature.
To generate a shareable link, navigate to Detail view of that survey and click on ‘Get Shareable Link’ button.
This will generate a shareable web link, which you can post on Social Medias or share with people to get responses online.
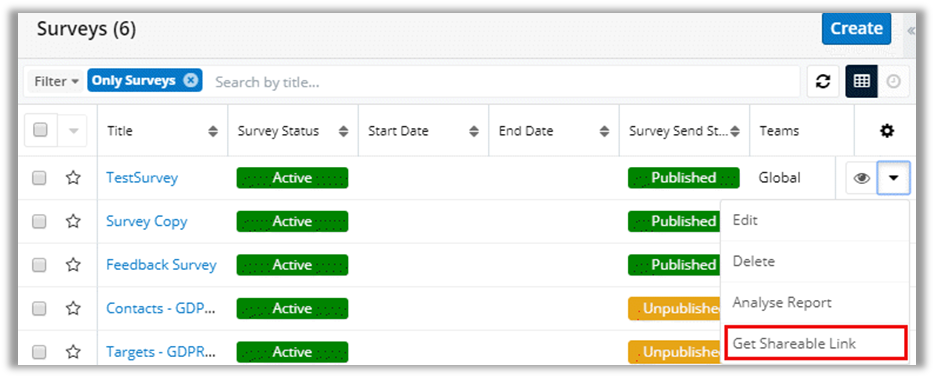
You can also directly generate and copy survey link from the list view of surveys shown in the Survey Module by selecting Get Shareable Link option. Selecting this option, link will get directly copied to the clipboard.
Survey Preview Icon
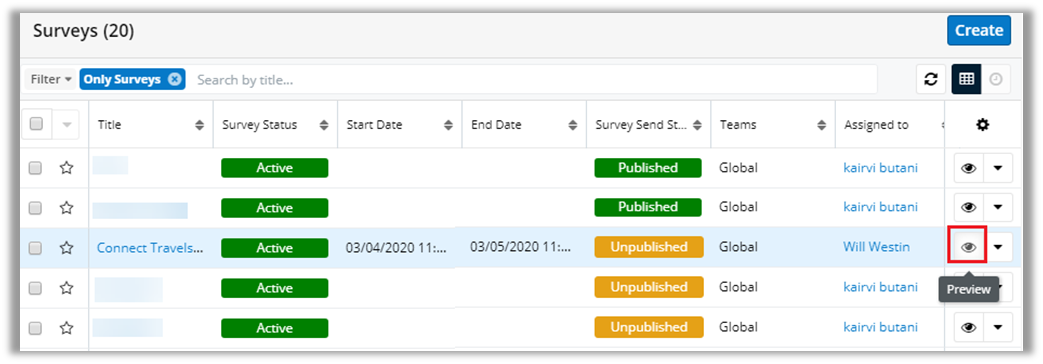
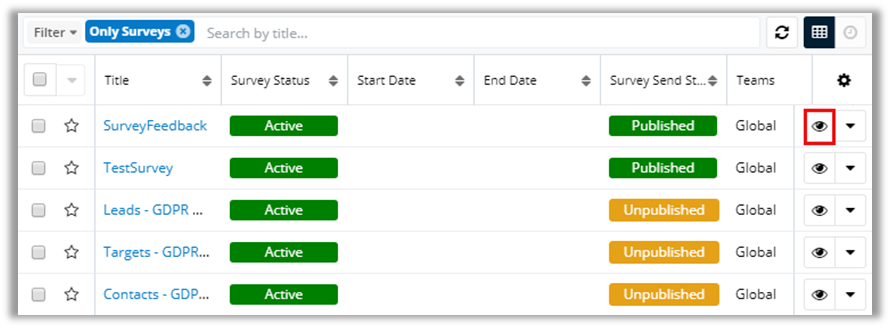
You can preview the survey that you have created before sending it. Survey can be previewed by selecting Preview option available on the list view and in the detail view of the particular survey.
In the list view of surveys, click on Preview icon available in the list besides every survey created.
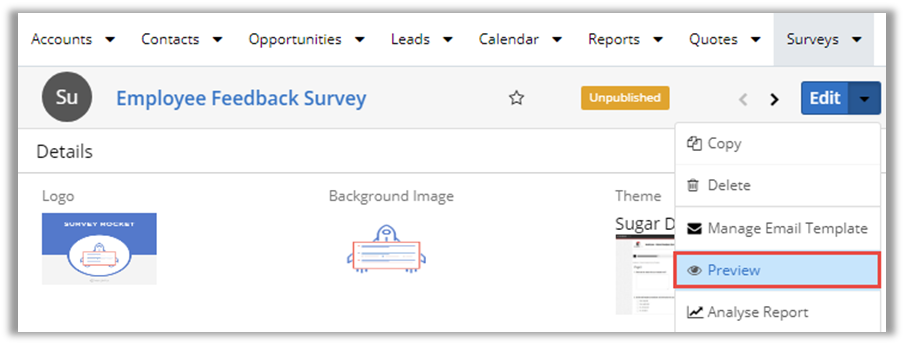
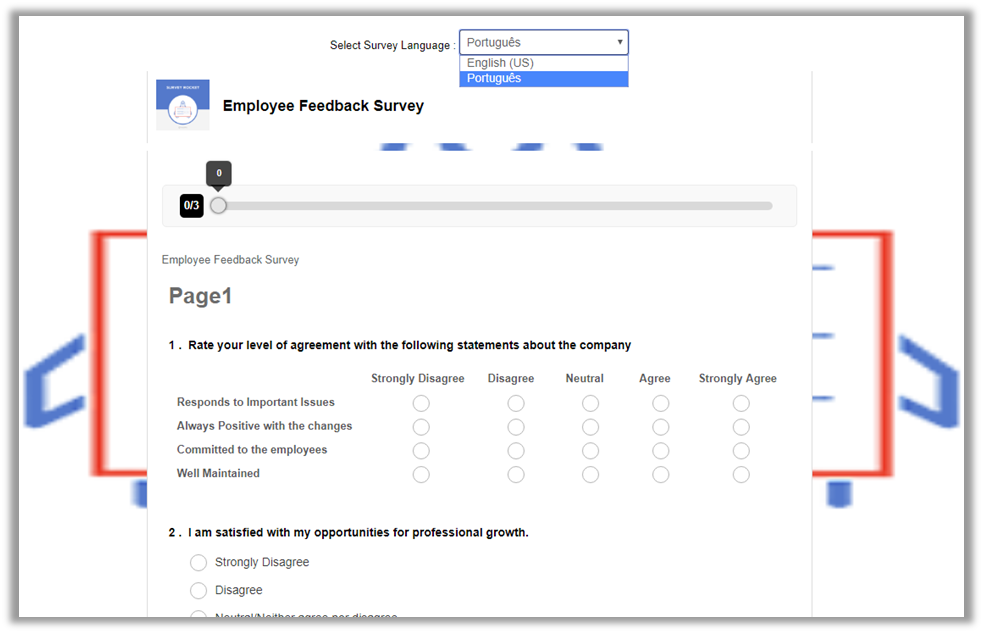
In the detail view of the survey, click on the dropdown arrow besides Edit button and select ‘Preview’ option. This will open up the preview of created survey in a new tab.
Note: Some of the Question Types and other functions will not work in the “Survey Preview”.
Copying a Survey
Once a survey is sent or shareable link is generated. i.e. Survey is published and filled by respondent, that survey cannot be edited again.
So if you want to use same Questions Type and Advance Options, copy that Survey and edit as per new Survey.
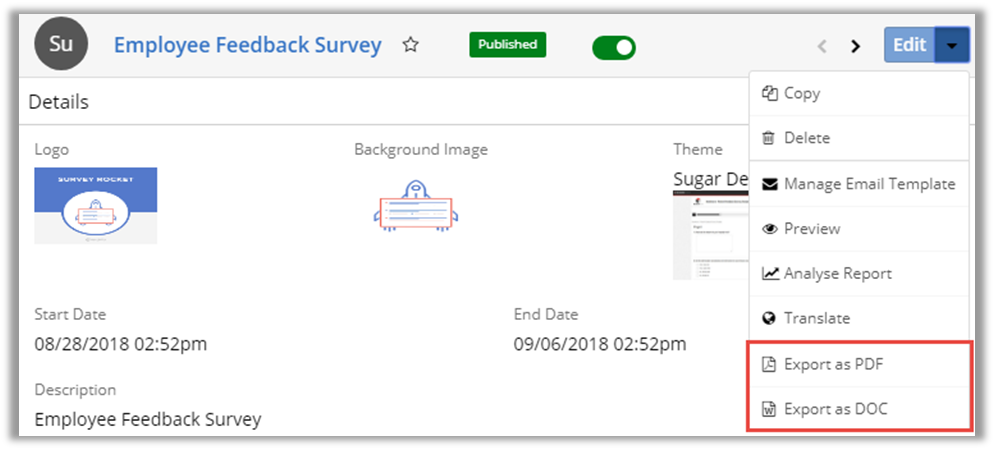
Copy option is provided from the action dropdown arrow besides ‘Edit’ button to copy a Survey.
Take Survey
You can take survey on behalf of the customer. Take survey option will be available for modules like accounts, contacts, leads and targets.
To take survey, Go to Detail page of any supported Module ->Take Survey.
It will open a pop up with the list of surveys. From there, you can select any of them and you will be redirected to the survey page.
Survey Automation
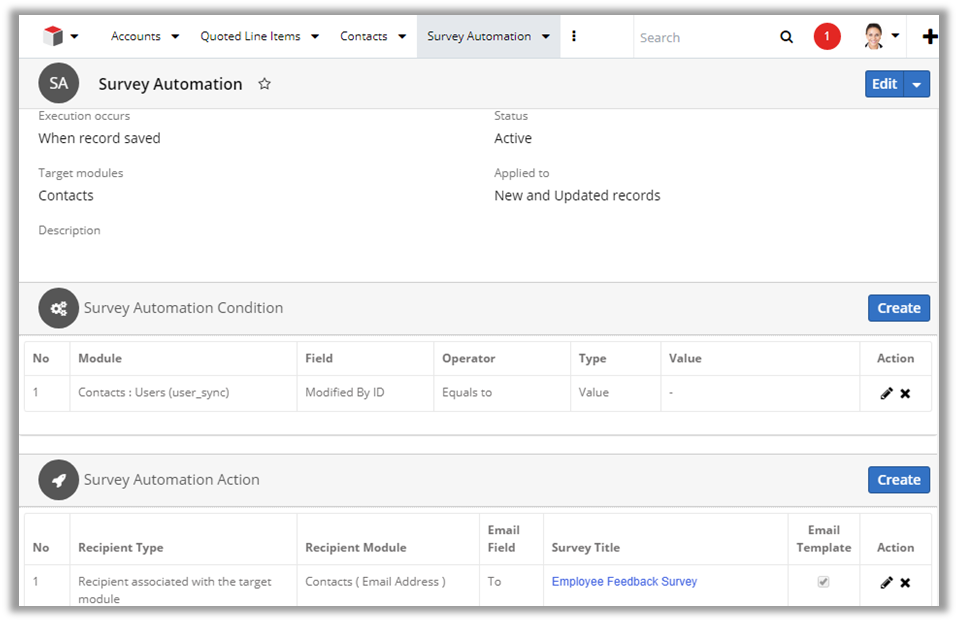
Send surveys automatically through survey automation module. Create a workflow from survey automation module to send surveys based on certain conditions that you set. Set actions to determine to whom the survey should be sent to.
Navigate to Admin Panel and click on ‘Survey Automation’ link.
Now click on ‘Create’ button to create survey automation workflow.
Enter a name for survey automation workflow, select an option from the dropdown to mention when the execution must occur, select a target module for the workflow and then select the type of records on which the automation must trigger.
Click on ‘Save’ button to save the survey automation workflow
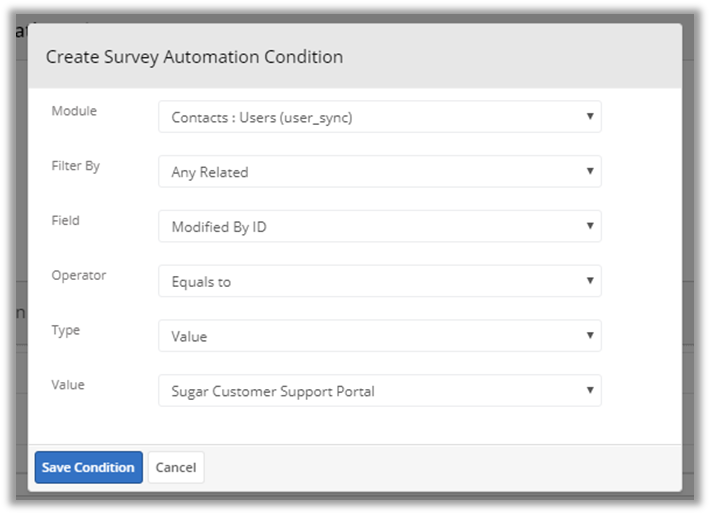
Now create conditions for the automation to trigger. When these conditions are met, the survey will be automatically sent to the chosen respondents.
To create conditions, click on ‘Create Condition’ button.
Select parameters to set the conditions and click on ‘Save Condition’ button.
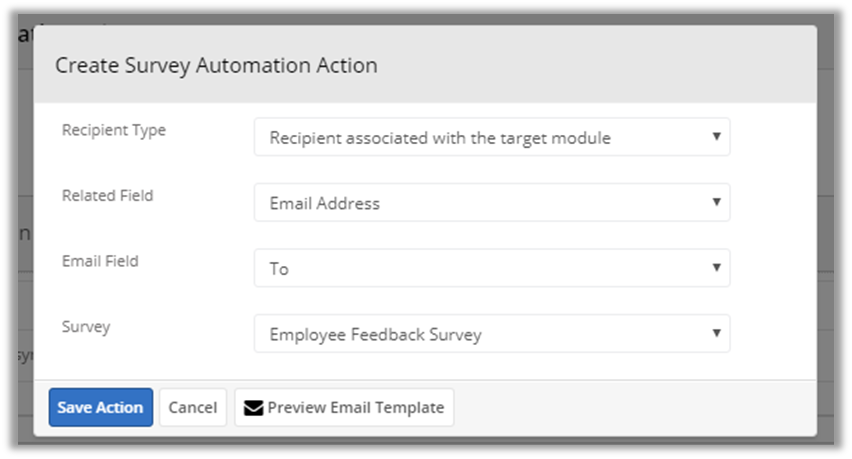
Now, set the actions to determine the recipients to whom the survey will be sent. Select the recipients associated with either target or related module from the dropdown. Select the related field for the chosen recipient type.
Select a survey from the dropdown and click on ‘Save Action’ button.
Sugar BPM Support
How it works:
-Surveys can now also be sent via Sugar BPM using the Survey Rocket plugin.
-You have to create a Process Definition and Design its flow.
-Define the Start event and then provide action to send surveys.
-To send surveys, you just need to Create a Related “Survey Transaction” record Action.
-Survey transactions records will be created whenever the Process condition matches as defined in design.
-Then, via scheduler survey will be sent for that survey transaction
How to configure :
Note: Only Admin users can configure this Process Definition module as per SugarCRM flow
You just need to follow the below steps :
- Send survey to Target Module : (Accounts | Contacts | Leads | Targets)
1. Go to Process Definition module
2. Select Target Module as Accounts
3. Then click on the action button “Design”
4. Drag and Drop Start Event from Top Left Corner
5. You have to define Conditions to start the Process event. Here, we have defined the condition as “When Account Billing Country is USA”
6. Then Define Action, Drag and drop “Action” from the Top Panel to canvas and then right click on dropped action and select Action Type as “Add Related record”.
7. Click on settings. Now, one popup window will be opened to configure which related module record you want to create.
8. Here, we want to send a survey to the triggering record account itself, so choose the below option in the fields.
Related Module : Survey Transactions [*:M] (Survey Submission: bc_survey_submission_accounts_target)
Filter: Keep as it is
Related to: Keep as it is
Fields :
Assigned to: Record Owner
Name: Name
Survey: “select the survey that you want to send”
Note: Keep all other fields as it is. Do not change anything. You can choose your desired future date in the Schedule on field if you want to send a survey on specified date and time. If you don’t provide any date then it will take current date and time.
9. Drag and drop End Process and keep “Do nothing” as it is.
10. Now, Join all 3 components by line
11. Then save the configuration.
12. Make Process Definition enabled by choosing the “Enabled” option in Status field of Process Definition
13. Now, Process design is ready. So whenever an Account is saved with Billing country “USA” it will send a survey to that account’s email address via mail.
- Send a survey to Related Module :
1. Go to Process Definition module
2. Select Target Module as Cases
3. Then click on the action button “Design”
4. Drag and Drop Start Event from Top Left Corner
5. You have to define Condition to start the Process event. Here, we have defined condition as “When Case status is closed”
6. Now Define Action, Drag and drop “Action” from the Top Panel to canvas, right click on dropped action and select Action Type as “Add Related record”
7. Click on Settings. Now, one popup window will be opened to configure which related module record you want to create.
8. Here, we want to send survey to the triggering(case) record’s related module(account), so choose below option in fields :
Related Module : Accounts [*:1] (Account: accounts)
Filter : Keep as it is
Related to : Survey Transactions [*:M] (Survey Submission: bc_survey_submission_accounts_target)
Fields :
Assigned to : Record Owner
Name : Name
Target
Related Survey : “select the survey that you want to send”
Note: Keep all other fields as it is. Do not change anything. You can choose your desired future date in the Schedule on field if you want to send a survey on specified date and time. If you don’t provide any date then it will take the current date and time.
9. Drag and drop End Process and keep “Do nothing” as it is.
10. Now, Join the all 3 components by line
11. Then save the configuration.
12. Make Process Definition enabled by choosing “Enabled” option in Status field of Process Definition
13. Now, Process design is ready. So whenever Case is saved with Status as “Closed” it will send a survey to case related account’s email address via mail.
Custom SMTP Configuration
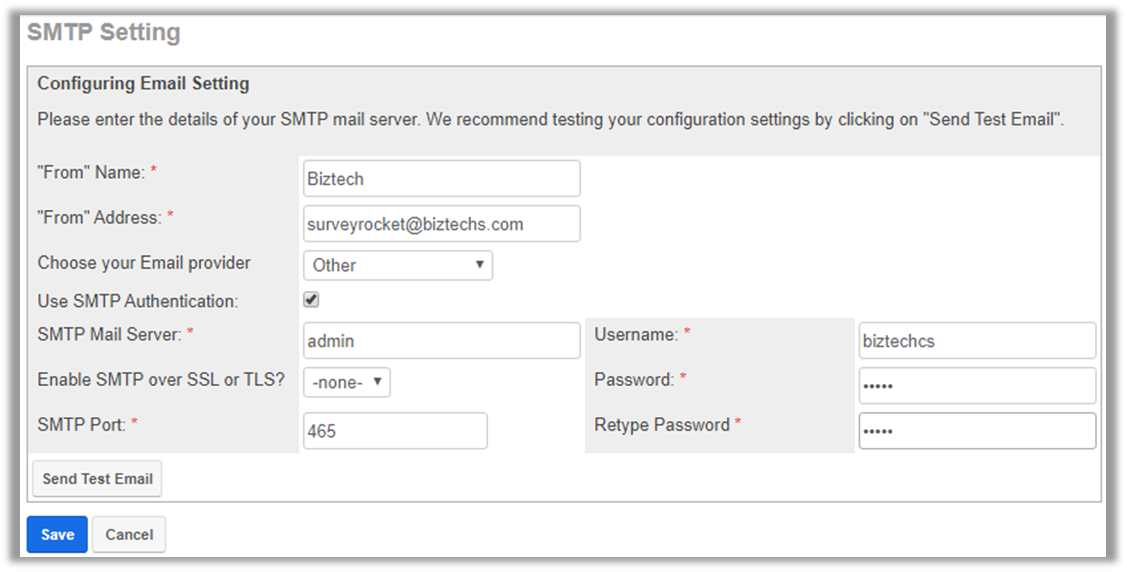
Use custom SMTP to send survey invitations through your own SMTP email account. This will increase the deliverability of your survey invitations by avoiding spam issues, email bounces and IP Blocks.
To configure SMTP for sending surveys, navigate to Admin Panel and click on ‘Survey Rocket SMTP Setting’ link.
Enter the necessary details of your SMTP mail server such as the name of provider, your email credentials and SMTP Port Number and click on ‘Save’ button.
Create Template for Email & SMS/WhatsApp
Email Template
To create an email template, click on Manage Email Template option from the ‘survey’ detail page.
If the Template is not created yet or this survey is not selected in any template, a ‘warning message’ will pop up to create a template for Email.
Note: If this survey is already selected in any Template, you will be redirected to that Template.
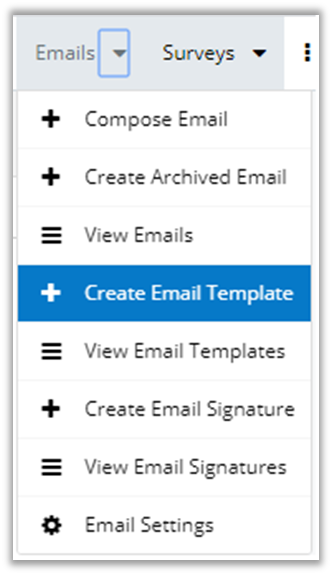
You can also create template from the Email option.
Email -> Create Email Template
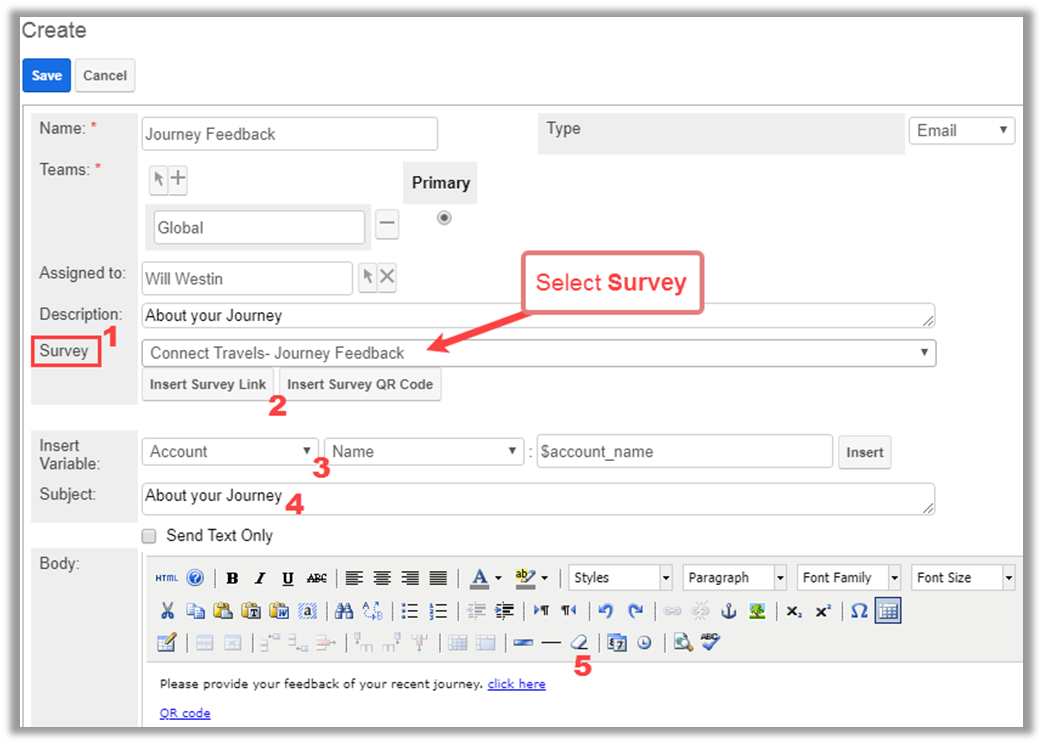
Insert all the required details like Template Name, Assignee and relevant Description.
Select a survey from the Survey dropdown option. By clicking on it, you will get the list of Surveys, select the Survey from it.
Insert the ‘Survey link’ by clicking on Insert Survey Link button and you can also provide the ‘QR Code’ by clicking on Insert Survey QR Code button. As clicking on buttons, Survey link and QR Code will automatically insert inside the email body.
Select a Module (Accounts, Contacts, Users, Leads and Targets) and select that module related required Variable (Name, Description, etc. ) click on ‘Insert Survey Link’ button.
Insert relevant Subject for your Survey/Feedback.
Customize the Template as per your need and click on Save button to save the template.
Similarly, you can also create a Template for “SMS/WhatsApp” module.
SMS/WhatsApp Module
SMS/WhatsApp Setting
First, you must setup the SMS/WhatsApp module from the Survey Rocket in Administration section.
Administration -> Survey Rocket -> SMS/WhatsApp Setting.
By clicking on SMS/WhatsApp Setting option, you will redirect to the SMS/WhatsApp Settings page where you can configure the SMS & WhatsApp settings using Twilio cloud communication platform.
Here you must register with the Twilio cloud communication platform. After registration, you will get the ID & Token which must insert here.
You must also insert the Name and Phone number for the SMS and WhatsApp.
After inserting all the details, click on Save button. It will take seconds to process and after success message you can send your Survey or Feedback using SMS/WhatsApp.
SMS/WhatsApp Template
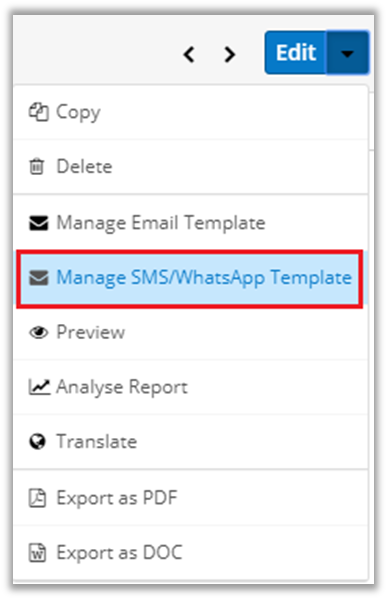
To create a SMS/WhatsApp template, click on Manage SMS/WhatsApp Template option from the survey detail page.
If the Template is not created yet or this survey is not selected in any template, the ‘warning message‘ will pop up to create a template for SMS/WhatsApp.
Note: If this survey is already selected in any Template, you will be redirected to that Template.
You insert any module inside the Content by selecting a Module (Accounts, Contacts, Users, Leads and Targets) and select that module related required Variables (Name, Description, etc.).
Select a survey from the Survey List dropdown option. By clicking on it, you will get the list of Surveys, select the Survey from it.
Insert the ‘Survey link’ by clicking on Add Survey Link button. Clicking on button, the Survey link will automatically insert inside the content.
Customize the Template as per your need and click on Save button to save the template.
Sending Survey & Survey Summary
Send Survey
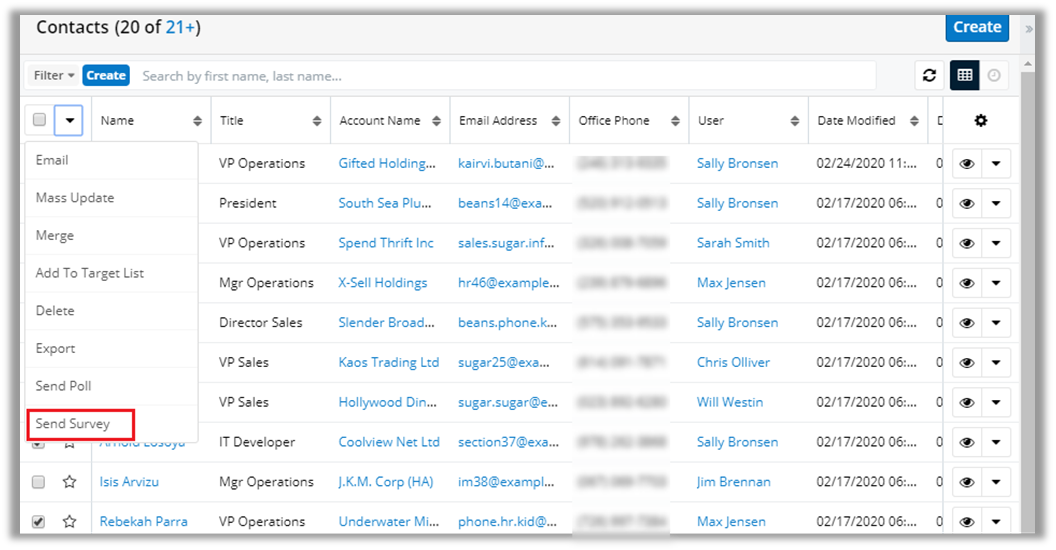
Navigate to a module from which you wish to send Survey and select the list of persons to whom the survey should be sent via Email or WhatsApp/SMS modules.
Now, select the contacts to send the Survey. Click on the drop-down arrow and click on Send Survey option from the menu.
A ‘Warning Message’ will pop up before proceeding with the activity of sending survey to the selected Contact(s).
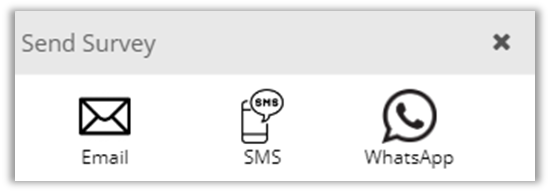
On clicking Confirm button, a pop-up window will appear from which you can select the sending option for the Survey: Email / SMS / WhatsApp.
Sending by Email
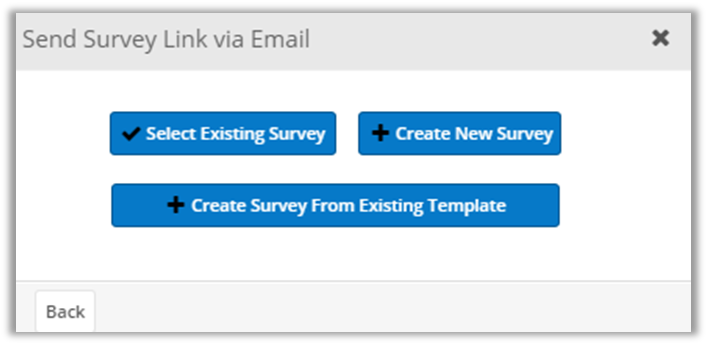
As you select Email, a pop-up window will appear from which you can select an Existing Survey / Create a New Survey / Create Survey from Existing Template. You can select as per your need.
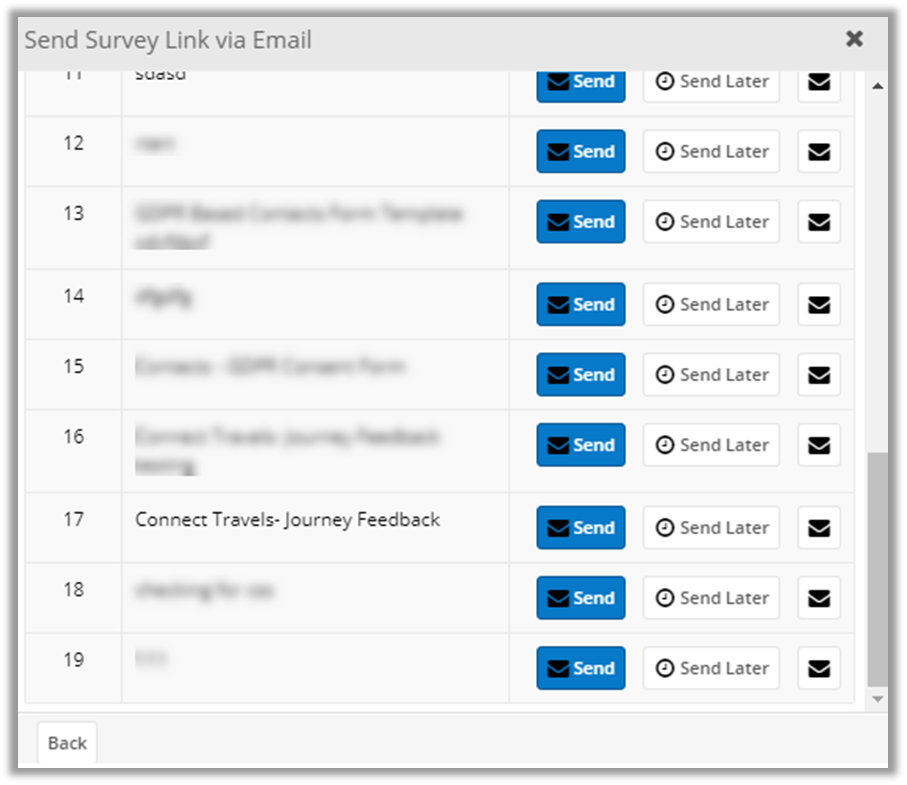
Now by clicking on Select Existing Survey button, the list of existing surveys will open having three options: Send, Send Later and Email Preview option.
As you click on Send button, the Survey will be sent to the selected contacts whose Email id is available.
You can also schedule a survey to send it later.
Click on Send Later button to set the schedule. Select the date and time on which you wish to send the survey and click on Schedule button. The Survey will be scheduled accordingly.
By clicking on Email Preview button, you will be redirected to the Email Template of the selected Survey. You can edit if you want to update / change it.
Sending by SMS/WhatsApp
Similarly, you can send the Survey using SMS/WhatsApp directly to the users’ mobile number.
The process of Sending Survey link using SMS or WhatsApp will be same. As per clicking on Select SMS Number or clicking on Select WhatsApp Number button, the option to send the Survey Link will open with the selection option of Number and Field.
Now by clicking on Send Survey Link button, the Survey Link will be sent to the selected records.
Survey Transactions
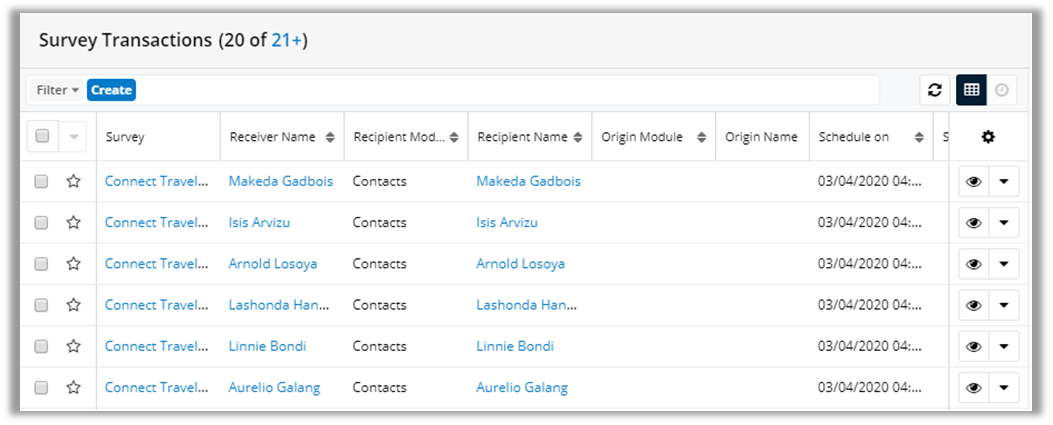
View all the survey transactions at one place. You can check the submitted survey details from Survey Transactions option
Survey Transactions displays the list of all surveys sent along with their mail delivery status, score details and module related parameters.
You can also filter out the transactions based on different filtering criteria.
View Survey Reports
Once a survey is sent, you can view various types of Reports based on that survey which represents the status of the survey using charts and tables.
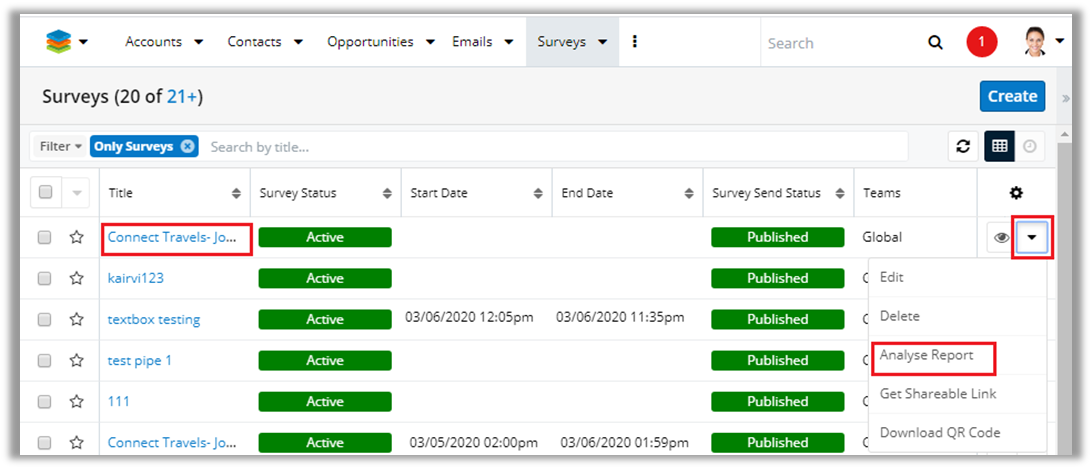
To view survey report from the list view, click on dropdown arrow besides preview icon and select Analyze Report option. After selecting the option, report gets opened for that survey.
You can also find the Analyze Report’ option from the dropdown arrow besides ‘Edit’ button in survey detail page
By clicking on Analyse Report, it will open all the Reports for that survey.
You will find mainly 6-types of Reports as below:
-> Status Report -> Question Wise Report -> Individual Report
-> Comparison Report -> CrossTab Report -> Survey Send Failure Report
Status Report
Status Report displays 6 different tabs of reports:
-> Combined -> Email -> Weblink -> Manual -> SMS -> WhatsApp
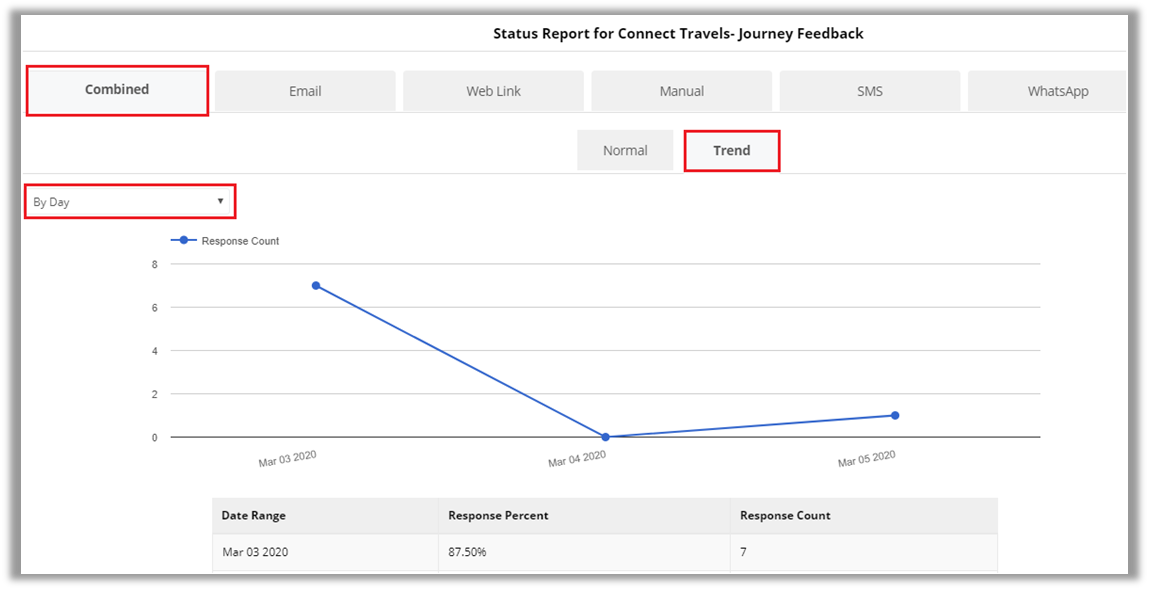
Combined
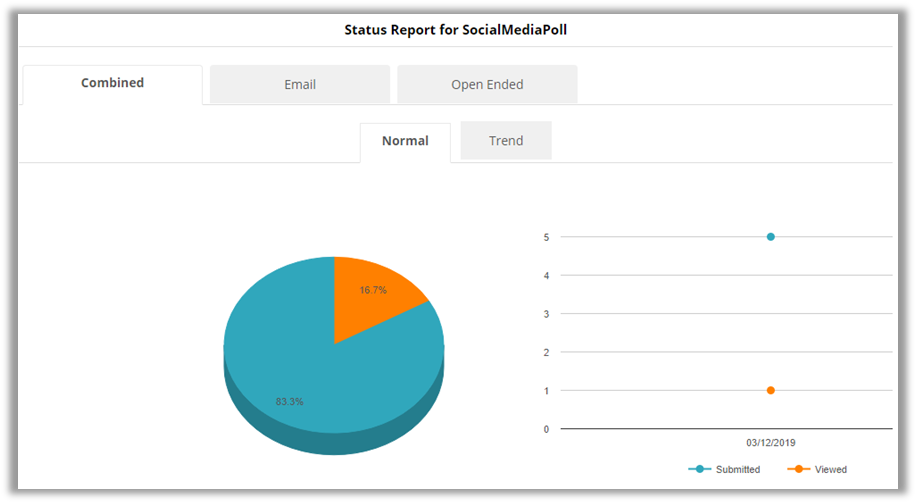
‘Combined Report’ has a Normal and Trend Report for user to select from. By default, normal report is shown.
‘Normal report’ has a pie-chart depicting the percentage of users who have submitted the survey and those who haven’t.
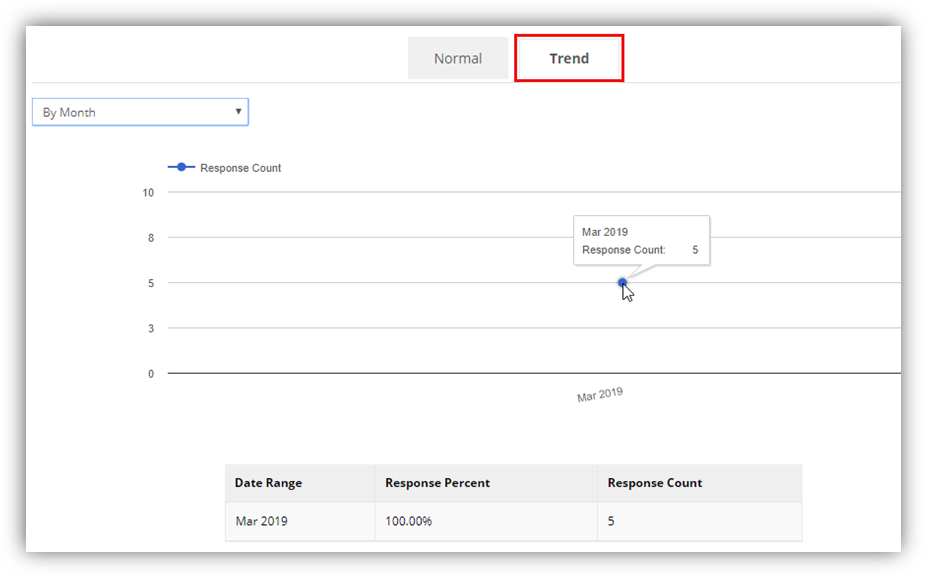
Trend Report lets you view and analyze trends based on survey responses.
For ‘Trend Report’, there is a dropdown to view trend based on: > Day > Week > Month > Year.
By default, it shows the period based on difference between the first response and last response received.
> Example:
– For gap of 6 days, then it will show trend by day. If there is a gap of more than 6 days between the responses, it shows trend by week.
– If there is a gap of more than 4 weeks, trend report is shown by month and for gap of more than 12 months, it is shown by year.
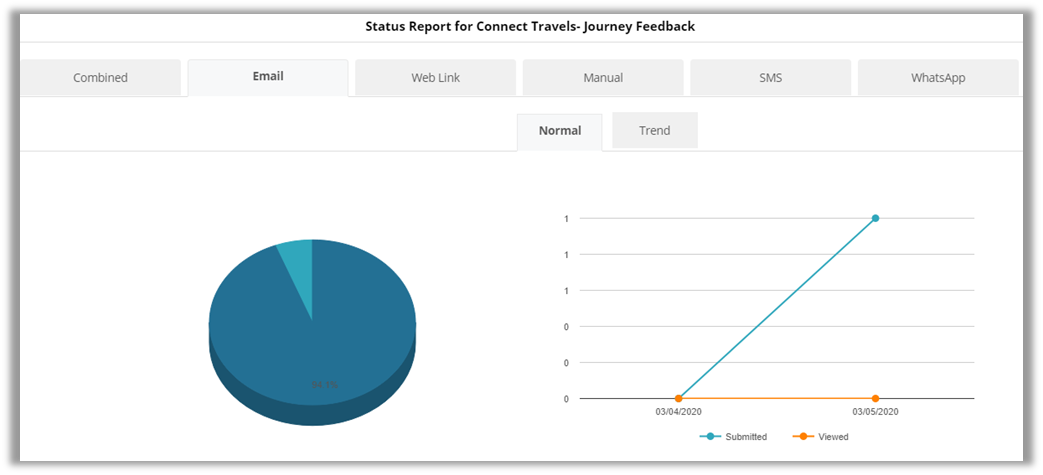
When you send survey via Email, you will get the separate tab to know how many responders have submitted the survey via Email.
‘Email report’ has a pie-chart depicting the percentage of users who have submitted the survey and those who just have viewed.
Like ‘Combined Report’, the Trend Report under Email will display the chart periodic wise based on difference between the first response and last response received.
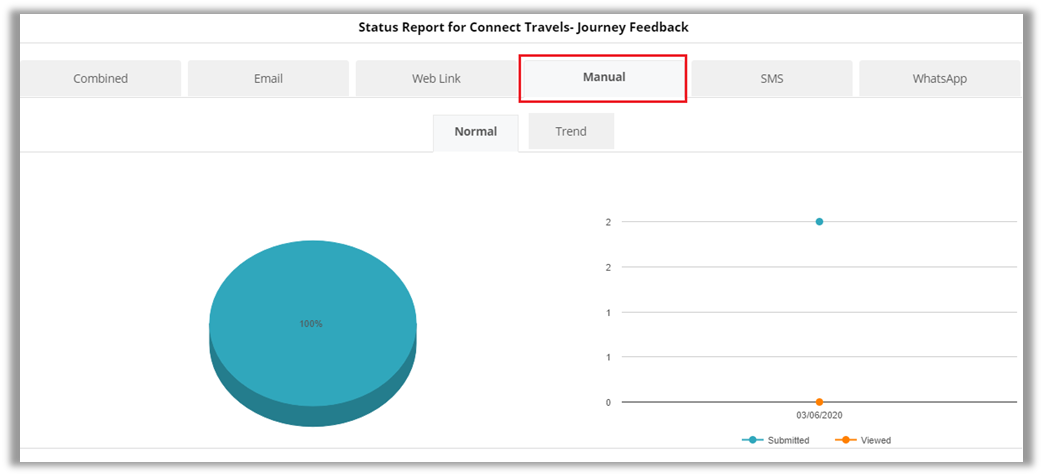
Manual
Manual Report displays the Reports which are given using Take Survey button in the supported modules. (Accounts, Contacts etc.)
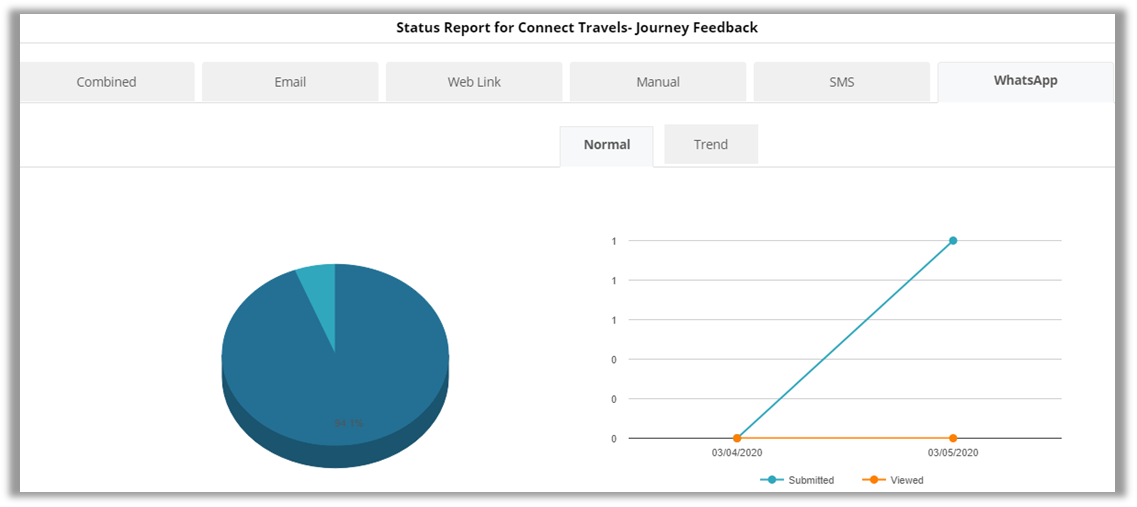
SMS & WhatsApp
Like ‘Email Report’, when you send survey via SMS and WhatsApp, you will get the separate tab to know how many responders have submitted the survey via SMS and WhatsApp respectively.
Question wise Report
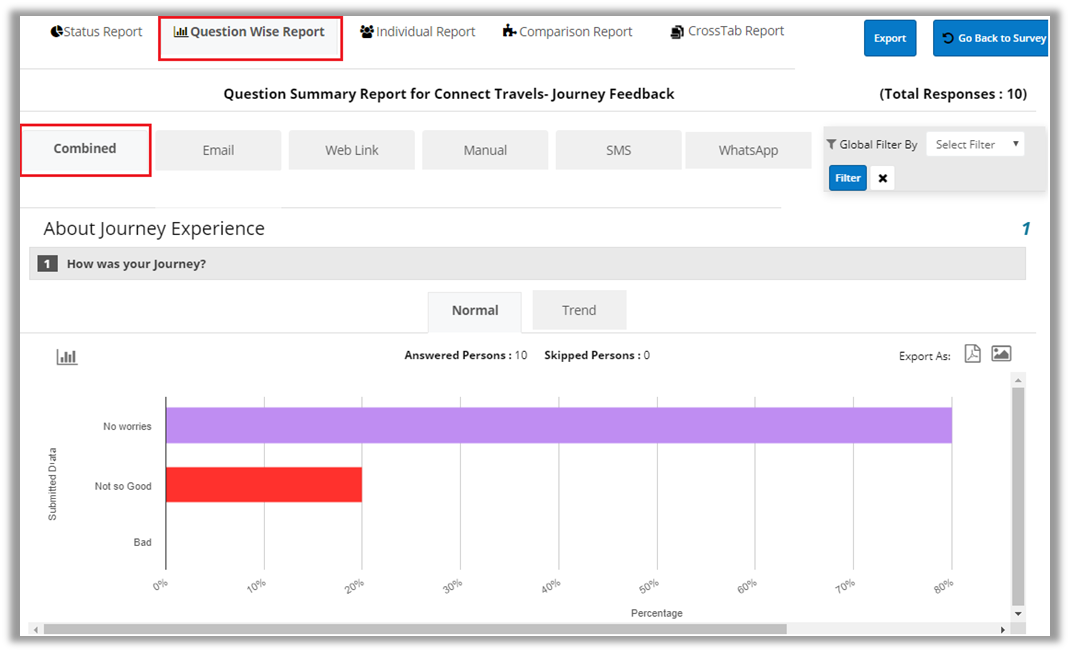
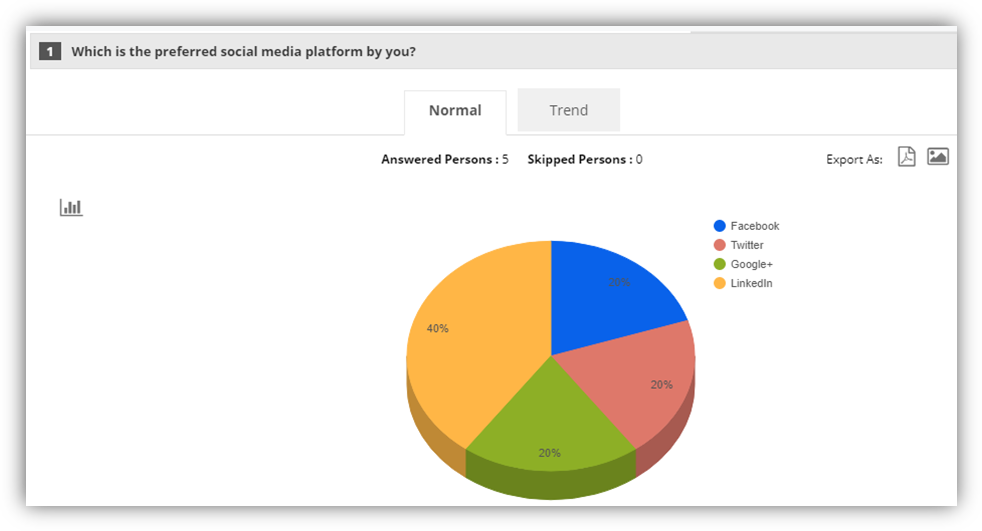
‘Question wise’ report displays question Summary Report that shows list of responses for each question.
Like ‘Status Report’, Question wise Report displays 6 different tabs of reports:
-> Combined -> Email -> Weblink -> Manual -> SMS -> WhatsApp
Under Normal tab to view chart which shows the ‘percentage of the submitted data’. Clicking on Trend tab you get ‘trend chart’ of the responses received for each question.
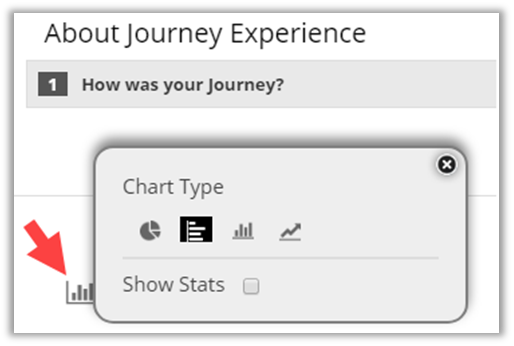
Under ‘Normal’ tab, you can view different types of charts for the response data.
To change the chart type, click on the ‘chart’ icon available on the left in every question section and select the type of chart that you want to see.
You can see different chart options like: Column Chart, Pie Chart, Bar Chart and Line Graph.
For matrix question type, different chart options are: Group Column Chart, Stacked Column Chart, Stacked Bar Chart and for NPS question type you get to view Meter Gauge by default.
Note: This Chart is only enabled when the Question is of ‘selection type’ (Radio button, Multi-Select etc.)
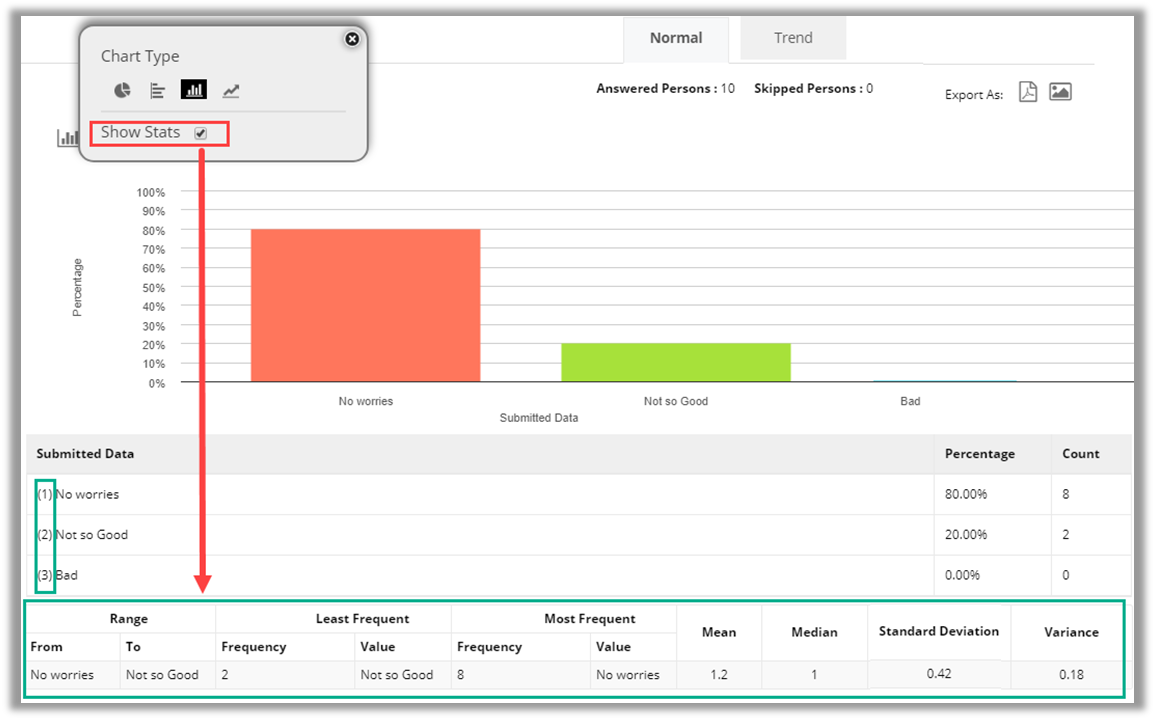
You can also view response statistics by checking the show Stats option.
Statistics Table includes data like Range, Least frequent, Most frequent, Mean, Median, Standard Deviation and Variance calculated based on responses received.
Note: Options to switch between normal and trend report or changing the chart type is available for closed ended questions only.
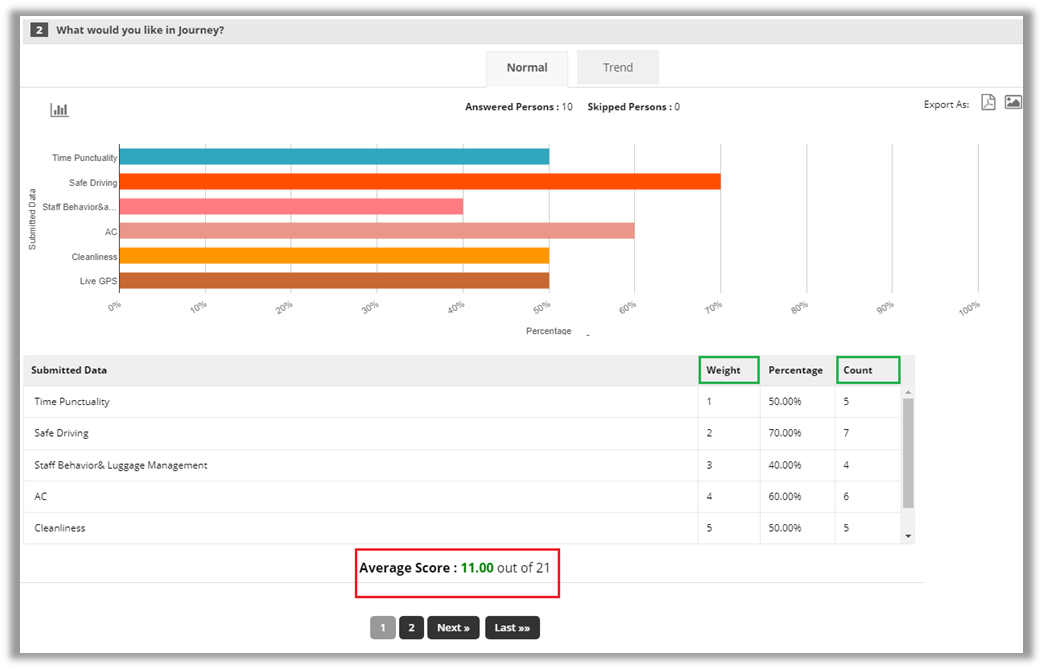
For Scoring enabled questions, weight for each answer choice will be displayed along with average score for that question based on the responses.
Note: If the ‘Question Types’ are: Multiple Choice Question and Checkbox, then the ‘Average Score’ will be displayed as per the Weight (Total) and if the ‘Question Types’ are: Radio button and Dropdown, then the ‘Average Score’ will be displayed as per the Weight (Max.).
Similarly, you can also check the Question wise Reports for Email, Web Link Manual, SMS and WhatsApp.
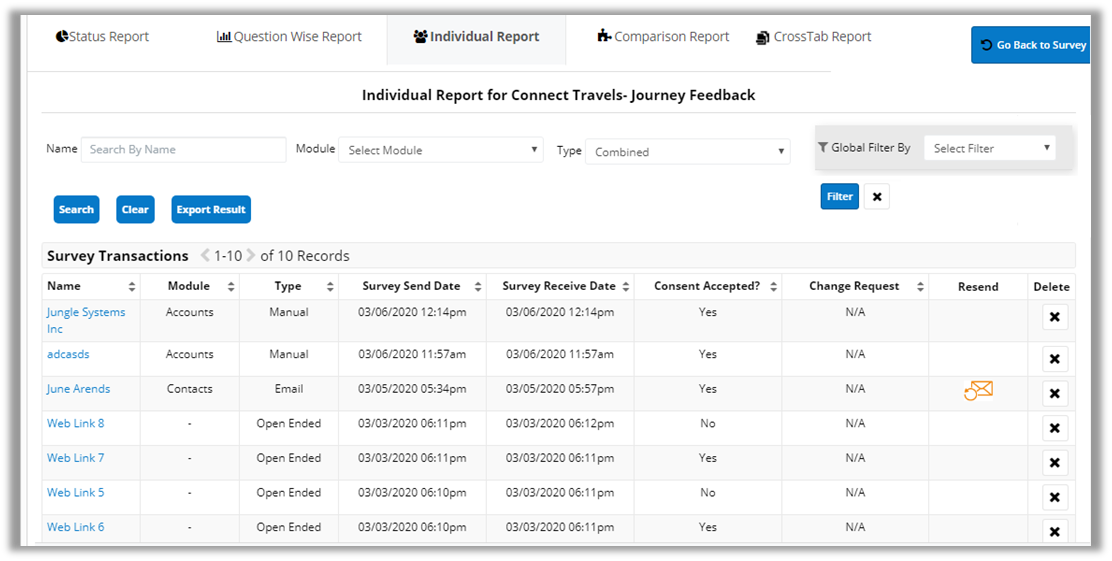
Individual Report
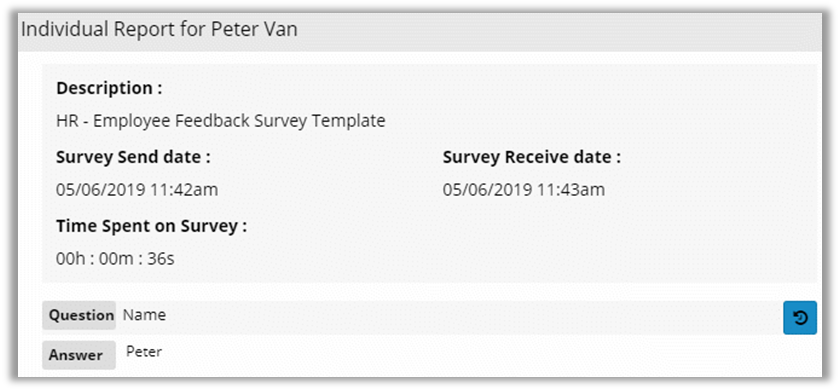
Individual Report displays the list of records to whom the survey was send. It displays the type of Module, Status (submitted or not viewed); Survey Send Date and Survey Submission Date.
A resend option is also available to resend the survey to a respondent.
You can sort the list according to modules or type of submission.
The results can be exported as an excel worksheet by clicking on the Export Result button.
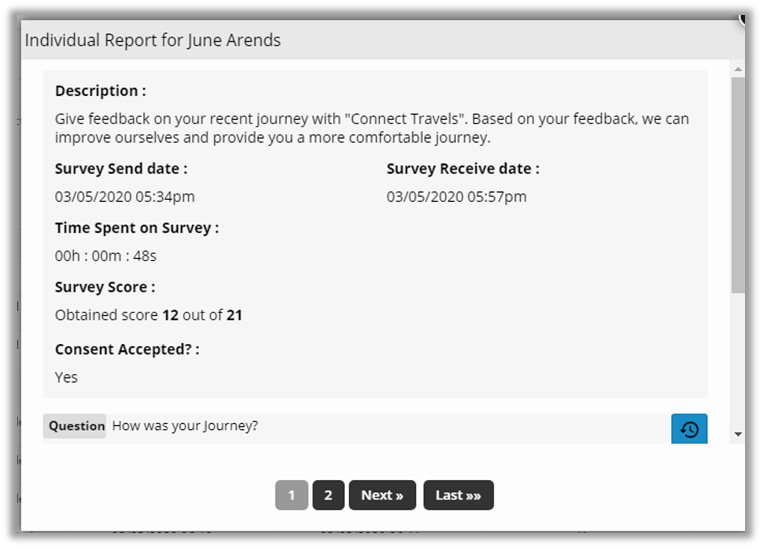
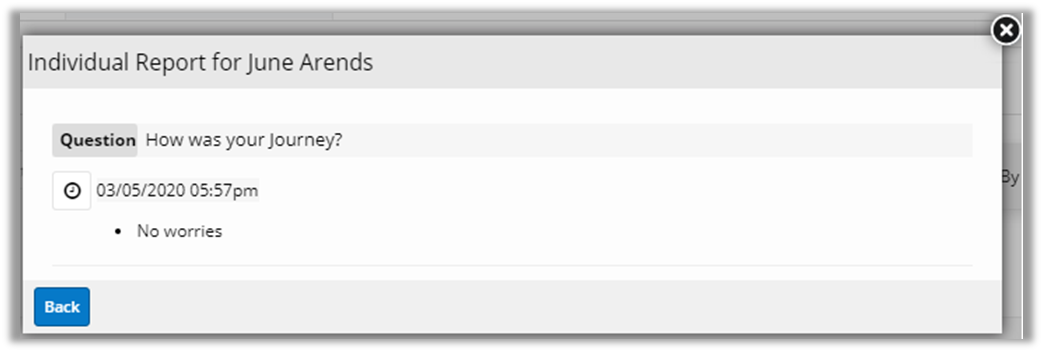
Along with the detailed report, you can also view history of the submitted answers by clicking on History button.
On clicking history button, you get list of all previous answers along with time and date for each question if there are any.
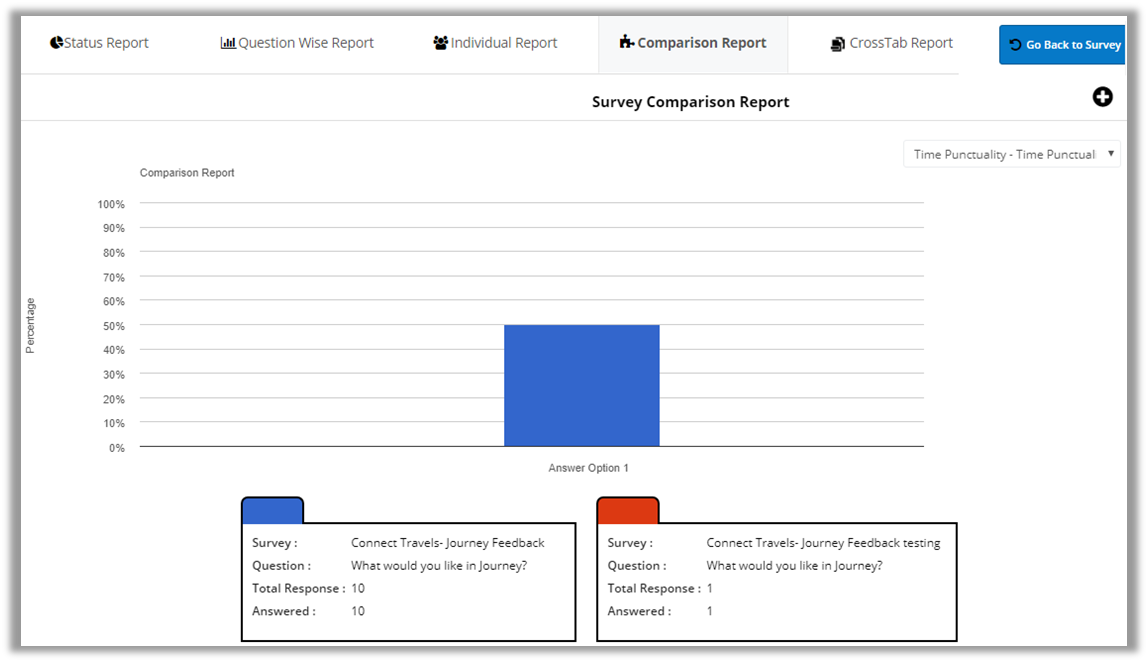
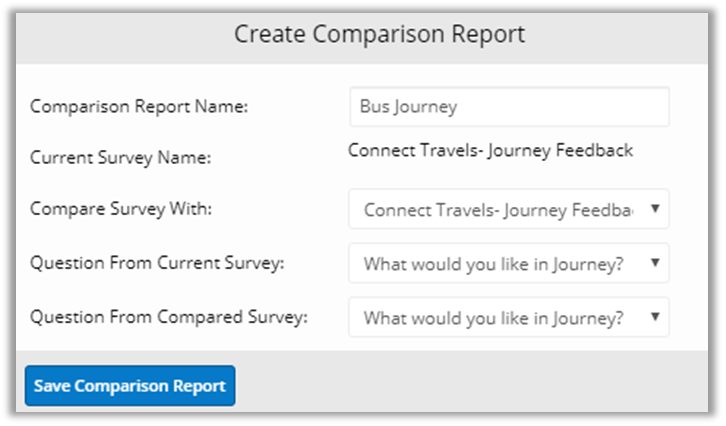
Comparison Report
You can Create a Comparison Report to compare the common question types from two surveys.
You can create a new Comparison Report by clicking on ‘create’ + icon.
While selecting questions from different surveys, make sure both have same question type.
The same applies with number of options in both the questions otherwise it will generate a popup box with an error message.
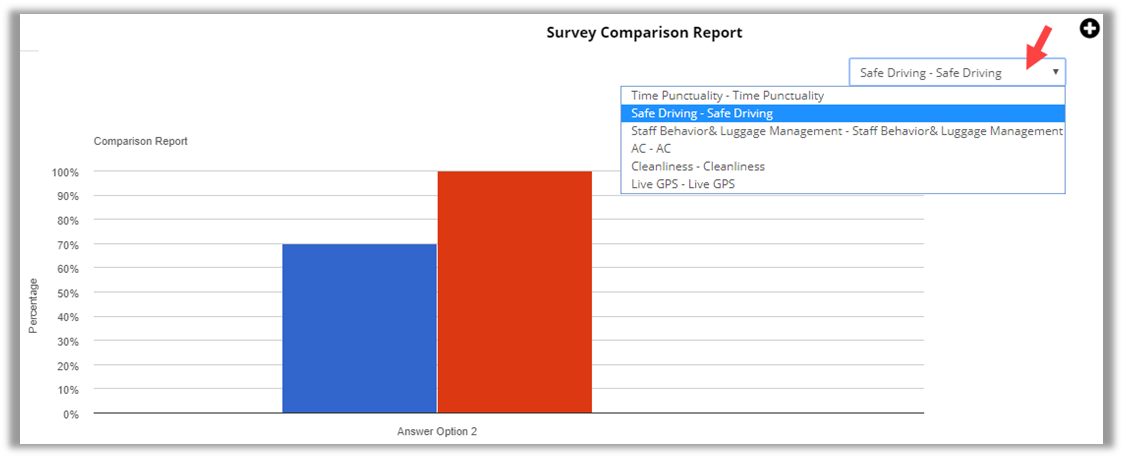
You can check the list of Comparison report under the Chart.
You can Edit or Delete the Survey Tab under the Action.
You can change the Answer from the dropdown list to compare the submitted answers.
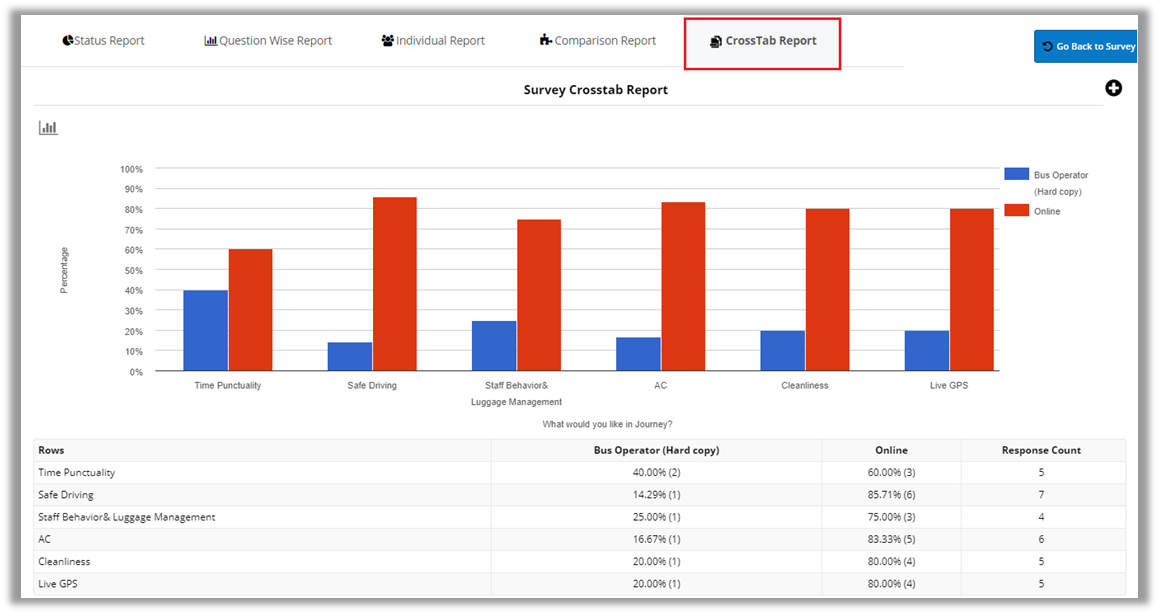
Crosstab Reports
You can create a Crosstab Report to check the percentage of two different Question of the Survey.
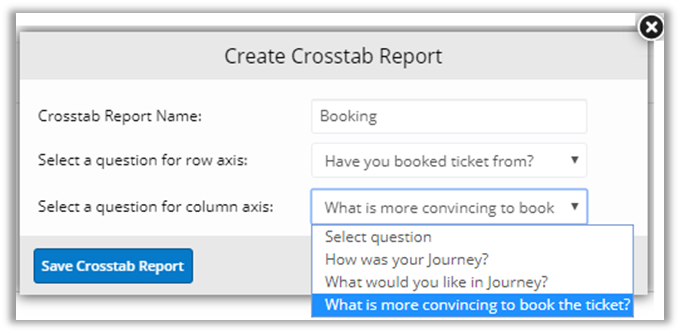
To create new Crosstab Report, click on ‘create’ + icon (top-right side).
By clicking on it, a pop-up box will open where you need to add details like Crosstab Report Name, select question for row axis, select question for column.
You can check the list of Crosstab report under the Chart.
You can Edit or Delete the Survey Tab under the Action.
Survey Send Failure Reports
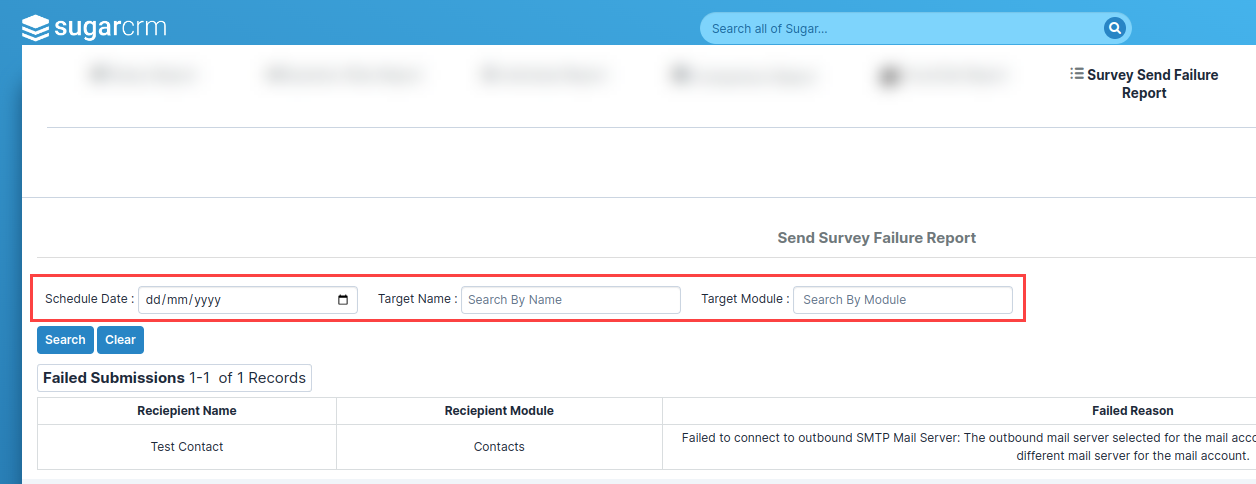
Here the report consists of a list of all the failed submissions. The grid would have Recipient Name, Recipient Module, Failed Reason and Resend.
The reason for failed submission is mentioned in the Failed Reason column. Also, in order to Resend you can click on the icon displayed under the respective column.
You can filter the list by setting the Schedule Date, Target Name and Target Module.
Survey Dashboard Support
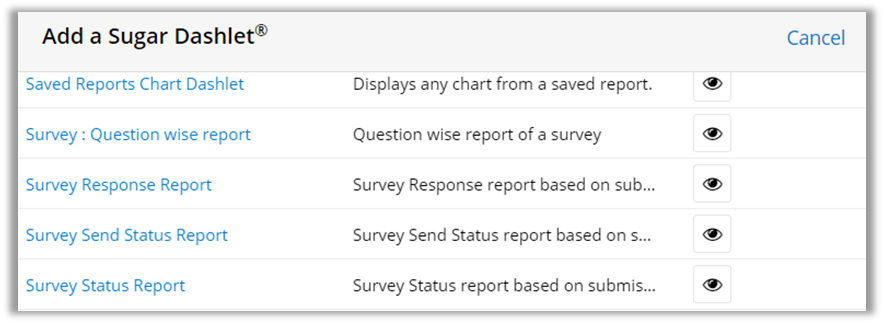
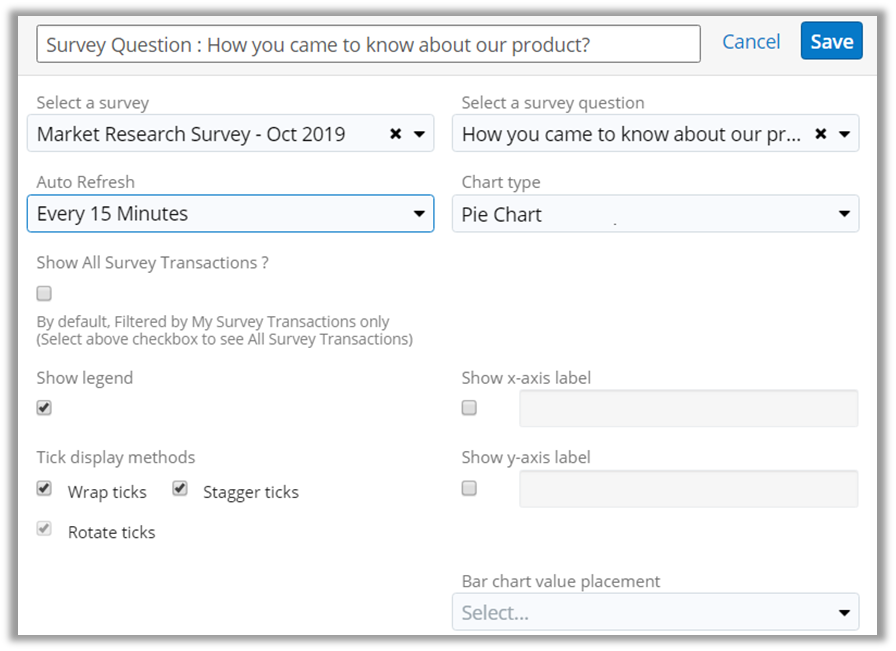
You can create dashboard having survey functionalities like question wise report, response report, send status report, survey status report, etc.
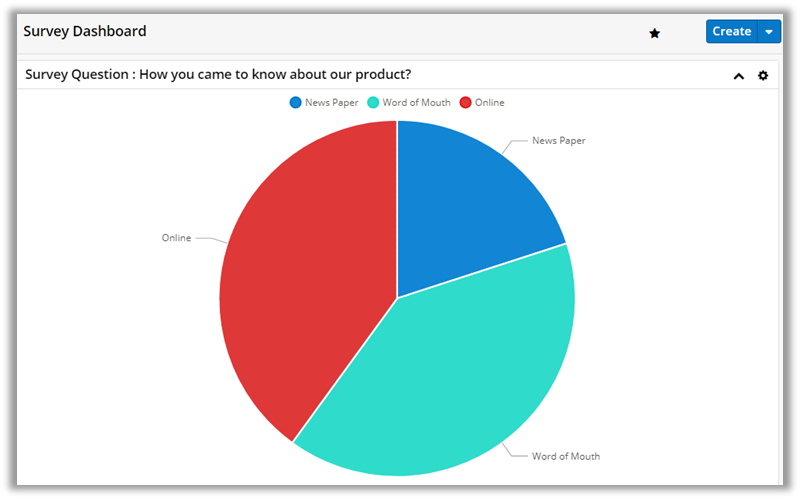
Survey Question report: By creating this dashlet, you will be able to view question report for that particular question.
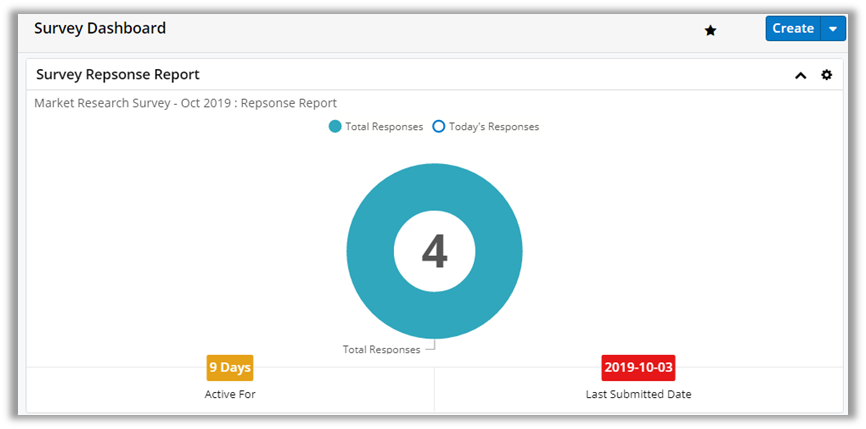
Survey Response Report: By creating this dashlet, you can view response report for that survey. The details included last submitted survey, today’s responses, last survey send responses and the number of days that survey has been active.
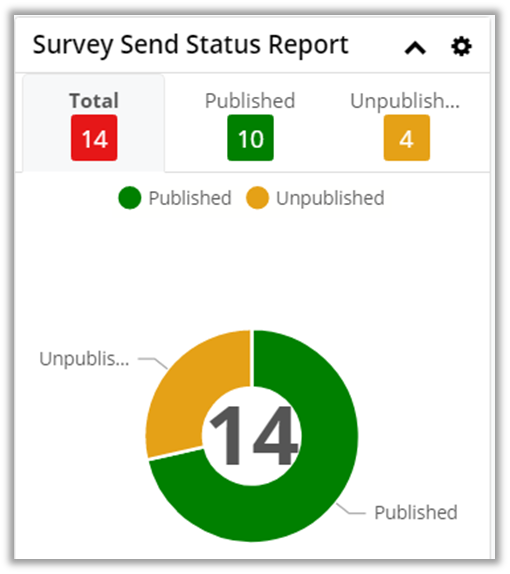
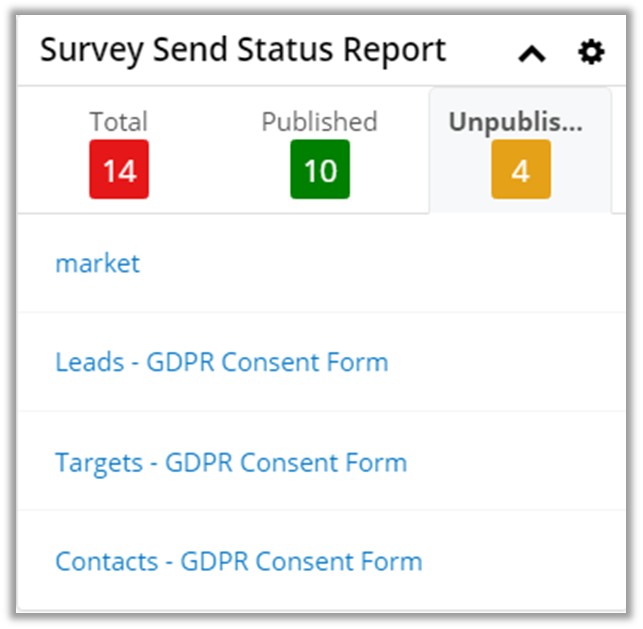
Survey Send Status Report: By creating this dashlet, you can view send status for surveys which include published surveys, unpublished surveys and total surveys.
By clicking on published, unpublished, or total tab, you will get the list of published, unpublished, and total surveys respectively.
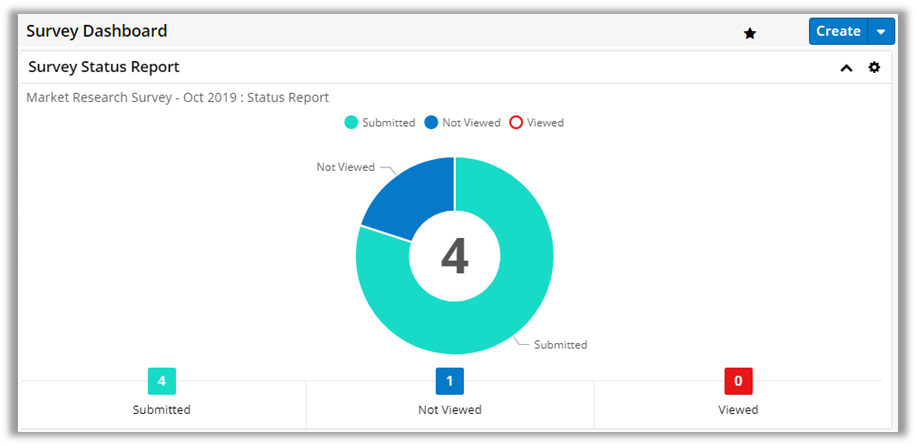
Survey Status Report: By creating this dashlet, it show an aggregated status report of all the surveys including submitted survey, viewed survey, not viewed survey etc.
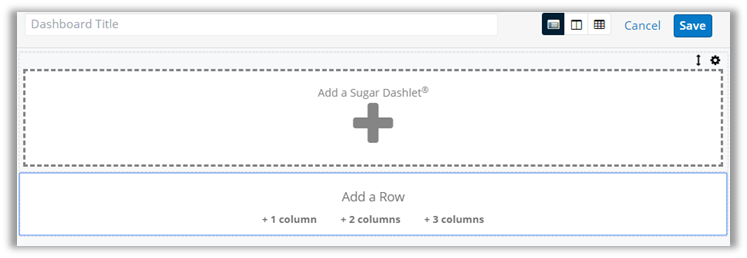
To add new dashlet in dashboard, click on ‘Add a Row’ button and click on add(plus) icon to add dashlet for that survey.
By clicking on that, it will show you drop down box to select category for which you want to display as dashlet.
After selecting category, fill required survey details like survey name, survey question, auto refresh, chart type, etc. for that report.
Global Filters
You can also filter responses as needed by applying global filters to the gathered data. There are two different global filters available: Filter By Date and Filter By Question Logic.
Global Filters are available and get applied to question wise report and individual report.
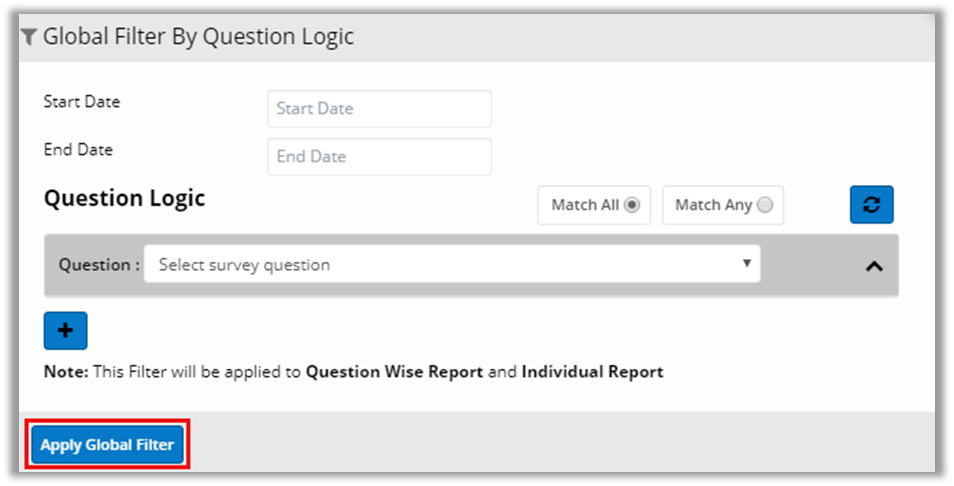
Filter By Date: To filter data based on date, select Date option from the global filter by dropdown and click on ‘Filter’ button. On clicking Filter button, a pop up appears where you need to enter start date and end date as required. Click on ‘Apply Global Filter’ button to view filtered results.
Filter By Question Logic: To filter data based on question logic, select Question Logic option from the global filter by dropdown and click on ‘Filter’ button. On clicking Filter button, pop up appears where you need to enter start date and end date if required and select question and its respective logic to filter results based on specific response.
In question logic filter, you can set time range by entering start date and end date to view responses in particular time period. In case if global filter by date is already applied, the filtered data is of those dates and can be changed if required.
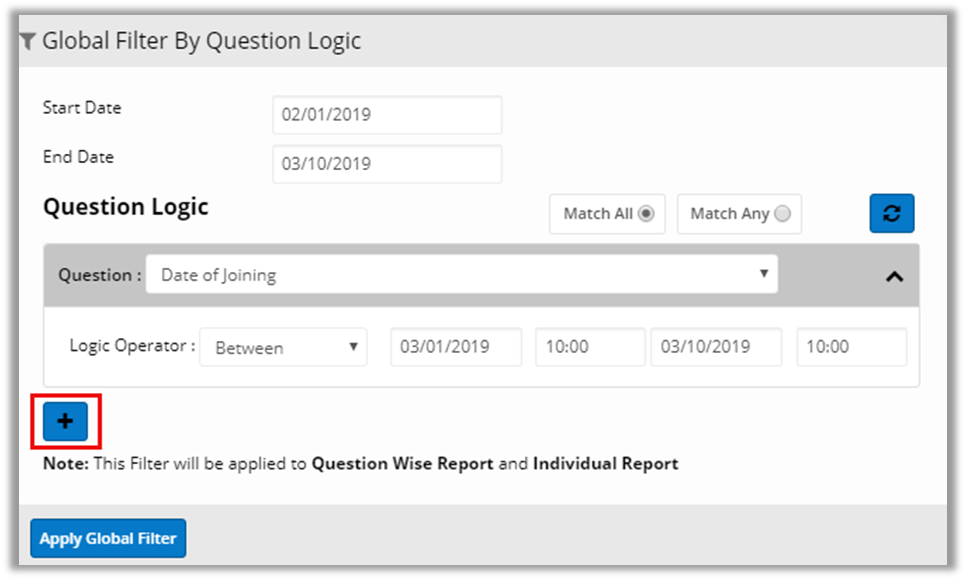
To set the filter’s logic, select survey question from the dropdown and logic that you want to apply for the filter.
For adding logic to the question, select the condition from the dropdown and enter the required value in the text area available next to the condition dropdown.
There are different logic operators available within the Logic Operator dropdown based on question type selected.
Multiple questions and its corresponding logic can be added at a time. To add more questions to the filter, click on ‘plus’ icon available. You can also reset the filter by clicking on reset button. For all the questions added in the filter, you can select the condition for them to work like Match All and Match Any.
On selection of Match All, ‘AND’ operation is applied on the filter while on selection of Match Any, ‘OR’ operation is applied on the filter. Match All is the default condition.
Click on ‘Apply Global Filter’ button to view filtered results.
Note: Global filters filter results of question wise report and individual report and they don’t get applied on trend report.
In question logic filter, selecting minimum one question along with its corresponding logic is mandatory.
Export Reports
You can also export reports as required by clicking on Export button available on the top right section in survey reports.
All available reports like status report, question wise report along with their different types like combined, email or open ended can be exported by clicking on Export button.
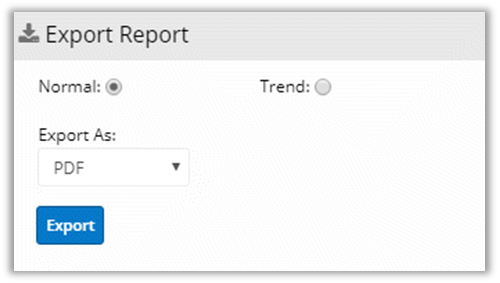
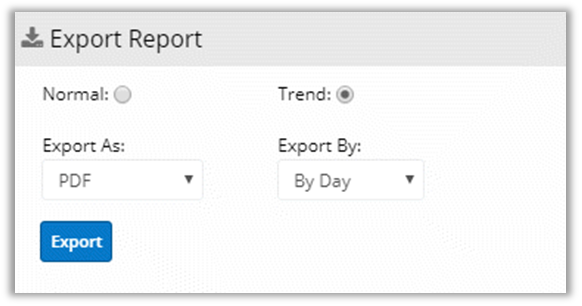
Clicking on Export option, it opens Export Report Pop up where you can select the report type, it can be Normal or Trend.
For normal status report you need to select Export As option for the report. It has two values: Pdf and CSV (For Sugar6, you get one additions export option of spreadsheet). And for trend report, along with export as option you must select Export By option as well. Different Export By options are: By Day, By Week, By Month, By Year.
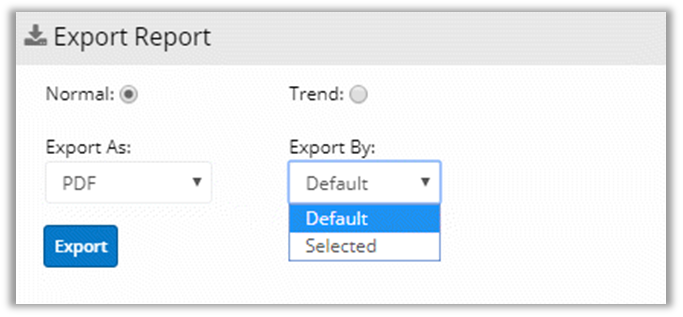
In case of question wise report to be exported, you get Export By option in Normal Report that has two options: Default and Selected.
Selecting default option will export pdf report as it is and if any filters are applied or some different chart is to be exported, you need to select Export By: Selected. Selecting the option will show data as filtered in the exported report. Also, in case of show stats to be exported, you need to select export by: Selected for including the statistics table in the exported file.
Example: When exporting normal report as pdf and export by: Default is selected, it will take bar chart in the report irrespective of chart selected. If you want some other chart/or chart as selected, you need to select export by: Selected for that report.
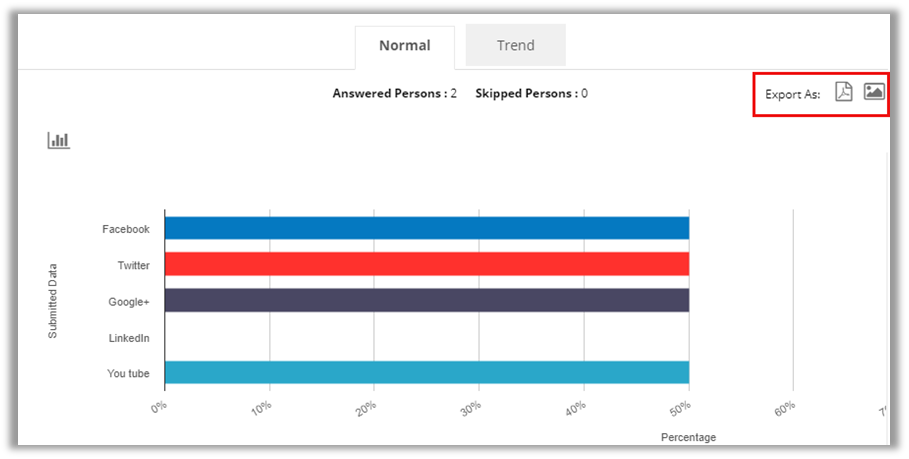
You also get to export individual questions as pdf or image format. Image export is available only for questions with charts. Here the chart selected, gets exported as it is.
Poll within Survey Module
To create a Poll from select ‘Create Poll’ option from the Survey Module dropdown.
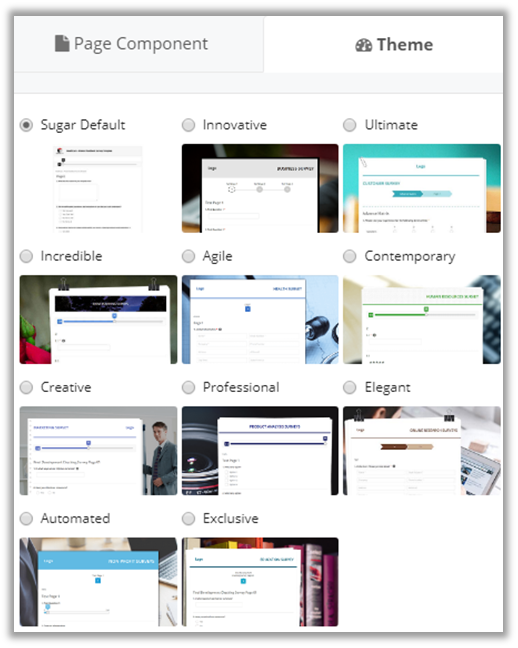
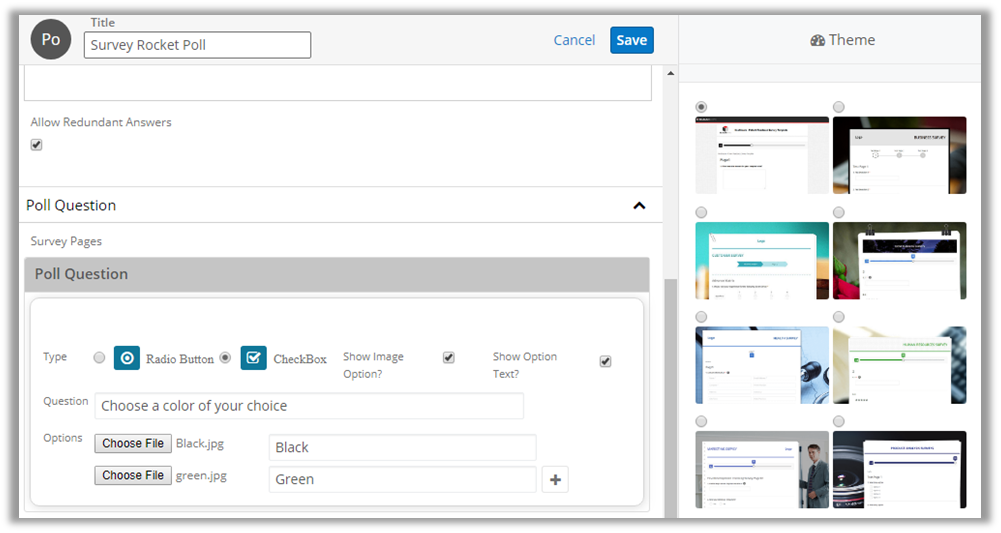
This will open up a page to create Poll. Fill in all the necessary information. You can upload a logo and select a theme that suits your requirement.
A Poll will have only one question which can either be a radio type question or a checkbox.
To allow more than one answer-choice for a respondent, select checkbox question type and to allow only a single answer choice, select radio button as the question type.
You can also allow multiple attempts for a single respondent. To allow multiple attempts check the ‘Allow Redundant Answers’ checkbox.
To view images as option you can select checkbox ‘Show Image Option’. And to view option label along with image you can check the box, ‘Show Option Text?’
Once you finish editing the question click on ‘Save’ button.
You can send Poll from the following modules: Accounts, Contacts, Leads and Targets
You can also Send Poll through a shareable link. To generate a shareable link, navigate to the Detail View of a Poll and click on ‘Get Shareable Link’ button.
This will generate a shareable web link, which you can post on Social Medias or share with people to get responses online.
You can also generate and copy survey link by clicking on Get Shareable Link option available in the list view of the polls.
View Poll Reports
Once a Poll is sent, you can view various types of Reports based on that Poll which represents the status of the Poll using charts and tables.
Poll reports can be viewed by selecting the Analyse Report option from the list view or the detail view of the Surveys module.
To view poll report from the list view, click on dropdown arrow besides preview icon and select ‘Analyse Report’ option. Selecting the option, report gets opened for that poll.
To view Poll reports from detail view, navigate to detail view of a Poll. Click on the dropdown arrow besides Edit button and select ‘Analyse Report’ option. This will open all the reports for that Poll.
Status Report displays a normal and trend report for user to select from. By default, normal report is shown.
Normal report has a pie-chart depicting the percentage of users who have submitted the poll.
Trend report lets you view and analyze trends based on poll responses. It works similar to that of trend report for survey.
Question wise report displays question summary report, that shows list of responses for each question.
Click on Normal tab to view chart and count along with percentage of the submitted data. Clicking on Trend tab you get trend chart of the responses received for each question.
Also, under normal tab, you can view different types of charts for the response data. To change the chart type, click on the chart icon available on the left in every question section and select the chart that you want to see. You can also view response statistics by checking the show stats option.
Statistics Table includes data like Range, Least frequent, Most frequent, Mean, Median, Standard Deviation and Variance calculated based on response received.
Reports are categorized into three types based on submissions:
Combined Reports displays combined report for Polls sent using shareable links and emails (Existing CRM Records)
Email Reports displays report for Polls sent through emails (Existing CRM Records)
Open Ended Reports displays report for Polls sent through shareable link (Existing CRM Records)
Individual Report displays the list of responses. It displays the module, type of submission, survey send date and survey submission date.
A resend option is also available to resend the Poll to a respondent.
You can sort the list according to modules or type of submission.
The results can be exported as an excel worksheet by clicking on the ‘Export Result’ button.
To view the detailed individual report of a respondent, click on the name field and it will display complete set of answers for that respondent.
Also, you can check previous answers along with current answer by clicking on the History button available with each question.
Also, data of poll results can be filtered based on date and based on question logic as required using the global filters.
Contact Us
We simplify your business, offer unique business solution in digital web and IT landscapes.
Live Chat
Get instant support with our Live Chat.
Visit our product page at: https://www.appjetty.com/sugarcrm-survey-rocket.htm and click on the Live Chat button for instant support.
Tickets
Raise tickets for your specific question!
Send an email to [email protected] or you can login to your account @ www.appjetty.com and click on My Support Tickets on your account dashboard, to get answers to your specific questions.
Customization:
If you would like to customize or discuss about additional features for SugarCRM Survey Rocket, please write to [email protected]


