


We provide the function for our customers to create a custom activity in Calendar 365. Here is the step-by-step procedure on how to create a custom activity and use it.
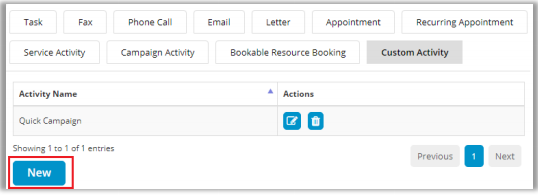
- To create a Custom Activity, click on the “Configuration” icon.
![]()
- Then click on the “Custom Activity” tab under the “Activities” section.
- Now click on the “New” button to create a custom activity.
- Thereafter, the following fields will appear under the “Custom Activity” tab:
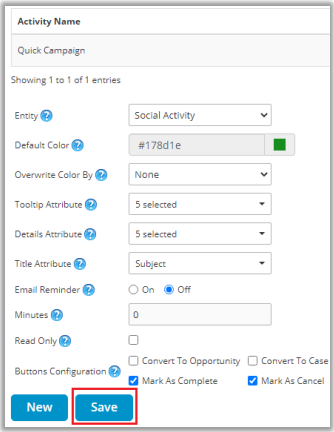
Entity: Select the required ‘custom’ activity from the Entity drop-down list.
Default Color: Select the default color for the activity that will be displayed on the calendar.
Overwrite Color By: Set the color of the activity on the status of the activity.
Tooltip Attribute: Checkmark the boxes besides tooltip attributes which you wish to include in activity tooltip.
Details Attribute: Checkmark the boxes besides attributes that you wish to include in activity details.
Title Attribute: Select the Title attribute which you wish to include in the activity title.
Email Reminder: Enable email reminder for the particular activity.
Minutes: Set the number of minutes before which you want a reminder email for an activity to be sent.
Read Only: If you tick the checkbox “Read Only”, no one will be able to edit the custom activity except for admin.
Buttons Configurations: Select the buttons that will be displayed in the calendar for activity.
- As you click on the Save button, you will get a popup message of activity successfully added.
- You can ‘Edit’ and ‘Delete’ the Custom activities you have created.
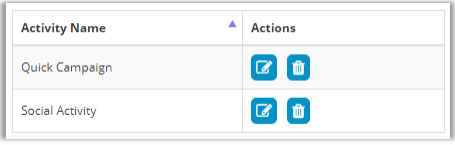
- If the custom activity is not selected as Read Only, any users can edit and act on the custom activity.
- If the custom activity is selected as Read-Only, the users cannot edit and perform any custom activity.